


Table of contents: Pumping is the main method (two…↓ Bleeding - One-Way Valve Kit ↓ Bleeding - pressure bleeding kit ↓ All methods ↓
1. Correct functioning of the brake hydraulic system is possible only after all air has been removed from the components and circuit; this is achieved by bleeding the system. Only clean, unused hydraulic fluid of the specified type may be used.
2. The brake fluid should be replaced periodically.
3. Never reuse liquid.
4. During bleeding, do not allow the reservoir fluid level to drop below the "Min" line.
5. Before starting work, check that all pipes and hoses are connected. Do not allow liquid to come into contact with plastic or paintwork of the car. Any liquid leakage should be immediately washed with cold water.
6. If the hydraulic fluid level has decreased due to a leak in the system, then after eliminating the malfunction, it is necessary to bleed the system.
7. There is a method of bleeding by one person, independently, kits for such bleeding of the brake are currently available in auto shops. If these kits are not available, you need a clean glass container and a suitable length of plastic or rubber tube, which with a special open-end wrench of the required diameter are needed for bleeding. The help of a second person will also be necessary.
8. If the hydraulic system has only been partially disassembled and the necessary precautions have been taken to minimize fluid loss, it is sufficient to bleed only that portion of the system.
9. When bleeding the entire system, the work should be carried out in the following sequence.
For early model years (master cylinder with one sleeve and two metal hydraulic couplings of the pipeline):
- 1) Pressure reducing valve
- 2) Left rear brake
- 3) Right front brake
- 4) Right rear brake
- 5) Left front brake
Note: In exceptional cases, it may be necessary to upgrade point 1 again after points 2 and 3 (secondary circuit) and after points 4 and 5 (primary circuit).
For late model years (dual-chamber master cylinder with four metal hydraulic pipe couplings):
- 1) Left rear brake
- 2) Right front brake
- 3) Right rear brake
- 4) Left front brake
Pumping is the main method (two people)
10. Clean the areas around all the nipples that need to be unscrewed, then remove the dust cap from the first one. Put a wrench and a hose on the nipple, lower the other end of the hose into a container with a small amount of brake fluid so that the end of the hose is immersed in it. Remove the master cylinder reservoir cap and add fluid to the "Max" mark. Install the cap without tightening it, do not forget to watch that the fluid level does not fall below the "Min" line throughout the bleeding procedure, to prevent air from entering the system.
11. One person fully depresses the brake pedal to create pressure, then locks it at full pressure.
12. While the pedal pressure is maintained, loosen the nipple (approximately one turn) and drain the fluid with air into the container (photo). The assistant should maintain pressure on the pedal. When the fluid stops flowing, tighten the nipple again. Release the pedal slowly and check the fluid level in the reservoir.
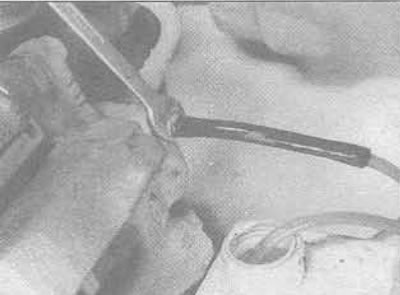
8.12. Bleeding the hydraulic system (front brake caliper nipple)
13. Repeat steps 11 and 12 until the fluid coming out of the nipple is free of air bubbles. If the master cylinder fluid has been drained and refilled, bleed air in order from the first nipple, pausing approximately 5 seconds between cycles for the master cylinder ports.
14. When air bubbles stop appearing, tighten the nipple, remove the tube and install the dust cap. Do not overtighten the nipples.
15. Repeat the procedure on all other pipes until all air is removed from the system.
Bleeding - One-Way Valve Kit
16. Connect the pipe to the branch pipe, open the branch pipe one turn.
17. Press the brake pedal, then slowly release it. The one-way valve included in the kit will prevent the removed air from returning to the system. Repeat this action several times to ensure that there is no air in the system.
18. Clamp the nipple, remove the pipe, install the dust cap.
Bleeding - pressure bleeding kit
19. Connect a sealed, fluid-filled container to the master cylinder reservoir, bleeding by opening each port in turn and allowing fluid to flow until air is removed from the system.
20. Pressure bleeding is especially effective when the system is difficult to bleed, or when performing a complete system bleed during a routine fluid change.
All methods
21. After completing bleeding, check the level and add fluid to the master cylinder reservoir.
22. Check the sensitivity of the brake pedal.