


Test pressures for the front brakes are 100 kg/cm³. These pressures are given for a cold brake system. The temperature of the wheels during emergency braking at a speed of 90 km/h reaches 80°C, and during a long descent on the brakes can reach 400°C. The pressure must be increased even more as the temperature of the brake fluid in the cylinder increases.
Normal pressure in the hydraulic system when the brakes are not working is negligible. When the brakes are applied, pressure builds up rapidly and remains in the system until the pedal is released. Every driver will imagine how quickly the pressure increases by equating the speed of its rise with the speed of his own reaction during emergency braking.
Recent research has shown that corrosion of brake lines can lead to brake system failure after just 80 days of exposure to the solvent used to melt ice and snow from roads. This effectively gives grounds to automatically suspect the presence of defects in the brake lines on a four-year-old car. Tubes made of copper alloy can be used as a replacement.
All of the above indicates the need for regular inspection of the tubes. Obviously, inspection should be carried out in the fall before winter and in the spring to assess the extent of damage caused by corrosion.
Trace the routes of all hard pipes and wash or brush away any dirt. If the tubes appear to be coated with any kind of underbody anti-corrosion compound, do not touch them. Inspect the tubes for dents that may have been caused by stones flying from the wheels. If you find anything like this, replace the defective section of tubing, but before you do so, read the rest of this section. Any exposed section that shows signs of corrosion or pitting on the outer surface may need to be replaced.
The flexible hoses running to each of the front wheels from underneath the vehicle and to each rear wheel should not show any external signs of wear or cracking. Bend them and see if any cracks appear on the surface. If the hoses are stiff and inflexible or kinked, it means they are nearing the end of their life. If in doubt, replace the hoses. Also make sure that they do not rub against the body.
Before attempting to remove the tube for replacement, it is important to make sure you have the necessary replacement parts if you do not want to be without your car for a long time. When removing the tubes they often get damaged.
Where the rigid tubing meets the flexible hose, support brackets are installed and the flexible tubing is held in place with a U-shaped clamp that fits into a groove in the fitting. Before using a wrench, soak the nipples in brake fluid, as there is always a small amount of corrosion in the nipple that will prevent it from loosening. While the nipples are soaking, tightly wrap the neck of the brake fluid reservoir with plastic wrap and adhesive tape. This is necessary to minimize fluid leakage from disconnected tubes. Hold the hex key on the flexible hose coupling while loosening the nipple on the rigid tube. Then pull the clamp to release both tubes from the bracket. In order to remove the flexible hose, you will need to perform this operation on both ends. For a rigid tube on the other end, you only need to unscrew the nipple from the cylinder or connector. When replacing the flexible hose, be careful not to damage the fittings of the tubes connected to it. If the nipple is particularly stubborn, be prepared to replace the rigid tube as well. This happens quite often when using open-end wrenches. It might be worth spending a little money on a special fitting wrench, which is like a socket wrench with a notch for the tube to fit through.
If you order a new tube from a workshop, take the old one with you as a sample so that the fittings and sockets at the ends are identical.
Replacing hoses or tubes is carried out in reverse order. Care must be taken to ensure that the fittings are aligned when tightening to avoid damaging the threads. This means that you may have to bend the tube slightly where it enters the connection, but this bend should never be too sharp.
When installing flexible hoses, be careful not to twist them. This can happen when final tightening of the fittings if the end of the flexible hose is not held with a wrench.
If a rigid tube is removed or a fitting becomes loose enough to allow air into the system, the system should be bled.
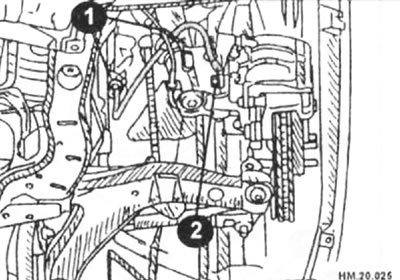
- Install the brake hose, aligning it with the protrusion on the brake caliper, and tighten the connecting hollow bolt (2) to a tightening torque of 16.7-19.6 N·m.
Caution: The copper sealing washer cannot be reused.
- Install the brake hose onto the brake pipe, tighten the union nut by hand, and then secure the hose to the bracket using the fixing plate (1).
- Using a special wrench, tighten the union nut to a tightening torque of 14.8-17.6 N·m.
- Fill the reservoir with brake fluid and bleed the brakes.