


Table of contents: Checking the base voltage of the…↓ Indication of the presence of faults ↓
If there is a fault in the charging system, do not immediately assume that the generator is faulty. First, you need to check the following:
- Make sure the battery cable connections are clean and tight.
- Check the density of the electrolyte in the battery. If it is low, charge the battery.
- Check the generator's external wires and connections.
- Check the condition of the drive belt and its tension.
- Check the tightness of the generator mounting bolts.
- Start the engine and check if the generator is making any unusual noise.
- Check the power fuses.
- If they are burnt out, find the cause and fix it.
- Using the electrical diagrams, check all fuses protecting the charging system circuits. Fuse locations may vary depending on the model year, but fuse designations generally remain the same.
Checking the base voltage of the battery
Caution: Before checking the battery's base voltage, turn on the high-beam headlights for 10-15 seconds. This will remove the surface charge from the battery plates, then wait until the voltmeter reading stabilizes.
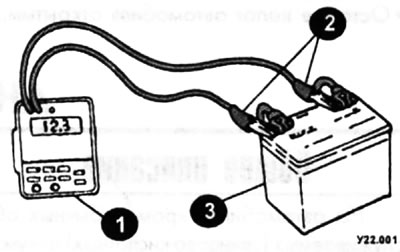
1 - voltmeter; 2 - voltmeter wires; 3 — storage battery (SB).
With the engine not running, use a voltmeter to check the base voltage on the battery. It should be approximately 12V.
Caution: When checking the battery base voltage, the ignition switch must be in the "OFF" position and all electrical equipment must be turned off (lamps, radio, etc.) off.
Checking the generator output voltage drop
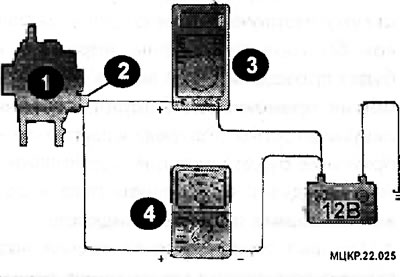
1 - generator; 2 — generator output B; 3 - voltmeter; 4 - ammeter.
- This test determines the condition of the wiring from the generator "B" terminal to the positive (+) terminal of the battery, including the condition of the fuse line.
- With the ignition on, disconnect the negative cable from the battery
- Disconnect the wire from the generator terminal "B" and connect a DC ammeter with a measuring range of 0-100 A in series with the terminal "B" connected to the disconnected wire. Connect the positive terminal of the ammeter to the "B" terminal of the generator, and the negative terminal of the ammeter to the wire disconnected from the generator.
Note: To perform such tests, it is better to use an ammeter with an inductive sensor ("current clamp"), which is connected to the measured circuit without disconnecting the wire from the "B" terminal of the generator.
- Connect a voltmeter to the "B" terminal of the generator and to the positive terminal of the battery.
- Connect the tachometer.
- Reconnect the negative battery cable.
- Leave the car hood open.
- Start the engine.
- With the engine running at approximately 2500 rpm, adjust the generator load by turning on the light fixture until the ammeter needle reads slightly above 30 A. Reduce the engine speed until the load reaches exactly 30 A. Read the voltmeter reading at this point. The limit value should be 0.3 V.
Caution: If your vehicle has a powerful alternator and a 30A load cannot be installed, use a 40A load value. Measure the voltage drop under this load.
- If the measured voltage drop value exceeds the permissible value, there may be a fault in the outgoing wire from the generator, so check the wiring between the "B" terminal of the generator and the positive terminal of the battery.
- Don't forget to check the fuse!
- Check the terminals to see if they are tight enough.
- Inspect the wire insulation to see if it has become discolored due to overheating. Correct any defects found, then retest.
- If everything is OK, let the engine idle.
- Turn off all electrical consumers and stop the engine.
- Disconnect the negative cable from the battery.
- Disconnect the measuring instruments.
Indication of the presence of faults
- The electronic voltage regulator turns on the "CHARGE" indicator lamp if the following symptoms appear while the generator is running:
- The generator is producing too much voltage.
- The generator does not produce voltage.