


Table of contents: Removal ↓ Installation ↓
Removal
Disconnect the negative cable from the battery.
Warning! If the car stereo system is equipped with a security code, make sure you have the correct combination to activate the audio system before disconnecting the battery!
Front cylinder head cover
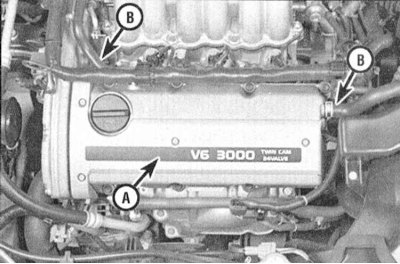
1. Remove the ventilation hoses and the coil assembly cover.
2. Remove the ignition coils (see Chapter Engine electrical equipment).
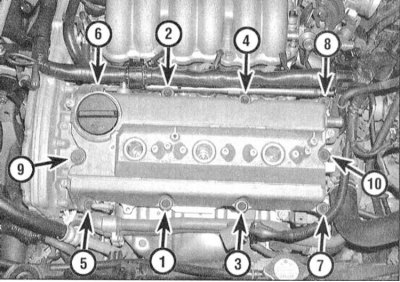
3. Proceeding in the reverse order to that shown in the illustration, unscrew the cylinder head cover mounting bolts.
4. Remove the cover.
Note: To separate a "stuck" lid, tap it with a hammer through a wooden block. Never pry the lid under the mating surface with a lever!
Rear cylinder head cover
1. Remove the upper section of the intake manifold (pressure chamber) (See Section Removal and installation the intake manifold).
2. Remove the ignition coil assemblies from the rear cover (see Chapter Engine electrical equipment).
3. After releasing the fastening clamps, disconnect the ventilation hoses from the cover.
4. Disconnect the PCV hose and any wiring that interferes with cap removal.
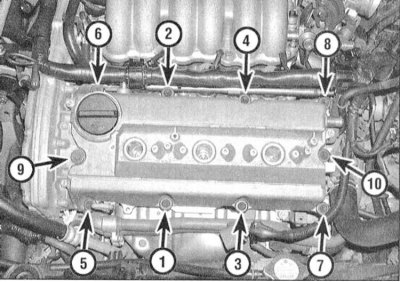
5. Proceeding in the reverse order to that shown in the illustration, unscrew the cylinder head cover mounting bolts.
6. Remove the cover.
Note: To separate a "stuck" lid, tap it with a hammer through a wooden block. Never pry the lid under the mating surface with a lever!
Installation
Both lids
1. The mating surfaces of the cylinder heads and their covers must be absolutely clean and dry. Using a scraper, remove all traces of old sealant and fragments of the destroyed gasket, then wipe the surfaces with a rag soaked in acetone. The presence of traces of oil on the mating surfaces may lead to the development of leaks.
2. If necessary, run the threads of the mounting bolts with a suitable die, restoring damaged threads and removing rust and traces of old sealant. Use a tap of the appropriate size to run the threaded holes in the head.
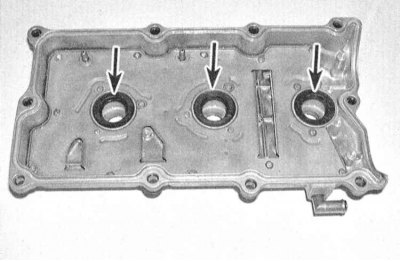
3. Check the condition of the sealing washers of the spark plug guide tubes seated in the cylinder head covers; replace them if necessary.
4. Fill the groove on the mating surface of the cover with RTV sealant, also apply sealant to the corners of the joints of the cover with the front camshaft bearing cover. Place a new sealing gasket on top of the sealant. Let the sealant dry a little and thereby fix the gasket on the cover.
5. Carefully press the cover onto the cylinder head and screw in the mounting bolts.
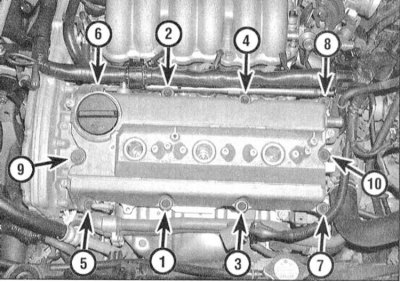
6. Tighten the bolts to the required torque in three to four stages, following a strictly defined order.
7. Further assembly is carried out in the reverse order of dismantling the components.
8. Start the engine and check it for signs of developing leaks.