


Radiator mounting elements
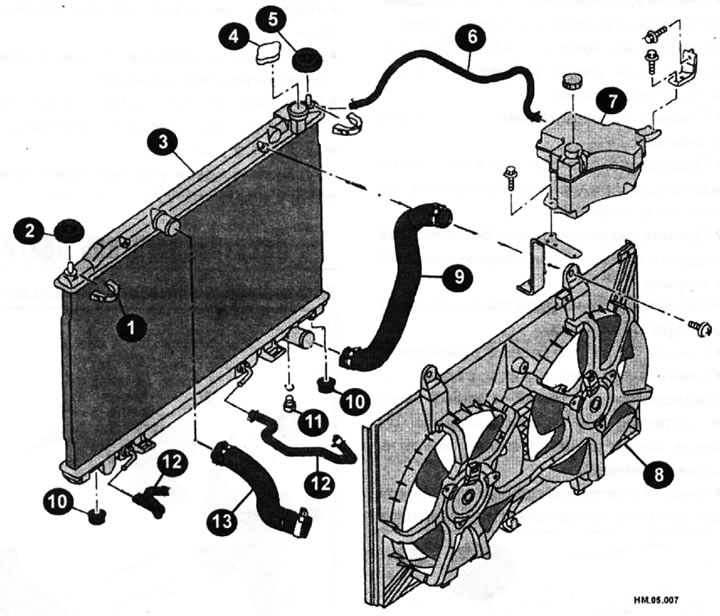
1 - Upper radiator clamp; 2, 5 - mounting rubber; 3 - radiator; 4 — radiator cap; 6 - expansion tank hoses; 7 — expansion tank; 8 — cooling system fan; 9 — lower radiator hose; 10 - mounting rubber; 11 — radiator drain plug; 12 — automatic transmission oil cooler hose; 13 — upper radiator hose.
The only reason why a radiator needs to be removed is to replace it with a new one or to repair a leak. If the radiator requires constant topping up of fluid, and the leak cannot be found in either the hoses or the radiator, the radiator cap may be the culprit. The lid can be checked for leaks as described above in the relevant section. If the sealing cap is faulty, it should be replaced. However, if the cap was faulty and you replaced it, continue to monitor the fluid level. The system is under pressure again and leaks can occur quite suddenly.
If the radiator cap is in good condition and the coolant is still leaking without any visible leaks from the outside, the problem is serious. This could be caused by a defective cylinder head gasket. At this stage, you should consult a specialist.
If the radiator is leaking, replace it with a new or reconditioned one. If the radiator has been repaired by the owner or a workshop, it should be pressure tested at a minimum of 1.5 bar. To do this, close the outlet port with a suitable plug and apply compressed air at 1.5 bar through another port. Immerse the radiator in a bath of water at 90°C. Let it sit for 15 minutes and then apply pressure again to 1.5 bar. Watch for bubbles, which would indicate leaks. If the radiator has not been pressure tested after repair, it should be monitored very closely for several weeks after installation to ensure any leaks are detected early.
Removal
- Disconnect the negative cable from the battery.
Note: This will erase any fault information from the on-board computer memory.
- Remove the lower engine cover.
- Drain the coolant as described in the relevant section of the chapter "Maintenance".
Caution: Drain the fluid only when the engine is cold.
- Remove the air duct and radiator grilles.
- Disconnect the automatic transmission fluid cooler hoses. Plug the openings to prevent fluid leaks.
- Remove the expansion tank and its bracket.
- Disconnect the upper and lower radiator hoses, first loosening the clamps that secure them.
- Remove the battery and its tray and move the fuse box to the side.
- Disconnect the radiator fan plug connection.
- Remove the cooling fan.
- Remove the upper radiator clamps by first pulling the tabs outward (arrows) to release them. Do not pull the tabs too hard, otherwise they may be damaged.
- Remove the mounting rubber bands from the mounting pins located on the radiator.
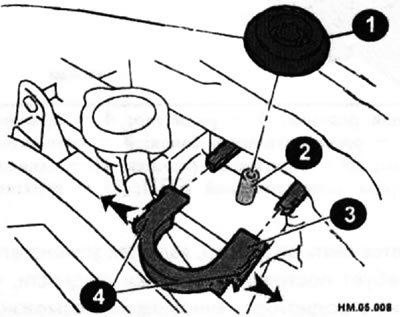
1 - mounting rubber; 2 - mounting pin; 3 - Upper radiator clamp; 4 - tongue.
- Now nothing prevents you from removing the radiator from the car.
- Lift the radiator and remove it with the help of an assistant.
Caution: When removing the radiator, be careful not to damage the condenser, air conditioner or radiator fins.
Caution: If the radiator remains removed for more than 48 hours, it is necessary to flush the radiator with clean water, dry it with compressed air and close the openings. The radiator can also be stored filled with coolant with the holes closed.
Flushing
- Flush the radiator, since the radiator is removed from the car, flush it in the opposite direction as well. Rinse the outside of the radiator with a hose and a strong stream of water. If you suspect that the radiator is partially clogged, flush it with a chemical solution before removing it from the vehicle. If nothing has changed, check if water flows through the radiator normally. 20-25 liters should pass in half a minute.
- Leaks that are visible from the outside can usually be repaired by soldering, but leaks in vertical pipes are generally inaccessible. You can temporarily eliminate the leak by using special additives to the coolant or by covering part of the radiator with a special mastic. However, it is better to replace the radiator.
Installation
The radiator is installed in the reverse order of removal, taking into account the following:
- Install the mounting rubber bands onto the radiator mounting pins.
- Align the top radiator clamp with the mounting location, then insert the clamp into the radiator fins until the clamp snaps into place.
- Visually verify that the two upper radiator clamps are connected to the radiator fins.
- To check the reliability of the connection, move the upper radiator clamps and the radiator itself back and forth.
- Check the radiator hoses for cracks and replace them if necessary.
- Tighten the radiator fan and expansion tank mounting bolts to a torque of 3.9–4.5 N·m.
- Install a new O-ring under the radiator drain plug and tighten the plug to a torque of 0.78-1.56 N·m.