


Table of contents: Anti-theft system ↓ Controlling the main functions of…↓ Radio ↓ RDS Radio Message System ↓ Traffic announcement reception mode…↓ Select by program type ↓ Automatic reconfiguration ↓ Sound volume setting mode ↓ CD-Changer ↓ CD playback mode switch button ↓ BLUETOOTH® interface for connecting…↓
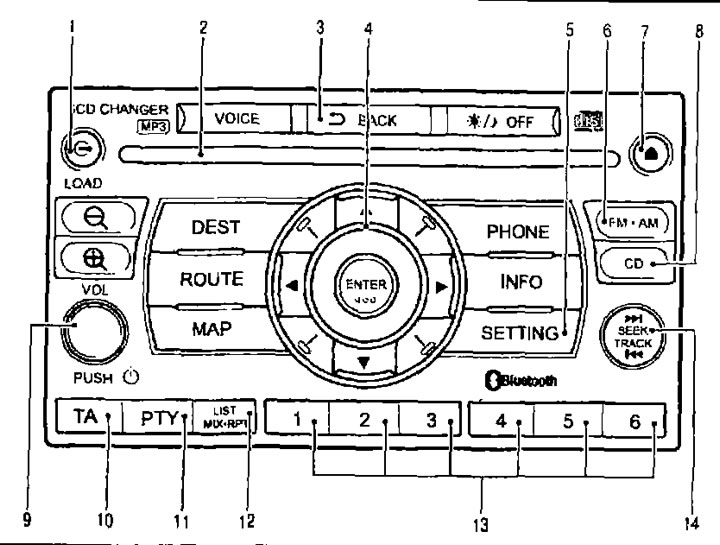
1. CD Load Button; 2. CD loading/unloading slot; 3. BACK button; 4. Multifunctional switch; 5. SETTING button; 6. FM-AM button (radio broadcast range selection); 7. CD eject button; 8. Enable CD playback button; 9. Power button/volume control; 10. TA button (road communications); 11. P7Y button; 12. LIST/MIX button (random play)/NRT (repeat playback); 13. Radio station preset and CD select buttons; 14. SEEK/TRACK button (search/skip to next track).
The audio system includes a digital radio receiver operating in the AM and FM ranges and a six-disc CD changer capable of playing compact discs with MP3 and WMA files.
Anti-theft system
This audio system can only be turned on when the NATS key in the ignition switch is in the ACC or ON position. The audio system is linked to your car's immobilizer with a unique code and therefore will not work on any other car.
Controlling the main functions of the audio system
The audio system can only operate when the ignition key is turned to the ACC or ON position.
Power switch
This button is used to turn on the audio system.
- The audio system will start working in the same mode (receiving a radio program or playing a compact disc), in which she was working immediately before the power was turned off.
- If there is no CD loaded in the player, the radio will turn on.
Adjusting the volume level
- Rotate the level control to set the desired sound volume.
- This audio system has a function of automatic volume adjustment depending on the vehicle speed.
Radio
 Selecting FM/AM bands
When you press the FM AM button, the audio system turns on and the radio receiver tunes to the station that was last received before the power was turned off. If a CD is already playing, pressing this button turns off the CD player and the system switches to the radio receiver mode.
To switch frequency ranges, use the FM AM button: FM →AM →FM.

 Manual tuning of the radio receiver
- To switch to manual mode for settings, press the button
 or
or  and hold it for more than 2 seconds. Then press the buttons
  or
or  to increase or decrease the frequency.
 - The frequency step is 100 kHz in the FM range, 9 kHz in the MW range, and 3 kHz in the LW range.

 Automatic search for radio stations
If you press the button briefly
 or
or  the radio will automatically start scanning the frequency range up or down. The search will stop as soon as the radio tunes in to the nearest station. If after the complete range scan no new station is found, the radio will stop at the frequency of the station from which the search was started.
Radio station preset buttons
Six stations can be programmed for both FM and AM bands.
In short (less than 2 seconds) pressing the preset button will start broadcasting the program of the radio station whose frequency corresponds to this button.
To program a radio station frequency manually:
1. Tune the radio to the desired station using the button
 or
or  .
.
2. Press and hold one of the preset buttons ((1) - (6)) until you hear a beep.
3. The channel number will appear on the display and the sound will be restored. This indicates that the frequency of the selected station has been successfully saved in the radio receiver's memory.
4. Repeat the steps described in steps 1-3 for the remaining preset buttons.
 Radio station list call button
Pressing this button successively switches modes in the following order: List mode (Tuning by radio station list) → Preset mode (Tuning to pre-programmed radio stations) → List mode (Tuning by radio station list).
Select a radio station from the list:
1. Select the setup mode (Preset mode or List mode) using the button
 .
.
2. Use the buttons
 and
and  or the rotary knob of the multi-function switch to select radio stations from the list or pre-programmed radio stations.
- If the preset radio station tuning mode is enabled, you can select one of six radio stations whose frequencies are stored in the radio receiver's memory cells. However, in the radio station list mode, you can store up to 50 radio stations with a sufficiently strong signal in the FM or AM frequency ranges.
- If the radio station list tuning mode is enabled, then when you press the button
 more than two seconds the radio receiver finds and stores in the list the frequencies of FM or AM radio stations with the strongest signal. Updating the list of radio stations may take some time.
 - If the radio station currently being received by the radio receiver is not an RDS radio station, then instead of the name of the radio station, the broadcast frequency is displayed on the display.
RDS Radio Message System
The RDS system allows additional information in coded digital form to be transmitted simultaneously with the main FM radio signal. The RDS system supports various information and service functions, such as displaying the name of the radio station, receiving traffic reports and local news, and automatically searching for a radio station transmitting a program of a certain genre.
Note: Some RDS service functions may not be available in some countries or regions.
Alternative Frequency (AF) radio signal
The AF mode works when listening to a radio station in the FM range, as well as when playing records on a CD (if the audio system previously worked in the FM range). To turn on this mode, press the SETTING button located on the audio system control panel. The setup window will appear on the display. Select the audio system settings menu and press the button
 to select the AF mode. Then turn on the AF mode and press the ENTER button. Each time you select the AF mode, its status alternates between ON and OFF. When the AF function is turned on, AF appears on the display.
When AF mode is on, the following functions are performed.
Automatic radio tuning function.
This feature compares the signal strength of radio stations on all alternative frequencies (aF frequency list) and selects the radio station with the best reception conditions.
Search for a radio station by PI identification code.
If the radio receiver has not found any suitable radio station as a result of searching the list of alternative AF frequencies, it automatically switches to searching for a radio station by PI code. When searching by PI code, the radio receiver scans the frequencies of all RDS radio stations that have the same PI code. During scanning, the sound is muted and the display shows PI SEARCH. The search stops as soon as the radio receiver finds a suitable radio station.
EON Extended Network Data Update (this function also works when the AF function is turned off).
Receiving data from the extended EON network allows you to automatically re-tune the frequencies of pre-programmed stations to the same radio network. In addition, you can use additional functions provided by this network. When receiving a signal from RDS EON radio stations in the FM band, the EON indicator lights up on the audio system display.
RDS functions
PS function (display the name of the radio station).
If the radio is tuned to an RDS station (manually or semi-automatically), RDS radio data reception starts and the name of the received station is displayed on the display.
Function of interrupting the current mode with an alarm signal (ALARM INTERRUPTION - EBU SPEC FOR INFO).
If the radio receives PTY code 31 (emergency message code), the current audio system operation mode is automatically interrupted and the emergency announcement broadcast begins, with the message PTY31 ALARM indicated on the display. The volume level will be the same as when broadcasting traffic announcements. After the emergency announcement broadcast ends, the audio system will immediately return to the original operating mode.
Local radio reception mode (REG).
- Some local radio stations are united into a regional network, since each of them covers only a small area, limited by the number of repeaters. If during the trip the signal level received from the radio station becomes too weak, the RDS system automatically switches the audio system to another local radio station with a stronger signal.
- If you turn on the REG mode when the radio receiver is operating in the FM range and is tuned to a local radio station, the radio receiver's setting will be saved and switching to other local radio stations will not occur.
- To turn on this mode, press the SETTING button located on the audio control panel and the setting window will appear on the display. Select the audio settings menu and press the ▼ button to select the REG mode. Then turn on the REG mode (ON) and press the ENTER button. When you select the REG function sequentially, it turns on (0N) and off (OFF). When the REG function is on, the REG inscription will appear on the display.
Traffic announcement reception mode (TA)
The AF mode works while listening to FM radio and when playing CDs (if the audio system previously worked in the FM range).
To turn on this mode, press the SETTING button located on the audio system control panel. The setup window will appear on the display. Select the audio system settings menu and press the button
 to select the TA mode. Then turn on the TA mode (QN) and press the ENTER button. Each time you select the TA function, its status alternates between ON and OFF. When the TA function is turned on, TA appears on the display.
- The traffic announcement (TA) reception mode is activated by pressing the TA button. When the mode is activated, the TA indicator lights up on the display.
- TA mode works regardless of whether AF mode is on or off.
Functions active when TA mode is on:
Interrupting the current mode to broadcast a traffic message
- When a traffic announcement is received, the radio program or CD playback is interrupted and TRAFFIC INFO appears on the display. The volume will be adjusted to the preset level.
- After the traffic announcement has finished, the audio system returns to the previously selected signal source and previously set volume level.
- If the audio system is tuned to an EON radio station and another EON radio station is broadcasting a traffic announcement, the radio will automatically switch to the EON station broadcasting the traffic announcement. Once the traffic announcement has finished, the audio system will return to the previous signal source.
- The interruption of the initial mode for the traffic announcement broadcast is cancelled if the TA button is pressed during the broadcast. In this case, the TA function returns to the standby mode.
Setting the volume level for traffic announcements
You can preset the volume level for traffic announcements using the audio settings menu, see "Volume Setting Mode" below.
 Select by program type
- The program type selection (PTS) mode operates when listening to a radio station in the FM range, as well as when playing recordings on a compact disc (if the system previously operated in the FM range).
- The RTU mode is activated if the PTY ON state is activated in the RTU program type selection menu or if the RTU button is pressed to the ON state. The RTU symbol appears on the display.
PTY radio program type selection mode
To install the required type of RTU radio program, do the following:
1. Press the SETTINGS button.
2. Press the ▼ button to select "Audio". Then press ENTER.
3. Press the ▼ button to select the RTU category. Then press ENTER.
4. Select the desired program type from the menu, then press the ENTER button to confirm your selection.
5. Select ON for the RTU function. When the RTU function is selected consecutively, it is alternately turned ON (ON) and OFF (OFF).
To return to the original audio system window, press the button
 (return) or the CO or AM-FM button.
The PTY type of the radio station can also be selected using the six preset buttons on the receiver.
The names of the first six PTY types are stored in the corresponding memory cells of the radio receiver. However, the memory cells can be reprogrammed by the user at his own discretion. To do this, display the name of the desired PTY type of radio station and then hold down one of the six buttons for at least 2 seconds.
Search function by specified program type PTY
- The specified function is activated by pressing the button
 or
or  .
. - If a radio station broadcasting the selected program type is found during the search, the radio receiver will stop on this radio station and the sound volume will be adjusted to the level specified in the PTY settings.
PTY standby mode
- PTY standby mode can be activated when the audio system is operating in any mode except AM radio reception.
- Press the PTY button to switch off the PTY standby mode. The PTY indicator on the display will go out.
PTY Interrupt Mode
- If the radio receiver detects a program with the required PTY code transmitted by the radio station to which the receiver is tuned, or by an EON radio station, an interrupt signal is given and the name of the PTY radio station is displayed. The name of the interrupting RTU radio station will appear on the display, and the sound volume will be adjusted to the level set for the PTY function.
- If you press the TA button in the PTY interrupt mode, the radio will return to the previous playback source. At the same time, the PTY interrupt standby mode remains on.
- If you press the FM-AM frequency range selection button or the CD button in the PTY interrupt mode, the audio system will switch to the corresponding signal source. At the same time, the RTU program type interrupt standby mode remains on.
Automatic reconfiguration
Automatic retuning of the radio receiver is carried out in the following cases:
- When the AF function is on and the TA radio function is off, there is no RDS data for 25 seconds or more.
- If the radio does not receive a signal from a station broadcasting a traffic announcement programme for more than 25 seconds when the AF function is off and the TA function is on.
- If the radio does not receive a signal from an RDS station broadcasting a traffic announcement programme for more than 26 seconds while the AF and TA functions are on.
Sound volume setting mode
To adjust the sound brittleness, follow these steps:
1. Press the SETTING button.
2. By pressing the button
 select the item "Audio". Then press ENTER.
3. By pressing the button
 , select the item "Speed Sensitive Volume" (compensation of sound level depending on speed) or PTY/TA VOL (sound level for PTY and TA). After that, press the ENTER button.
4. Set the desired sound level using the buttons
 and
and  .
.
5. Press the ENTER button to confirm your selection.
To return to the original audio system window, click the button
 (return) or the CD or FM-AM button.
Note: When this function is active, the higher the vehicle speed, the higher the volume level.
CD-Changer
CD changer control
- Turn the ignition key to the Acc or ON position.
- Press the CD button to switch the audio system from radio reception to CD playback.
- When this button is pressed, the CD changer power is turned on and playback of the track that was playing when the power was last turned off begins.
 Loading CDs into the player
To load a CD into the CD changer:
- 1. Press the button
 and hold for at least 1.5 seconds.
 - 2. Press the CD select button that corresponds to the unloaded slot of the player (empty slots are indicated by a gray CD symbol). After pressing the button, a message will appear on the display.
- 3. After opening the loading window, the message on the display changes to "Please insert disc" (insert cd).
- 4. Partially insert the CD into the loading window with the label facing up. The CD will continue to load automatically and the CD will start playing automatically.
The sequence for loading six CDs into the CD changer is:
- 1. Press the button
 and hold it for less than 1.5 seconds.
 - 2. Insert the CD into the loading slot.
- 3. When the next slot number appears on the display, insert the next CD into the loading slot.
Caution: Do not force the CD into the slot and do not use 8cm diameter CDs.
At the same time, the following information will be displayed on the audio system display: the recording number, the recording duration, and the number(s) of occupied CD changer slots.
CD playback mode switch button
- If the CD button is pressed when the audio system is off and a CD is loaded, the audio system will turn on and the CD will start playing automatically.
- If the button is pressed while the radio is on, the radio station will automatically stop and the CD will start playing.
CD Select Buttons
- To select one of the six compact discs loaded into the CD changer, press the corresponding disc selection button.
- Playback of the selected disc starts automatically from the first track.

 Fast forward/backward scrolling
After a long (not less than 2 seconds) button presses
 or
or  the CD will begin playing at fast forward or reverse speed. Once the button is released, the player will return to normal playback speed.

 Go to next/previous entry
If the button
 or
or  pressed while playing a CD, the next track will begin playing. Press the button repeatedly to skip multiple tracks on the CD. The number of tracks skipped will be equal to the number of times the button is pressed. After skipping the last track on the disc, the CD player will skip to the first track again.
Click the button
 or
or  to go to the beginning of the current record. To skip several records, press the button several times. The number of records skipped will be equal to the number of times the button is pressed.
 MIX RPT button (Random playback/Repeat playback)
To change the playback mode, press the button
 several times in a row. The order of changing modes is given below: ALL DISC OPT →1 DISC RPT → 1TRK RPT → ALL DISC MIX → 1 DISC MIX → ALL DISC RPT.
ALL DISC APT: The player plays all tracks on all loaded CDs in sequence.
1 DISC RPT: The player plays the current CD repeatedly.
1 TRK RPT: The player repeatedly plays the current recording.
ALL DISC MIX: The player plays all tracks on all loaded CDs in random order.
1 DISC MIX: The player plays all tracks on the selected CD in random order.
Playing CDs with MP3 and WMA file formats
If the CD loaded into the player contains files of these formats with text information (catalog name, album name, song title, artist name), then the corresponding information will be displayed on the audio system display.
To move to the next directory or another subdirectory within the current directory, use either the cursor control keys
 or
or  , or the rotary control or the rotary switch of the audio system on the steering wheel, then press the ENTER button to enter the subdirectory. The audio system displays a list of MP3/WMA files in the current directory or a list of subdirectories. To return to the previous directory, press the button
  . When playing MP3/WMA records on compact discs, you can set the desired playback mode using the MIX-RPT button. Pressing this button successively switches the playback modes in the following order: ALL DISC RPT → 1 DISC RPT → 1 FOLDER RPT →1 TRK RPT → ALL DISC MIX → 1 DISC MIX →1 FOLDER MIX → ALL DISC RPT.
ALL DISC RPT: The player plays all tracks on all loaded CDs in sequence.
1 DISC RPT: The player plays the current CD repeatedly.
1 FOLDER RPT: The player repeatedly plays all MP3/WMA files in the current directory.
1 TRK RPT: The player repeatedly plays the current recording.
ALL DISC MIX: The player plays all tracks on all loaded CDs in random order.
1 DISC MIX: The player plays all tracks on the selected CD in random order.
1 FOLDER MIX: Plays all MP3/WMA files in the current directory in random order.
If you cannot activate the AUDIO TEXT mode, this means that the CD or the recordings on it do not contain text information.
To display text information contained on an MP3/WMA CD, follow these steps.
1. Using the button
 select item "Audio Text" and press the ENTER button.
2. Press the button
 or the CD button to switch the displays to the original CD player control mode.
 Ejecting CDs
1. The CD can be ejected in different ways:
- By pressing the EJECT button
 (the current disk will be ejected).
 - By pressing the CD select button and then pressing the EJECT button
 .
. - By pressing the EJECT button
 followed by pressing the CD select button for the occupied slot.
2. After pressing the EJECT button, the corresponding message appears on the display.
3. The loading window door will open, the CD will slide out of the slot and can be removed.
4. If necessary, insert another disk into the appropriate slot or wait until the loading window door closes.
5. To eject all CDs in sequence, press the EJECT button
 and hold it for more than 1.5 seconds. The CD changer will start unloading from the last played disc. After the next disc is completely ejected, the next CD will be unloaded.
- If you do not remove the CD that came out of the player's loading window within 15 seconds after pressing the button, it will be automatically loaded into the player again after a while to protect it from damage.
Unloading CDs.
- You can eject all CDs from the CD changer when the ignition key is in the OFF or LOCK position. The audio system will not turn on automatically.
- In short (less than 1.5 seconds) when you press the button, the current disc will be unloaded from the player.
- To eject all discs one by one, hold down the EJECT button for more than 1.5 seconds; the CD changer will start ejecting from the current or last played disc.
BLUETOOTH® interface for connecting a mobile phone (if any)
This system allows you to use your mobile phone in the mode "hands free" ("hands-free"), which increases comfort and safety of movement. For more information, see "Connecting a mobile phone" below.