


Fuel tank mounting elements
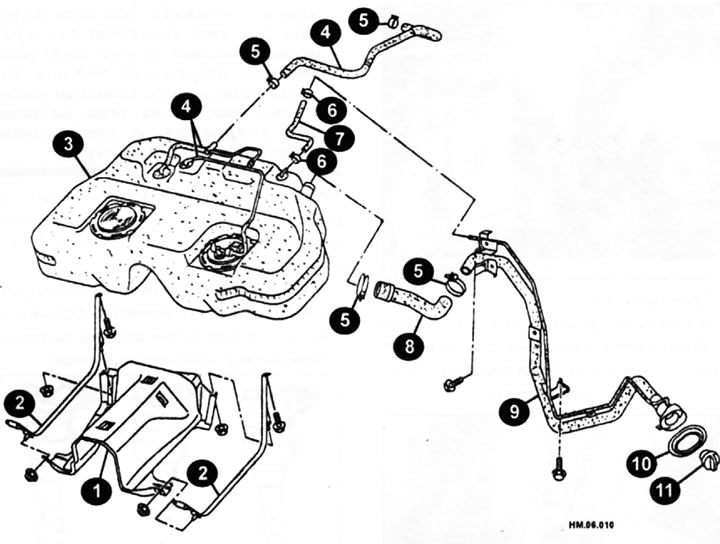
1 - fuel tank protection; 2 - fuel tank mounting tape; 3 - fuel tank; 4 — fuel tank ventilation hose; 5, 6 — hose clamp; 7 — fuel vapor recirculation hose; 8 — fuel tank hose; 9 - fuel filling pipe; 10 — bushing; 11 — fuel tank cap.
Removal
Caution: Do not operate the fuel tank until the fuel gauge shows no fuel in the tank. If the tank must be removed when it is full, drain the fuel from the tank before removing it.
Attention: This work requires special tools to separate the fuel lines.
- Raise the vehicle and support it securely.
- Relieve the pressure in the fuel system as described above. Drain the fuel from the tank completely.
- For safety reasons and to maintain the center of gravity of the fuel tank in the center, drain the fuel from the tank to a level where the weight of the right and left sides of the fuel tank is approximately equal.
Caution: Always keep a fire extinguisher handy when performing this operation. Fuel vapors are explosive.
- Open the fuel tank cap.
- Open the fuel tank cap and release the pressure inside the tank.
- Remove the rear seat cushion trim and cushion bolts, then lift the rear seat cushion.
- Remove the main fuel quantity sensor, fuel filter and fuel pump inspection hole cover on the left side as described when removing the fuel pump.
- Disconnect the wiring harness plug and the fuel supply line quick connector.
- Separate the quick release connector.
- Remove the center muffler.
- All-wheel drive models: Remove the rear driveshaft.
- Remove the parking brake cables.
- All-wheel drive models: Remove the rear final drive.
- Using a floor jack, support the bottom of the rear final drive.
- All-wheel drive models: Loosen the rear suspension beam mounting nuts and carefully lower the jack until the rear suspension beam is clear of the mounting studs.
- Remove the fuel tank protection.
- Tag and disconnect the fuel tank hose, fuel tank vent hose, and fuel vapor recirculation hose from the sides of the fuel tank.
- Place a jack under the fuel tank, placing a large wooden block between it and the tank. Raise the jack so that it just touches the tank.
Please note: Fuel lines have different diameters, which eliminates errors during their installation. If you still have any doubts, mark all pipes and their connections.
- To prevent leaks and dirt from entering the fuel system, plug the ends of the pipes and hoses.
- While supporting the fuel tank, remove the fuel tank mounting strap bolts.
- Slowly lower the jack and inspect the tank for damage.
- If you suspect that the tank is leaking, do not rush to seal it. Take it to a repair shop or buy a new tank. If the tank is constantly contaminated with fuel due to damage to its interior surface, replace it.
Cleaning and repair
- Over time, sediment accumulates at the bottom of the tank.
- After removing the tank, it must be thoroughly washed and then turned upside down. If possible, it should be cleaned with steam.
- A temporary repair of a leaking gas tank can be done using various adhesives available at auto parts stores. If a large area is being installed, it is necessary to secure supporting pieces of fiberglass or perforated zinc sheets. If soldering is used, the top of the tank must be cleaned with steam to ensure that no traces of gasoline vapor remain. Exposing the tank to an open flame is very dangerous, even if it has been empty for a long time.
Installation
- Raise the fuel tank into place using a jack. Install and tighten the mounting bolts.
Caution: To prevent the fuel tank from overheating, the tank heat shields must be returned to their original positions.
- Remove the jack. Connect all fuel lines and electrical wires going to the tank.
- After pushing the hoses to the distance indicated below, secure them with clamps:
fuel tank hose: 35mm; other hoses: 25 mm.
- Make sure the hose clamps are not located on a raised section of the fuel line.
- Tighten the hose clamps until the distance between the clamp projections is as shown below:
fuel tank side: 2-6mm; fuel filling pipe side: 5-9mm.
- Press the fuel tank strap pins firmly against the vehicle.
- Before securing the fuel tank, temporarily install the filler hose.
- When installing the filler hose to the fuel tank, you can use clean engine oil to make the job easier.
Caution: Use appropriate bolts to secure the filler neck hose. The bolts must be tightened to a specific torque.
- Lower the car.
- Fill the fuel tank with fuel.
- Check for leaks by doing the following:
♦ Turn on the ignition (without starting the engine), several times and create fuel pressure in the fuel lines. After this, check for fuel leaks at the connections.
♦ Start the engine, accelerate it, and again check for fuel leaks at the fuel system connections.