Note. The procedures described below apply to Station Wagon and Hardtop models. For other types of bodies, work is carried out similarly with the necessary amendments to the design features of the body.
Removing
1. Disconnect the negative cable from the battery.
2. In a luggage compartment give fixing screws and remove tethered hooks.
3. Give fixing screws and remove furnish of fastening of a rug from wings of a door of a back.
4. Fold the mat forward and release the screws securing the access cover. Remove the cover.
5. Disconnect and plug fuel hoses. Disconnect the electrical connector.
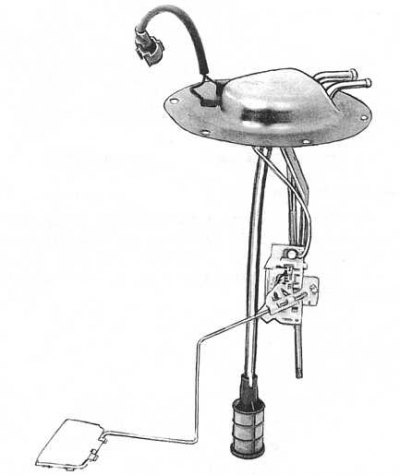
Note. The fuel flow sensor unit, and on 3.0L models also the fuel pump, can now be removed from the fuel tank for necessary repairs after loosening the fasteners. The fuel consumption sensor of 4.2 l models removed from the gas tank is shown in the accompanying illustration.
6. Jack up the rear of the vehicle and place it on jack stands.
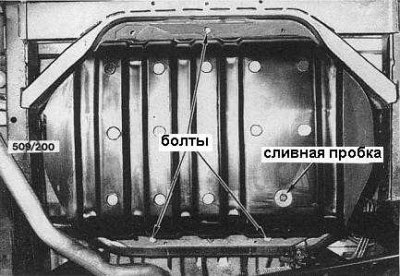
7. Carefully unscrew the drain plug of the gas tank (see accompanying illustration) and drain the fuel into a clean container. Screw the plug back into place and tighten it firmly.
8. Working through the opening of the arch of the right rear wheel, give the bolts securing the protective screen of the filler neck to the tank body, remove the screen.
9. Loosen the clamps securing the filler neck and the fuel evaporator tube (the corresponding tank components of the 4.2 l models are shown in the accompanying illustration).
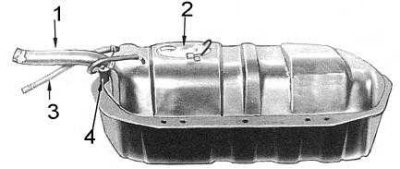
1 - filler neck; 2 - fuel consumption sensor; 3 - evaporator tube; 4 - control valve
10. Give fixing bolts and lower down the protective screen of a gas tank.
11. Give bolts of fastening of a tank to the chassis and carefully take a tank from under the car. Before removing the tank, make sure once again that the filler neck and the fuel evaporation pipe are disconnected.
Installation
Installation is in the reverse order.
1. Make sure all hoses are in good condition and properly connected to their fittings.
2. When installing the tank, make sure that the pipes of the filler neck and the removal of fuel vapors are connected to it correctly.
3. Fill the tank with clean fuel and check for leaks.