Note. The following procedures require a suitable fuel pressure gauge (manometer) and a three way fitting.
Models 3.0 l
Fuel pressure check
Note. It is important that during the check of the fuel pump the patency of the fuel lines and filter is not disturbed. Otherwise, the possibility of unreasonable replacement of the pump due to false measurement results cannot be ruled out.
1. Place a drain pan under the fuel vapor separator.
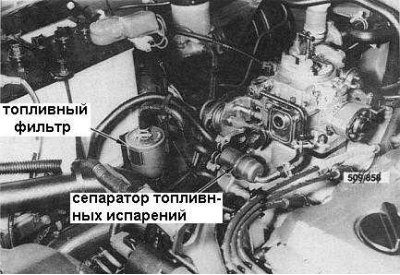
2. Disconnect from a separator an inlet fuel hose an illustration) and plug the open end of its connection fitting on the separator.
3. Connect a suitable pressure gauge to the hose and turn on the ignition (turn the key to the ON position).
4. Compare the pressure gauge reading with the regulations (see tables of sizes and adjustments at the end of the guide). Replace the fuel pump if necessary.
Check of serviceability of functioning of the fuel pump
1. Check the condition of the fuel pump and engine control fuses located in the mounting block. Replace burnt ones.
2. In a luggage compartment give fixing screws and remove tethered hooks.
3. Give fixing screws and remove furnish of fastening of a rug from wings of a door of a back.
4. Fold the mat forward and release the screws securing the access cover. Remove the cover.
5. Disconnect the electrical wiring from the fuel pump (see accompanying illustration).

1 - fuel pump
2 - electrical connector
6. Connect a voltmeter between red and green (+) and black (-) negative wires near the harness electrical connector. Turn the engine over and read the voltmeter.
7. If the voltmeter detects battery voltage, check for continuity between the red-green and black wires near the fuel pump electrical connector. If there is no continuity, replace the fuel pump.
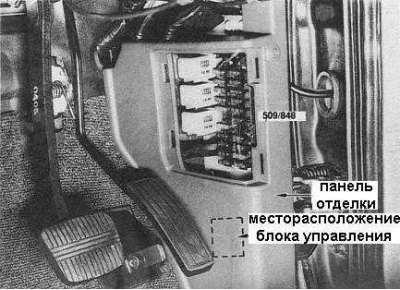
8. If there is no battery voltage, remove the trim panel under the fuse box and disconnect the fuel pump control unit electrical connector (see accompanying illustration).
9. Check for continuity between the black wire and chassis ground. If there is no continuity, check the condition of the wiring.
10. Disconnect a wire from the plug S of a starter.
11. Turn on the ignition (key to ON position) and measure the voltage between brown (+) wire and body body ground (-). Turn the ignition key to the START position and check the voltage again. If there is no battery voltage in both cases, check the condition of the engine control fuse and related wiring.
12. Turn the key to the ON position and check the voltage between the light green (+) wire and body body ground (-). If there is no battery voltage, check the condition of the fuel pump control fuse and related wiring.
13. Reconnect the S terminal of the starter. Connect the electrical connector of the fuel pump control unit and start the engine. Connect the probe to the white-red (+) wire on the reverse side of the electrical connector and check the voltage between this wire and the chassis body ground (-). If there is no battery voltage, check the condition of the alternator wiring harness.
14. With the engine running, connect the probe to the green wire on the reverse side of the electrical connector and check the voltage between this wire and body shell ground (-). If there is no battery voltage, check the condition of the oil pressure switch and related wiring.
15. Disconnect starter terminal S. Turn the ignition key to the ON position, connect a probe to the green-red wire on the back of the fuel pump electrical connector and check the voltage between this wire and the chassis ground (-). Turn the key to the START position and measure the voltage again. If battery voltage is missing in both cases, replace the fuel pump control unit.
16. If there is battery voltage, check the condition of the fuel pump wiring.
Removal and installation
1. Disconnect the negative cable from the battery.
2. In a luggage compartment give fixing screws and remove tethered hooks.
3. Give fixing screws and remove furnish of fastening of a rug from wings of a door of a back.
4. Fold the mat forward and release the screws securing the access cover. Remove the cover.
5. Disconnect and plug fuel hoses. Disconnect the electrical connector.
6. Give fixing bolts and take the petrol pump with a sealing ring from a fuel tank.
Attention! Installation
Installation is in the reverse order.
1. Make sure that the O-ring is in good condition.
2. Check up a condition of contacts of an electric socket.
Models 4.2 l
Fuel pressure check
Note. It is important that during the check of the fuel pump the patency of the fuel lines and filter is not disturbed. Otherwise, the possibility of unreasonable replacement of the pump due to false measurement results cannot be ruled out.
1. Disconnect the fuel supply hose from the carburetor.
2. Disconnect the fuel return hose from the fuel pump and plug the fitting on the pump.
3. Connect a three-way fitting in series with the fuel supply line to the carburetor.
4. Connect a suitable fuel pressure gauge to the remaining free branch of the fitting (manometer).
Note. Run the engine for about 60 seconds to remove air pockets from the system.
5. Driving the engine at various speeds, observe the readings of the pressure gauge. Compare results with regulatory requirements (see tables of sizes and adjustments at the end of the guide). Replace fuel pump if necessary.
Removal and installation
Attention! Withdrawal
1. Disconnect the negative cable from the battery.
2. Mark the hoses suitable for the fuel pump and outgoing from it.
3. Disconnect the fuel hoses from the fuel pump.
4. Loosen the fixing screws and remove the pump with insulator and gaskets (see accompanying illustration).
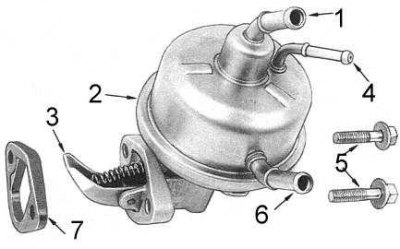
1 - inlet fitting; 2 - fuel pump; 3 - drive lever; 4 - return fitting; 5 - bolts; 6 - outlet fitting; 7 - insulator
6. If necessary, check the pump as described below.
Attention! Installation
1. Installation is carried out in the reverse order.
2. If necessary, replace the insulator and gasket.
Check of serviceability of functioning of the fuel pump
1. Remove the fuel pump.
2. Lower the pump into a container filled with fuel and flush it by pressing the drive lever several times.
3. Drain fuel from pump. Block the pump inlet with your finger and operate the drive lever. While holding the lever in the up position, release your finger - an air suction sound should be heard.
4. Place your finger on the outlet fitting and pressurize the pump by operating the lever. The pressure should be held for two to three seconds.
5. Re-pressurize as described in the previous paragraph, then lower the pump into a pail of fuel and check for air leaks.