Note. The following procedures require a pressure gauge with a range of up to 600 kPa, a suitable three-way fitting, and hoses.
Attention! Before disconnecting any components of the fuel system, relieve fuel pressure!
Depressurizing the supply system
1. Loosen the screws and lift the engine compartment relay panel next to the battery. Remove the cover and remove the 15A fuel pump fuse.
2. Start the engine and let it idle until it stops spontaneously. To be sure, run the starter for another ten seconds.
3. Turn off the ignition and reinstall the fuel pump fuse.
Checking for External Fuel Leaks
1. Make sure there is enough fuel in the gas tank.
2. Turn on the ignition for five seconds.
3. Wait thirty seconds and turn the ignition back on for five seconds. This will raise the pressure in the fuel lines of the power system.
4. Inspect system components for signs of leaks, paying particular attention to the pump damper, filter, and fittings.
Fuel pressure check
1. Depressurize the system and disconnect the negative cable from the battery.
2. Disconnect the fuel supply hose from the fuel line.
3. Using a piece of fuel hose and reliable clamps, install a three-way fitting between the fuel supply hose and the fuel line.
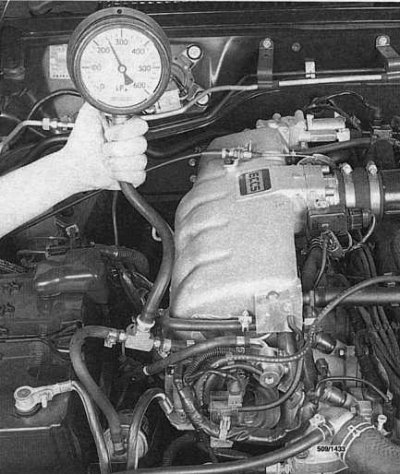
4. Connect a pressure gauge with a measurement range of up to 600 kPa to the free branch of the fitting (see accompanying illustration). Make sure all connections are capable of withstanding the intended pressure.
5. Connect the negative cable to the battery and check the power system for signs of external leaks.
6. Run the engine for three minutes at idle and measure the fuel pressure - it should be approximately 235 kPa.
Note. If the engine temperature is above 90°C on pre-October 1994 models, the vacuum supply to the pressure regulator will be cut off for three minutes after the engine is started in order to build up fuel pressure.
7. If the fuel pressure is insufficient, check the fuel filter and fuel supply lines for blockage. Also check the condition of the fuel pump strainer.
8. If the pressure is excessively high, check the correct connection of the vacuum hoses of the pressure regulator and the continuity of the fuel return line. On pre-October 1994 models, connect the vacuum hose directly between the pressure regulator and the intake manifold. If the pressure now returns to normal, check the governor control solenoid valve for proper operation. If the pressure is still too high, replace the regulator.
9. Disconnect the vacuum hose from the fuel pressure regulator and check that the pressure rises to approximately 294 kPa. If there is no increase in pressure, replace the regulator.
10. Connect the vacuum hose to the pressure regulator and stop the engine. Make sure the pressure continues to hold for at least five minutes.
Note. There may be a slight drop in pressure initially. This is normal and should not cause concern.
11. If the pressure does not hold, proceed as follows:
- Clamp the fuel return hose at the pressure regulator. If the pressure drop stops, replace the regulator.
- If the pressure continues to drop, remove the clamp from the return hose and pinch the fuel supply hose at the fuel filter. If the pressure drop stops, repair the defective fuel pump control valve, or replace the pump.
- If the pressure still continues to drop, the injectors should be checked for leaks. To do this, remove the fuel line with injectors from the engine without disconnecting the fuel supply and return hoses, turn on the ignition and inspect the injectors externally.
12. Upon completion of the test, depressurize the supply system and remove the pressure gauge and three-way fitting.
Fuel pump service
Examination
1. Perform the checks described in the section on troubleshooting road start failures for late model years.
2. If there is no power to the fuel pump with a good relay and fuse, check the condition of the wiring between the relay and the pump, perform the necessary repairs.
3. If power is on but the pump is not running, measure the resistance between the pump's green/red wire and the black wire. If the measurement is not 0.5 ohm, replace the pump.
Removal and installation
The fuel pump, as on the 3.0 liter models, is combined with the fuel flow sensor unit. The procedures for removing and installing the unit are described in Part 1 of this Chapter in the Section on fuel tank maintenance. The only thing to take into account is the fact that before disconnecting the negative cable from the battery, it is necessary to relieve the pressure in the power system.
Checking the fuel pump relay
The procedures for removing and checking the fuel pump relay are described in detail in Chapter Onboard electrical equipment.
Fuel filter replacement
The procedure is described in detail in Chapter Settings and ongoing maintenance.
Fuel pressure regulator service
Removal and installation
Attention! Withdrawal
1. Relieve pressure in the supply system.
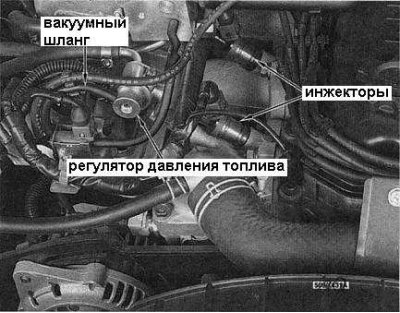
2. Disconnect the fuel and vacuum hoses from the regulator (see accompanying illustration).
3. Give fixing screws and remove the regulator from the fuel line. Discard the O-ring.
Attention! Installation
Installation is in the reverse order.
1. Install a new O-ring on the regulator.
2. Track reliability of a tightening of fixture.
3. Check the fuel system for signs of external fuel leaks.
Maintenance of the fuel line and fuel injectors
Removal and installation
Attention! Withdrawal
1. Relieve pressure in the supply system.
2. Disconnect the negative cable from the battery.
3. Disconnect the throttle cable from the link on the throttle body and its bracket.
4. Loosen the clamps, give the fixing bolt and remove the air duct with the muffler from the throttle body and air flow meter.
5. Disconnect the wiring harness from the throttle position switch (TPS), auxiliary air valve (AAS) and quick idle speed compensation devices (FICD).
6. Drain the coolant, dropping its level below the level of the location of the cooling hoses of the injection chamber.
7. Disconnect the cooling hoses from the pressure chamber.
8. Mark and disconnect a hose of the vacuum amplifier of brakes, vacuum hoses and a hose of ventilation of the engine from a delivery chamber.
9. Give fixing bolts and remove the delivery chamber with a lining from the inlet pipeline.
Note. Access to three of the mounting bolts of the injection chamber is possible from under the inlet pipeline.
10. Loosen the clamps and disconnect the fuel lines from the fuel line.
11. Disconnect the fuel pressure regulator vacuum hose.
12. Disconnect the electrical wiring from each of the fuel injectors and release the clips of the clamps securing the wiring harness to the fuel line.
13. Give fixing bolts and remove assembly of a fuel line with injectors from the car.
14. Remove the injectors from the line.
Attention! Installation
Installation is in the reverse order.
1. Be sure to replace the O-rings of the injectors. Lubricate the rings with petroleum jelly before installation.
2. Prime the cooling system.
3. Check the fuel system for signs of external fuel leaks.
Checking the injector circuit
1. Disconnect the electrical wiring from the fuel injectors.
2. Using an ohmmeter, measure the resistance between the terminals of each of the injectors. If the resistance is outside 10÷14 Ohm, the defective injector should be replaced.
3. Connect the test lamp on the LED alternately between the terminals of the electrical connector of the wires of each of the injectors, including the starter. The lamp should light up. Otherwise, check the condition of the fuses near the battery. On models produced between October 1994 and August 1995, check the condition of the fuel pump relay. If the fuses and relays are in order, the condition of the wiring and the ECU should be checked. Contact the dealership of the vehicle manufacturer.
4. To check the correct operation of the injectors, perform the following procedures:
- Connect the electrical wiring to the injectors and start the engine.
- With the engine running at idle, disconnect the wiring from each of the injectors in turn for no more than five seconds. When a working injector is turned off, the engine speed will drop with a simultaneous violation of their stability.
- If there are no changes in the speed and stability of revolutions, the corresponding injector is jammed, or its patency is impaired for another reason. However, before removing the injectors for detailed inspection and cleaning, check for spark on the spark plug wires.
Note. Cleaning and checking the condition of the injectors requires special equipment, so this work should be entrusted to employees of the dealership of the car manufacturer.