


Table of contents: General information ↓ Hairpins ↓ Seals ↓ Gaskets ↓ Bearings and bushings ↓ Crankshaft rotation ↓
General information
Before starting to loosen, the stuck threaded fastener should be generously soaked in penetrating oil for some time. When absorbed, the oil softens the corrosion deposits, which significantly facilitates the subsequent procedure of unscrewing the nut or unscrewing the bolt/screw.
Corrosion deposits can also be destroyed by sharp blows of a hammer applied to the head of the bolt.
A convenient device for loosening stuck fasteners is an impact driver, which can be equipped with either a socket head or a screwdriver-shaped attachment.
In particularly severe cases, heating the body of the component into which the stubborn bolt/screw is screwed may help (or the body of the nut) a blowtorch, a gas welding torch, etc. However, when heating components made of aluminum alloys, do not forget that the melting point of aluminum is much lower than that of steel - do not overdo it.
If you cannot release a stuck nut or fastener using any of the listed methods, you should carefully make a side cut on it using a hacksaw (parallel to the axis of the fastener), then break the nut with a chisel, being careful not to accidentally damage the threads of the bolt/stud.
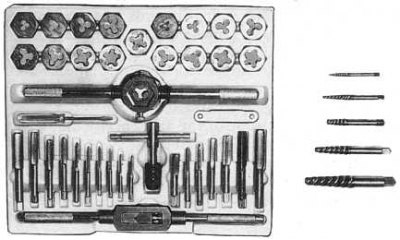
If the bolt/stud is cut flush with the component surface, a special extractor will be required to remove the fragment - follow the manufacturer's instructions. Extractors usually come with a set of dies and taps (see accompanying illustration).
The damaged thread can then be repaired using a die or tap of the appropriate size. If the thread in a fastening hole is damaged beyond repair, the hole should be enlarged using a drill, then a new thread should be cut in it using a suitable tap. Alternatively, if the original thread size needs to be maintained, a spiral insert can be installed in the hole.
Hairpins
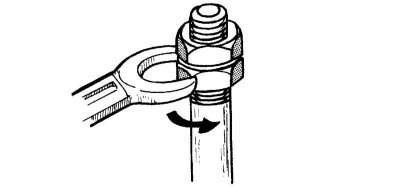
The simplest method of unscrewing a stud is to lock two nuts onto its free end (see accompanying illustration). Then the stud is unscrewed like a bolt, and the key is placed on the lower nut.
There are also many special tools available for removing studs - ask at auto parts stores.
Seals
Removal of seals is usually done by prying them out with a flat-head screwdriver or other suitable tool. In doing so, a certain amount of caution must be exercised so as not to damage the contact surface of the component on which the seal is installed.
The seal that must be replaced can also be removed by screwing several screws into its end surface. The seal is then extracted by the screws by grasping their heads with pliers.
Before installing a new seal, be sure to lubricate its lips.
Unless otherwise specified in the instructions, the seal is always installed with the jaws facing the cavity being sealed. When putting the seal on the shaft journals, care should be taken not to damage its jaws on the sharp edges of the keyways or splines. To do this, the dangerous part of the journal must be wrapped with tape.
Install a new seal using a wooden block, socket head or a section of pipe of a suitable diameter. Make sure that the seal lips are positioned horizontally relative to the journal axis, otherwise the seal may bend, which will lead to leaks. If the seal seating depth is not specified, it should be installed flush with the outer surface of the corresponding component.
Gaskets
When two components that are hermetically sealed together are separated (for example, cylinder head and block) do not introduce a lever between their mating surfaces. This is a serious error and can cause irreversible damage to the sealing surfaces, especially if the components are made of soft aluminum alloy.
The components can be separated by tapping along the perimeter of the joint with a soft-faced hammer, or with a regular hammer through a wooden block. Before installing a new gasket, both mating surfaces must be thoroughly cleaned of the old gasket material and traces of sealant.
Make sure that the replacement gasket matches the parameters of the old one and is correctly applied to the fastening and technological holes of the components being joined.
Cork and paper gaskets are subject to shrinkage and must be soaked in water before installation after long-term storage.
Bearings and bushings
If a special bearing/bushing extractor is not available, its equivalent can often be successfully made from scrap materials.
Bearings can often be removed from their shafts/axles by gently tapping them alternately from opposite sides (use a hammer and punch).
If you don't have a suitable press at hand, the bushing can be installed by clamping it together with its component in a vice. The vice can also be used to extract the bushing. This will require appropriately sized spacers, one of which should rest against the bushing, and the second, larger one, against the surface of the component. Instead of a vice, you can use a large and sufficiently strong clamp here.
The simplest tool for removing and installing bushings can be made from a long bolt, two washers (small and large), nuts and tubular spacers (see accompanying illustrations).
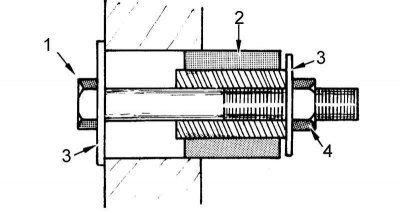
1 - bolt; 2 - bushing; 3 - washer; 4 - nut
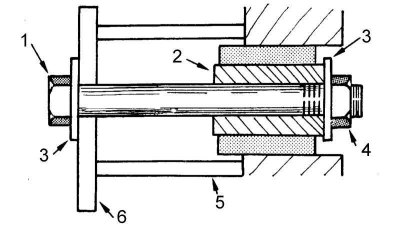
1 - bolt; 2 - bushing; 3 - washer; 4 - nut; 5 - spacer; 6 - large washer
Rubber bushings and bushings installed in blind holes are removed using a special type of flared bolt used by masons (Rawlbolt Loxin). Fit a suitable sized bolt into the bushing. Screw it tightly into the bushing. The bushing can now be pulled out by the bolt using a sliding hammer or a pair of levers.
Bushings installed in blind holes can also be extracted using hydraulic force. After filling the bushing hole with grease, insert a fairly tight-fitting punch into the hole and begin to tap it in. In this case, the bushing will begin to come out of the hole under the action of hydraulic pressure.
Crankshaft rotation
There are many situations where it becomes necessary to rotate the crankshaft to bring it to a certain position (for example, when setting the ignition timing, checking the valve timing, etc.).
To make it easier to turn the engine, remove the spark plugs - this will relieve the compression pressure.
The easiest way to turn the crankshaft is with a socket head (with drive) or a spanner, which should be placed on the crankshaft pulley nut. The shaft should be turned in the direction of normal rotation.
On vehicles with manual transmissions, the engine can be turned over by putting the transmission in high gear and pushing the vehicle. Alternatively, the vehicle can be lifted off the ground and, with the transmission in high gear, one of the drive wheels can be turned forward manually.
The crankshaft can also be brought to the closest position to the required position by briefly switching on the starter. The shaft position is then adjusted by turning the crankshaft by the pulley nut.