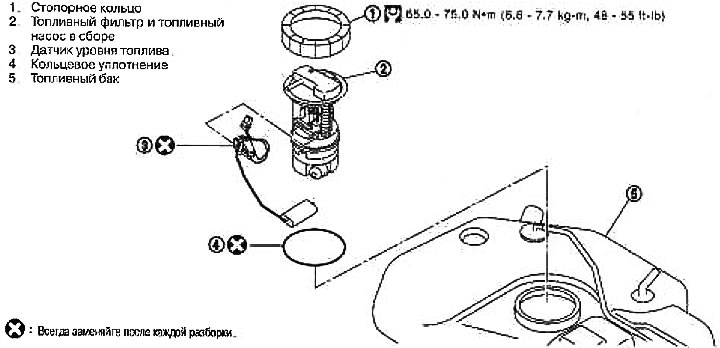
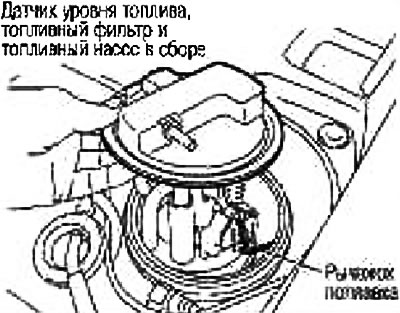
1. Retaining ring; 2. Fuel filter and fuel pump assembly; 3. Fuel level sensor; 4. O-ring; 5. Fuel tank
Removing
Attention: Before working on the fuel system, read «General Precautions».
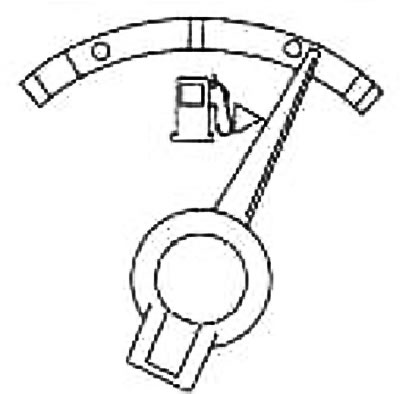
1. Check the fuel level, if the gauge shows the level is higher than the figure (full or almost full tank), drain the fuel tank and bring the gauge to the level shown in the figure or less.
If the fuel pump does not work, insert a hose with a diameter of less than 25 mm into the filler pipe through the hole and drain the fuel from the filler pipe. Disconnect the filler hose and pipe and drain the fuel from the filler hose.
Approximately the fuel level drops to the level shown in the figure or below after draining approx. 7 liters of fuel from the tank
Note: The fuel is drained to avoid spilling fuel when removing the fuel gauge, fuel filter, and fuel pump assembly.
2. Relieve fuel pressure. See chapter Engine management system.
3. See paragraphs. 5-7. Disconnect the connectors from the fuel level sensor, fuel filter and fuel pump assembly.
- A. Start the engine. After it stalls, crank it two or three times and depressurize the fuel line.
- b. Open the fuel filler door.
4. Remove the filler cap and relieve the pressure inside the fuel tank.
5. Remove the rear seat.
6. Remove the cover from the inspection hatch.
Remove the cover by turning the clips 90°clockwise with a screwdriver.
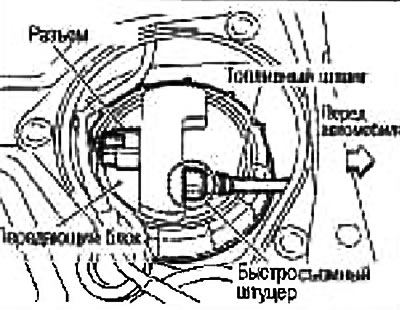
7. Disconnect the connector and fuel hose from the transmission unit.
Note: The transfer unit is the connection point for the electrical wiring connector and the fuel hose.
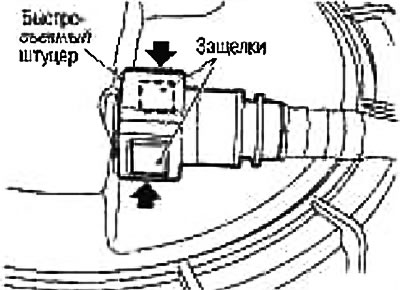
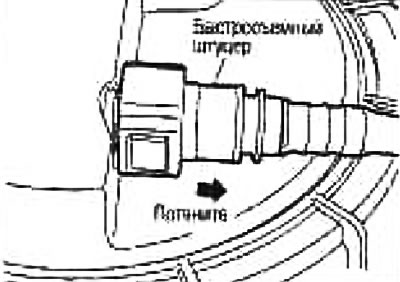
Disconnect the quick fitting as follows:
Grasp the fitting on both sides, press in the latches and remove the fuel tube.
If the nipple is stuck to the tube of the transmitter unit, move them back and forth a few times until they come free. Then disconnect them by pulling in different directions.
Attention:
- The tube can be detached when the latches are fully recessed.
- Do not twist it more than necessary.
- Do not disconnect the quick fitting with any tool.
- Protect the plastic tube from heat. Especially when carrying out welding work near the tube.
- Do not allow acidic liquids such as battery electrolyte, etc. to come into contact with the plastic tube.
- Do not bend or twist the plastic tube when connecting or disconnecting.
To keep the connection area clean and to prevent damage and foreign matter, completely cover it with plastic bags, etc.

Caution: To avoid damaging the O-ring, do not insert plugs in the quick fitting.
8. Turn out a lock ring by means of a key (special tool: KV993G0010).
Caution: Rotate the special tool while pushing the fuel gauge, fuel filter and fuel pump assembly as a spring is acting from inside the fuel tank outward.
9. Remove the fuel level sensor, fuel filter and fuel buildup assembly.
Attention:
- Do not bend the float lever when removing.
- Do not hit or drop components.
10. Temporarily install the retaining ring by hand-tightening it to the maximum torque.
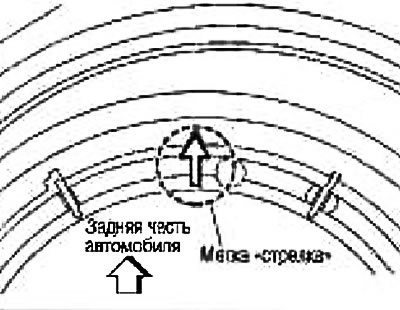
Rotate label «arrow» on the circlip towards the rear of the vehicle.
Caution: Do not remove the retaining ring until the fuel level sensor, fuel filter, and fuel pump assembly are installed.
11. Remove the fuel level sensor as follows:
- a. Disconnect connector (brown).
Grab the connector with your fingers as latch to release the stopper is not provided. Pull down at a right angle.
- b. Insert a screwdriver into the gap between the left side of the fuel level sensor and the fastener. Pry with a screwdriver in the direction of the arrow.

Attention: Do not damage the components.
When the locking latch moves to the side, slide the fuel level sensor in the direction of the arrow and remove.
Attention:
- Do not reuse the removed fuel level sensor.
- Do not disassemble the fuel filter and fuel pump assembly.
Installation
Installation is carried out in the reverse order of removal, taking into account the following:
Installing the fuel level sensor
1. Check for damage to the fuel gauge mounting on the fuel filter and fuel pump assembly side.
2. Insert the fuel level sensor into the groove. Insert the sensor all the way.
After installation, apply force in the opposite direction (withdrawal direction). Make sure the sensor does not come off.
3. Connect the connector. Insert the connector all the way.
Installing the fuel level sensor, fuel filter and fuel pump assembly
Install as follows:
1. Turn out a lock ring.
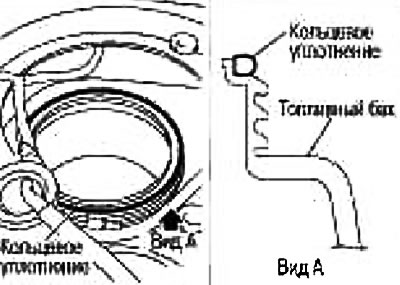
2. Place the O-ring on the fuel tank without twisting it.
3. Install the fuel gauge, fuel filter, and fuel pump assembly by aligning the tab at the back of the transmitter unit with the cutout at the back of the fuel tank opening.

Attention:
- Do not drop the O-ring.
- To prevent the O-ring from falling out (to maintain the state shown in figure p. 2, view A) firmly press the fuel level sensor, fuel filter and fuel pump assembly to the hole in the fuel tank until step 5 is completed.
4. Rotate label «arrow» on the circlip towards the rear of the vehicle.
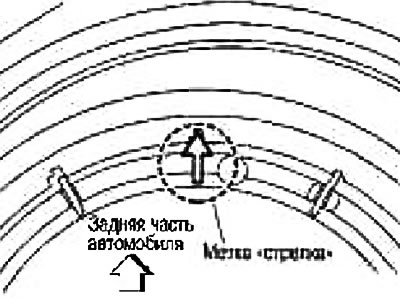
Then turn the retaining ring clockwise, hand-tighten it until it stops with maximum force.
Caution: Install the circlip horizontally.
5. Tighten the retaining ring to the required torque using a wrench (special tool: KV993G0010).
Fuel hose installation
Connect the quick fitting as follows:
1. Check the joints for damage and foreign particles.
2. Align the fitting with the transmitter unit, then insert the fitting into the tube at a right angle until it clicks into place.
3. After connecting, check that the connection is secure by pulling the tube and fitting by hand (see fig.).
Check after installation
Check for fuel leaks by doing the following:
1. Turn the ignition key to position «ON» (without starting the engine). After pressurizing the fuel lines, check for fuel leaks at the joints.
2. Start the engine. While revving the engine, recheck the fuel leak loops at the fuel line junctions.