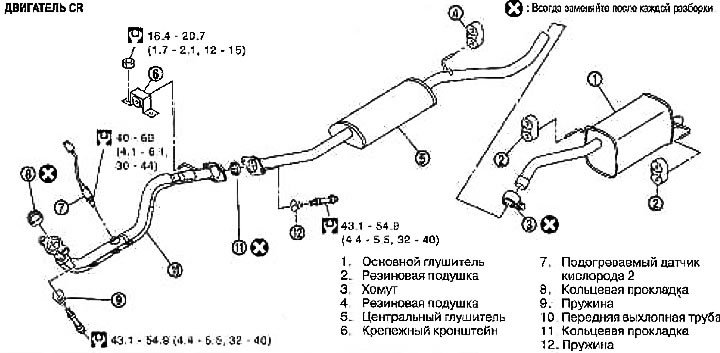
1. Main muffler; 2. Rubber cushion; 3. Collar; 4. Rubber cushion; 5. Central muffler; 6. Mounting bracket; 7. Heated oxygen sensor 2; 8. O-ring; 9. Spring; 10. Front exhaust pipe; 11. O-ring; 12. Spring
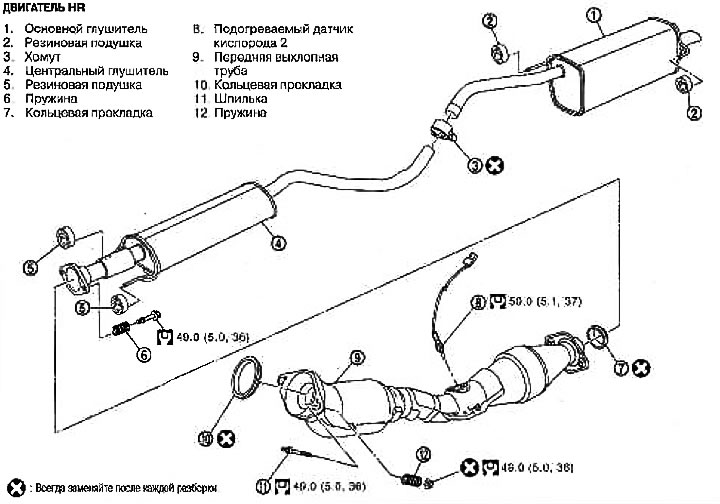
1. Main muffler; 2. Rubber cushion; 3. Collar; 4. Central muffler; 5. Rubber cushion; 6. Spring; 7. O-ring; 8. Heated oxygen sensor 2; 9. Front exhaust pipe; 10. O-ring; 11. Hairpin; 12. Spring
Attention:
- Use genuine exhaust system components or equivalent as they are designed for heat and corrosion resistance and shape.
- Carry out work on the exhaust system after it has completely cooled down, as immediately after the engine is stopped, the system is hot.
- Do not cut your hands on the edges of the insulator.
Removing
Disconnect all components by removing the fasteners.
Heated oxygen sensor 2 (engines CR, HR).
When removing the heated oxygen sensor 2 from the vehicle, proceed as follows:
1. Disconnect the connector.
2. Unscrew the sensor with a wrench (special tool).
Caution: Handle the sensor with care, do not drop or hit it.
Front exhaust pipe (engines CR, HR)
1. Detach the center muffler at the attachment points.
2. Disconnect the ground cable from the vehicle.
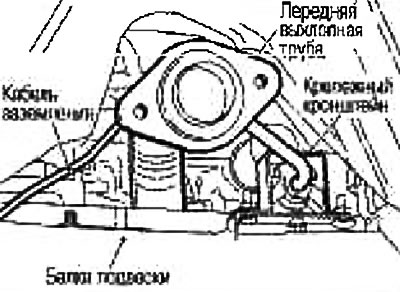
3. Turn off fixing nuts of a fixing arm on a suspension beam.
4. Disconnect the three way catalytic converter at the attachment points and remove the front exhaust pipe.
Installation (engines CR, HR)
Installation is carried out in the reverse order of removal, taking into account the following:
Remove all deposits, eg old gasket, from sealing joint surfaces. Connect them securely to avoid exhaust gas leakage.
When installing the front exhaust pipe assembly, finger-tighten the mounting nuts on the bolts on the exhaust manifold side and the mounting bolts on the vehicle side. Check for excessive mechanical stress, then tighten the nuts and bolts to the correct torque.
When installing the rubber pads, do not twist or stretch them in any direction.
The rubber pads mounted on the rear side of the center muffler and on the side of the main muffler have different thicknesses. Install thicker rubber pads on the side of the main muffler.
Install the O-ring as follows:
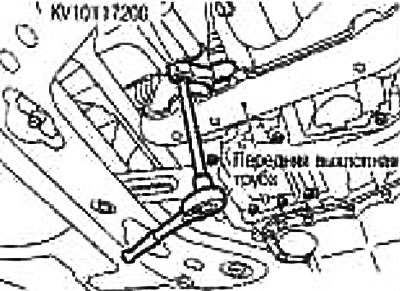
Install the heated oxygen sensor 2 with a wrench (special tool: KV10117200)
Attention:
- Handle the sensor with care, do not drop or hit it.
- Discard the heated oxygen sensor 2, if it has been dropped from a height of more than 0.5 m onto a hard surface, such as a concrete floor, replace it with a new one.
- Do not overtorque the heated oxygen sensor 2. Overtightening can damage the sensor and cause the MIL to come on «MI».
- Tightening the heated oxygen sensor 2 with a wrench (special tool: KV10117200), tighten to half of the specified torque as the reading may increase slightly due to the length of the tool. Do not over tighten.
Joint «three-way catalytic converter - front exhaust pipe»
1. Firmly insert the O-ring into the three-way catalytic converter in the direction shown in the illustration.
Caution: Be careful not to damage the surface of the O-ring when installing.
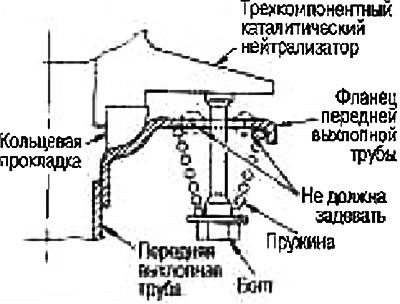
2. Tighten the mounting bolt by placing the large side of the spring against the front exhaust flange.
Tighten the mounting bolt and make sure that no part touches it.
Joint «front exhaust pipe - central muffler»
1. Firmly insert the O-ring into the front exhaust pipe in the direction shown in the figure.
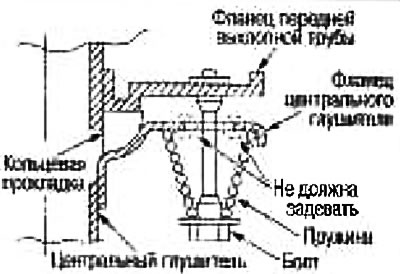
Caution: Be careful not to damage the surface of the O-ring when installing.
2. Tighten the fixing bolt with the larger side of the spring against the center muffler flange.
Tighten the mounting bolt and make sure that no part touches it.
Check after installation
Start the engine and check for exhaust leaks at the joints of the exhaust pipes and extraneous noise.
After installation, make sure that there is no excessive mechanical stress in the mounting brackets and rubber pads. If these components are installed incorrectly, excessive noise or vibration may be transmitted to the bodywork.