


Table of contents: Removal ↓ Installation ↓
Fuel must be supplied to the injectors at the correct pressure, in sufficient volume and within a certain temperature range. There should be no fuel vapor or air bubbles in the fuel. All this is provided by an electric fuel pump.
The fuel pump is located in the fuel tank.
Fuel pump mounting elements

1 - retainer; 2 - main fuel quantity sensor, fuel filter and fuel pump; 3 - additional fuel quantity sensor; 4 - sealing ring; A - left side; B - right side.
Removal
It is necessary to remove the fuel pump if it does not work.
Check the amount of fuel in the tank using the fuel gauge. If the fuel tank is full or nearly full, drain enough fuel from the tank until the gauge needle is positioned as shown in the illustration or below.
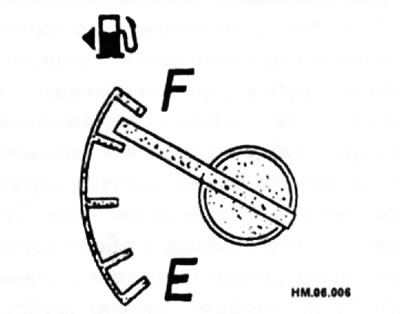
- To drain the fuel, insert an auxiliary tube or hose with a diameter of no more than 25 mm into the fuel filler pipe through the opening of the tank filler neck.
- Disconnect the fuel tank hose from the fuel filler pipe.
- To siphon fuel from the tank, insert the auxiliary tube or hose through the fuel tank hose into the tank.
Caution: Never suck out fuel by mouth! Use a special device, available at auto parts stores.
- Typically, the fuel level in the fuel tank drops to the value shown in the figure or lower after draining approximately 20 liters of fuel.
- Release the fuel pressure in the fuel lines.
- Open the fuel tank cap.
- Open the fuel tank cap and release the pressure inside the tank (if the fuel was not drained).
- Remove the rear seat cushion trim and cushion bolts, then lift the rear seat cushion.
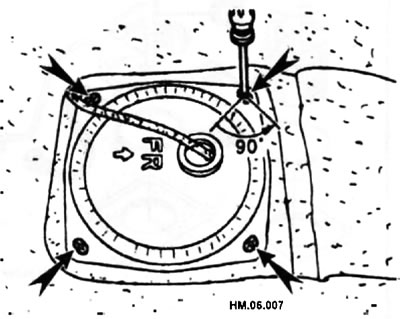
- By turning the clamps (arrows) counterclockwise by 90°, remove the cover of the inspection hole of the main and additional fuel quantity sensors.
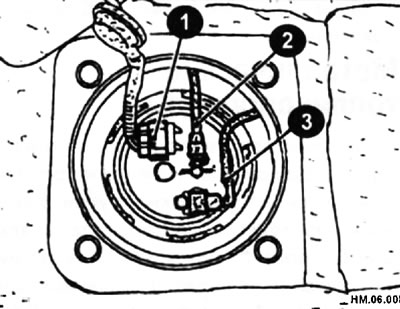
- Disconnect the wiring harness plug (1) and the quick-release connectors of the fuel tank vent hose (2) and the fuel supply line (3).
- Separate the fuel tank vent hose connectors.
- Press the tabs (arrows) and pull the hose to remove the connector.
- Separate the fuel tank vent hose connectors.
- Press the tabs (arrows) and pull the hose to remove the connector.
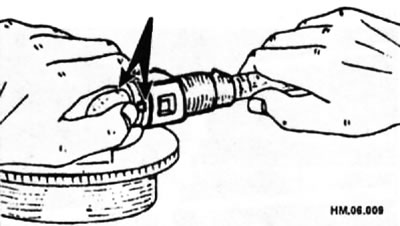
- The quick release connector can be separated by fully pressing the tabs. Do not twist the connector more than necessary to separate it. Do not use any tools or devices to separate the quick-release connector.
- Quick-release connectors require careful handling.
♦ Do not expose the plastic tube to heat. Be especially careful when welding near the pipe.
♦ Do not allow the plastic tube to come into contact with corrosive acids such as battery electrolyte, etc.
♦ When installing or disconnecting the plastic tube, do not bend or twist it.
♦ Do not remove any remaining clamps from the pipe unless the plastic tube or clamp is being replaced.
♦ If the plastic tube or pipe is replaced, the retainer must also be replaced. Retainer color: green.
- To keep the connectors clean, undamaged, and free of foreign objects, cover the connectors with plastic bags or something similar.
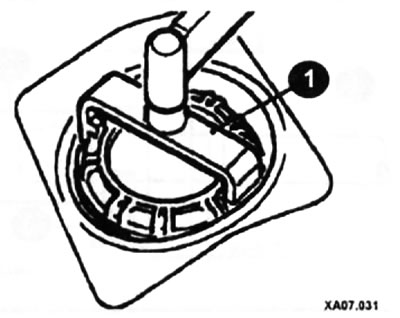
- Using a special open-end wrench (1), remove the fasteners of the main and additional fuel quantity sensors by unscrewing them counterclockwise.
- Remove the main fuel quantity sensor, fuel filter and fuel pump, as well as the additional fuel quantity sensor.
- Lift up the main fuel quantity sensor, fuel filter and fuel pump, separate the fuel hose connector by pressing the tabs and pulling out the hose, and disconnect the wiring harness plug of the auxiliary fuel quantity sensor.
- To remove the auxiliary fuel quantity sensor, lift it up and release it.
Installation
- Installation is carried out in the reverse order of removal, taking into account the following.
- Connect the fuel hose, pressing it inward until it stops, and the plug of the wiring harness of the additional fuel quantity sensor.
- Align the direction indicator mark on the main and additional fuel quantity sensors with the mark on the fuel tank as shown in the arrow illustration.
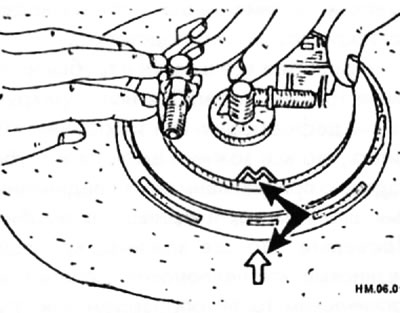
- Install the inspection hole cover so that the direction indicator mark (stamped arrow) was directed towards the front of the car (left and right). Secure the clamps by turning them clockwise.
- Check the quick release connector for damage or foreign objects or particles.
- Align the connector with the pipe, then insert the connector into the pipe until you hear a click.
- Pull on the pipe and the connector to make sure they are securely connected to each other.
- Check that the two locking tabs are in the connector.
- Turn on the ignition (without starting the engine) several times and check for fuel leaks at the fuel line connections after pressure has built up in the fuel lines.
- Start the engine and, while idling, check for fuel leaks in the fuel system connections.