Removing
Caution: Make sure you have a fire extinguisher near the work area. Keep open flames away from the work area. Work in a well ventilated area.
1. Models with SR20DE engine: Relieve fuel pressure.
2. Open the fuel filler door.
3. Unscrew the filler cap and relieve the vapor pressure of the fuel in the tank.
4. Remove pillows and backs of the second row of seats.
5. Remove the floor covering, then the inspection hole cover.
Use a screwdriver to turn the clip 90°clockwise, then remove the cover.

6. Disconnect the wiring connector and fuel hoses.
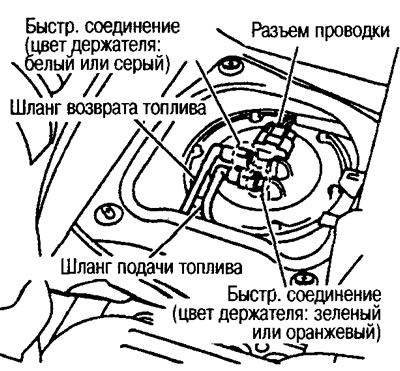
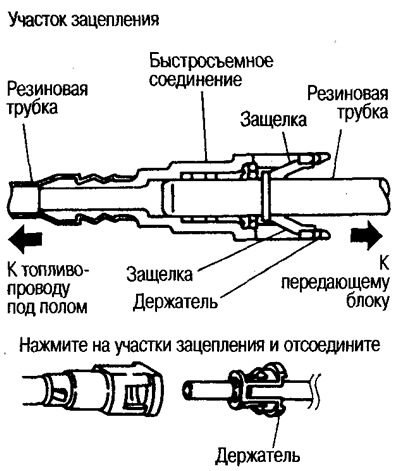
Remove quick couplings:
Pinch the latches on the sides of the holder with your fingers and pull it out.
If the connector and tubing on the transmitter side cannot be removed, pull it back and forth until it starts to move and remove.
Attention:
Do not heat the rubber tube. Be especially careful when welding near the tube.
Keep the rubber tube away from corrosive liquids such as battery electrolyte.
Do not twist or bend the tube during removal and installation.
Do not remove the holder from the tube side except when replacing the tube.
If you replace the tube, replace the holder with a new one.
Holder color:
- Fuel side: orange or green
- Fuel return side: white or gray
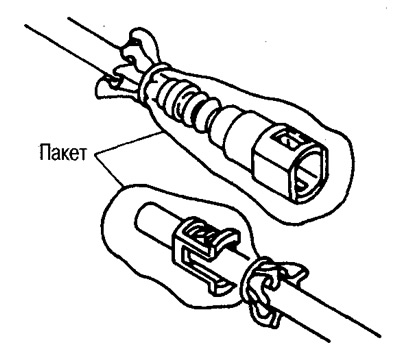
Wrap the connection in a bag to prevent contamination.
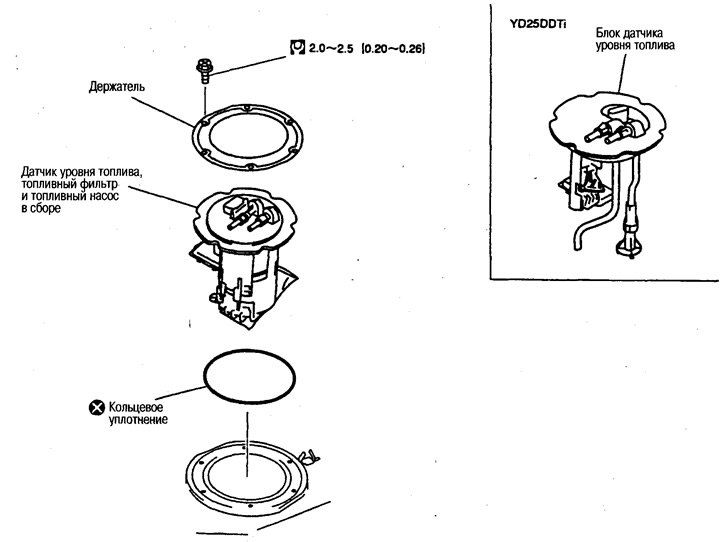
7. Remove fuel level sensor, fuel filter and fuel pump assembly (models with SR engine) or fuel gauge block (models with YD engine).
Attention:
Do not bend the float arm while removing.
Do not drop parts or subject them to shock.
Installation
Installation is carried out in the reverse order of removal, taking into account the following.
Check that there are no foreign particles on the fuel pump pre-filter (models with SR engine).
The hose connections of the transmission unit must point towards the front of the vehicle. Align the pin and hole for it on the side of the fuel tank.
Align the grooves so that they are parallel to the grooves on the fuel tank and install the holder.
Tighten the holder set screws evenly.
Caution: Use original mounting bolts.
Install the quick connectors in the following order:
(1) Check the connection for damage and contamination.
(2) Align the connection on the center of the tube axis and insert the tube without distortion so that the connection clicks with a characteristic sound.
(3) After installation, make sure the connection is fixed tightly.
Make sure the two clips on the holder are locked into place.
Pull the tube and connection and make sure they are tight.
Examination
Start the engine, rev up and check for fuel leaks.