


Vehicle heating and air conditioning Nissan Serena 2 (C24)

Temperature control cable (manual air conditioner)
Adjustment 1. Remove the clip securing the cable sheath. 2. Turn the temperature control lever to the maximum heating position. 3. Press the mixing flap lever in the...
Adjustment 1. Remove the clip securing the cable sheath. 2. Turn the temperature control lever to the maximum heating position. 3. Press the mixing flap lever in the...

Fan selector cable (manual air conditioner)
Adjustment 1. Remove the clip securing the cable sheath. 2. Turn the blower switch to the position «VENT». 3. Press link 1 of the blower selector damper, at the same...
Adjustment 1. Remove the clip securing the cable sheath. 2. Turn the blower switch to the position «VENT». 3. Press link 1 of the blower selector damper, at the same...

Intake air volume control cable (manual air conditioner)
Adjustment 1. Remove the cable sheath clip. 2. Turn the intake flap lever to the position «air intake». 3. Press the intake damper rod in the direction of the arrow, at...
Adjustment 1. Remove the cable sheath clip. 2. Turn the intake flap lever to the position «air intake». 3. Press the intake damper rod in the direction of the arrow, at...

Control unit (manual air conditioner) — removal and installation
1. Remove trim A, unscrew the fixing screws. 2. Remove the cables for temperature control, airflow selection and intake air volume control. 3. Disconnect the wiring...
1. Remove trim A, unscrew the fixing screws. 2. Remove the cables for temperature control, airflow selection and intake air volume control. 3. Disconnect the wiring...

Control unit (manual air conditioner) — disassembly and assembly
Adjustment cables Fasten the cable to the lever as shown in the figure so that the latches are fixed. Clamp the cable sheath and secure it.
Adjustment cables Fasten the cable to the lever as shown in the figure so that the latches are fixed. Clamp the cable sheath and secure it.

Control unit (automatic air conditioner)
Removal and installation Preparatory work Remove trim A from the dashboard. Disassembly and assembly Attention: Do not remove the LCD display unit from the front case...
Removal and installation Preparatory work Remove trim A from the dashboard. Disassembly and assembly Attention: Do not remove the LCD display unit from the front case...

Rear air conditioner switch
To access, remove the rear air conditioning unit assembly. Then, remove the switch from the rear air conditioner unit by sliding it in the direction of the arrow and...
To access, remove the rear air conditioning unit assembly. Then, remove the switch from the rear air conditioner unit by sliding it in the direction of the arrow and...

Electric motor of the supercharger fan
Removal and installation Attention: Do not touch the fan blades. Do not disassemble the motor and fan. Check for leaks after installation.
Removal and installation Attention: Do not touch the fan blades. Do not disassemble the motor and fan. Check for leaks after installation.

Supercharger block assy
Removal and installation 1. Remove the central lower section of the instrument panel. 2. Disconnect the intake air volume control cable (manual air conditioner) or...
Removal and installation 1. Remove the central lower section of the instrument panel. 2. Disconnect the intake air volume control cable (manual air conditioner) or...

Intake damper drive (automatic air conditioning)
Preparatory work Remove the front blower assembly. Attention: When installing the intake flap actuator, position it so that it fits snugly into the 1 flap link hole....
Preparatory work Remove the front blower assembly. Attention: When installing the intake flap actuator, position it so that it fits snugly into the 1 flap link hole....

Air filter ventilation
Preparatory work Remove the glove box assembly. Replacement Change (or flush) ventilation air filter once a year or every 12,000 km. The type of filter is indicated on a...
Preparatory work Remove the glove box assembly. Replacement Change (or flush) ventilation air filter once a year or every 12,000 km. The type of filter is indicated on a...

Electric motor of the rear air conditioner fan
Preparatory work Remove the rear air conditioner lower housing. Attention: After installation, check for leaks. Air conditioning with manual control - preparatory work...
Preparatory work Remove the rear air conditioner lower housing. Attention: After installation, check for leaks. Air conditioning with manual control - preparatory work...

Cooling-discharge unit — removal and installation
Removing 1. Set the temperature control to maximum, turn the mode selector to «DEF» (manual air conditioner). 2. Discharge the refrigerant into the recovery/recharge...
Removing 1. Set the temperature control to maximum, turn the mode selector to «DEF» (manual air conditioner). 2. Discharge the refrigerant into the recovery/recharge...

Cooling-pressure unit — disassembly and assembly
Attention: Automatic air conditioning: after installing the drives, set them to their original position (step 3 self-diagnosis, see below). Air conditioner with manual...
Attention: Automatic air conditioning: after installing the drives, set them to their original position (step 3 self-diagnosis, see below). Air conditioner with manual...

Ventilation ducts and grilles, windshield blower duct — removal and installation
Preparatory work Remove the dashboard. Central ventilation grill - preparatory work Remove the dashboard. Side ventilation grilles - preparatory work Remove the...
Preparatory work Remove the dashboard. Central ventilation grill - preparatory work Remove the dashboard. Side ventilation grilles - preparatory work Remove the...

Airflow ducts at floor level and rear heater grille
1. Remove the lower section of the instrument panel from the front passenger side. 2. Remove the mounting stand cover. 3. Remove the center and side (right and left) air...
1. Remove the lower section of the instrument panel from the front passenger side. 2. Remove the mounting stand cover. 3. Remove the center and side (right and left) air...

Rear air conditioner grilles — preparatory work
Remove the rear air conditioner lower housing.
Remove the rear air conditioner lower housing.

Rear air conditioning covers — preparatory work
Remove the left and right curtain rails (models with electric blinds).
Remove the left and right curtain rails (models with electric blinds).

The lower housing of the rear air conditioner — removal and installation
1. Remove the rear air conditioner switch and slide it so that it does not interfere with operation. To remove the switch, release it from the four clips. 2. Remove the...
1. Remove the rear air conditioner switch and slide it so that it does not interfere with operation. To remove the switch, release it from the four clips. 2. Remove the...

Rear drain hoses — removal and installation
1. Remove the ceiling trim. 2. Remove finishing of central racks and reels of seat belts. 3. Remove the floor covering. 4. Remove clips and brackets. 5. Disconnect drain...
1. Remove the ceiling trim. 2. Remove finishing of central racks and reels of seat belts. 3. Remove the floor covering. 4. Remove clips and brackets. 5. Disconnect drain...

Compressor — removal and installation
Removing 1. Discharge the refrigerant into the HFC-134a recovery/charge unit. 2. Remove the lower right engine protection. 3. Remove the compressor belt (models with SR...
Removing 1. Discharge the refrigerant into the HFC-134a recovery/charge unit. 2. Remove the lower right engine protection. 3. Remove the compressor belt (models with SR...

Rear air conditioner unit
Attention: Do not reuse the insulator, replace it with a new one. Union nut for expansion valve and evaporator inlet pipe: : 9,8-19,6 N-m (1.0-2.0 kg m) Union nut...
Attention: Do not reuse the insulator, replace it with a new one. Union nut for expansion valve and evaporator inlet pipe: : 9,8-19,6 N-m (1.0-2.0 kg m) Union nut...
Diagnostics of malfunctions of the conditioner
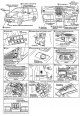
Location of components System Description On vehicles with automatic air conditioning, the cabin temperature, outside air temperature, evaporator air temperature and...
Location of components System Description On vehicles with automatic air conditioning, the cabin temperature, outside air temperature, evaporator air temperature and...
Diagnostics of malfunctions of the conditioner with manual control
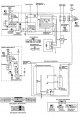
Checking the magnetic clutch system Checking the magnetic coupling Disconnect the connector from the air conditioning compressor, check the operation of the compressor...
Checking the magnetic clutch system Checking the magnetic coupling Disconnect the connector from the air conditioning compressor, check the operation of the compressor...
Diagnostics of malfunctions of the automatic conditioner
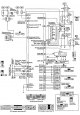
Wiring diagram Standard input / output voltages of the air conditioner regulator
Wiring diagram Standard input / output voltages of the air conditioner regulator

Fault self-diagnosis function
Description There are five procedures for self-diagnosis. In each of them, control signals are issued, with the help of which it is checked whether there is a...
Description There are five procedures for self-diagnosis. In each of them, control signals are issued, with the help of which it is checked whether there is a...

Checking the components of the rear air conditioner unit
Cabin air temperature sensor Disconnect the connector from the interior air temperature sensor, check the resistance between pins #1 and #2 of the connector on the...
Cabin air temperature sensor Disconnect the connector from the interior air temperature sensor, check the resistance between pins #1 and #2 of the connector on the...
This section is available on: russian, bulgarian, belarusian, ukrainian, serbian, croatian, romanian, polish, slovak, hungarian
Similar information for other Nissan models
➜ User manual: Heating, air conditioning and audio Nissan Almera 1 (1995-2000)
➜ Body: Heating and air conditioning Nissan Qashqai 1 (2006-2013)
➜ Power unit: Heating and ventilation Nissan Sunny 7 (1990-1998)
➜ Power unit: Heating and ventilation Nissan Micra 3 (2002-2010, petrol)
Link in different formats to this section
TEXTHTMLBB Code
- General information
- Control devices
- User manual
- Power unit
- Petrol engine SR20DE
- Diesel engine YD25DDTi
- Cooling and lubrication system
- Engine management SR20DE
- Engine management YD25DDTi
- Power and exhaust system
- Transmission
- Automatic gearbox
- Drive and cardan shafts
- Transfer case
- Chassis
- Front suspension
- Rear suspension
- Brake system
- Steering
- Body
- Safety system
- Interior (internal elements)
- Exterior (external elements)
- Doors, locks and windows
- Heating and air conditioning
- Electrical equipment
- Equipment and devices
- Lighting system
- Windshield wipers and washers
- Electrical circuits
NissanBook.ru © 2018–2024 · Mobile version · Articles about Nissan · Sitemap: EN BG BY UA RS HR RO PL SK HU · Feedback · Site search · Bookmark
Almera 1 (N15) · Maxima 4 (A32) · Terrano 1 (petrol) · Patrol 4 (Y60, petrol) · Example 1 (P10, petrol) · Qashqai 1 (J10) · Serena 2 (C24) · Sunny 7 (B13) · Note 1 · Micra 3 (petrol) ·
Almera 1 (N15) · Maxima 4 (A32) · Terrano 1 (petrol) · Patrol 4 (Y60, petrol) · Example 1 (P10, petrol) · Qashqai 1 (J10) · Serena 2 (C24) · Sunny 7 (B13) · Note 1 · Micra 3 (petrol) ·