


Table of contents: Removal ↓ Installation ↓
Removal
1. Disconnect the negative cable from the battery.
Warning! If the car stereo system is equipped with a security code, make sure you have the correct combination to activate the audio system before disconnecting the battery!
2. Set the parking brake and chock the rear wheels of the vehicle.
3. Jack up the car and place it on supports.
4. Remove the crankcase guard and the right cover.
5. Remove the exhaust pipe (see Chapter Power and exhaust systems).
6. Drain the engine oil (see Chapter Settings and ongoing maintenance).
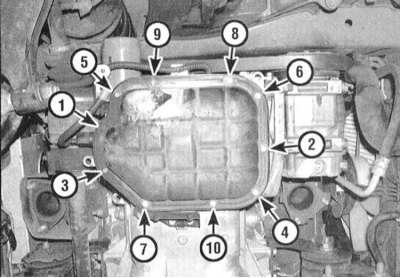
7. The oil pan consists of two sections. The lower stamped steel cover is attached to the upper aluminum section, which in turn is bolted to the engine block. Moving in the reverse order shown in the illustration, unscrew the mounting bolts and remove the lower stamped section of the pan.
Attention! To avoid compromising the tightness of the component joint, do not use a lever to pry the cover under the mating surface!
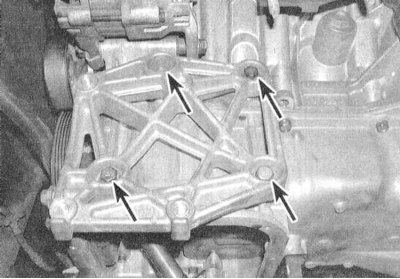
8. Remove the air conditioning compressor (see Chapter Cooling and heating systems) and slide it to the side without disconnecting the refrigeration lines. Remove the mounting bracket securing the compressor support bracket to the pan.
9. Suspend the engine from above using a winch or beam.
Attention! Make sure that the unit is securely fixed in the raised position.
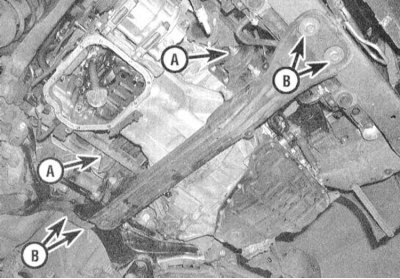
10. Unscrew the through bolts of the front and rear powertrain suspension mounts and the crossmember mounting bolts. Remove the crossmember from the vehicle complete with mounts. Remove the oil filter.
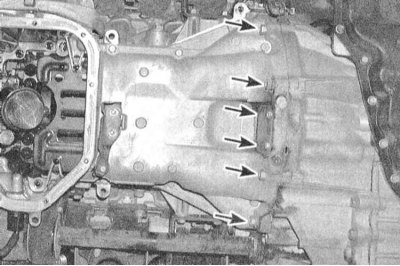
11. Remove the bolts securing the rear cover plate and transmission dome to the aluminum section of the pan.
12. Moving from the edges to the center in the reverse order of tightening, unscrew the bolts securing the upper aluminum section of the pan to the engine block.
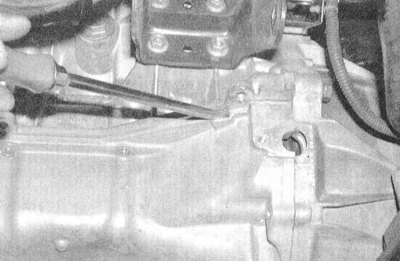
13. To separate the aluminum section of the tray from the block, pry it under the groove provided in the casting on the front side. Try not to damage the mating surfaces.
Installation
1. Thoroughly clean the mating surfaces of the aluminum pan section and the engine block, completely removing all traces of the old gasket material and sealant. Wipe the cleaned surfaces with a rag soaked in acetone.
Caution: To avoid leaks, try not to damage the mating surfaces during the cleaning process.
2. Make sure that the threaded holes in the engine block and the aluminum section of the pan are absolutely clean - if necessary, run them through with a tap of the appropriate size.
3. Apply RTV sealant to the ends of the front timing cover gasket, then place the gaskets on the aluminum pan section. Apply the same sealant to the aluminum section mounting flange.
Note: The pan must be installed on the engine within 15 minutes of applying the sealant.
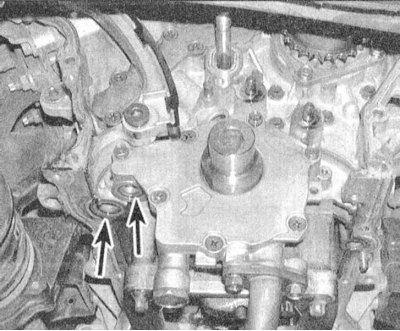
4. Install new sealing rings into place on the front wall of the engine and the oil pump housing.
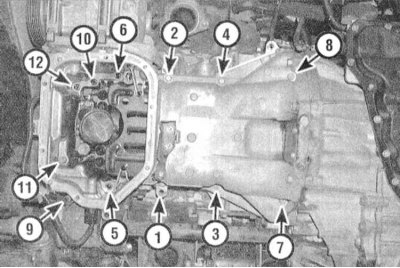
5. Being careful not to destroy the sealant cushion, carefully press the aluminum section of the pan to the block. Screw in the mounting bolts and, acting in a strictly defined order, tighten them in three or four steps with the required force.
6. Screw in the bolts securing the rear cover plate and transmission dome.
7. Check the flange of the stamped bottom section of the tray for signs of deformation, paying particular attention to the condition of the flange around the mounting holes. If necessary, straighten the flange by placing it on a flat wooden block.
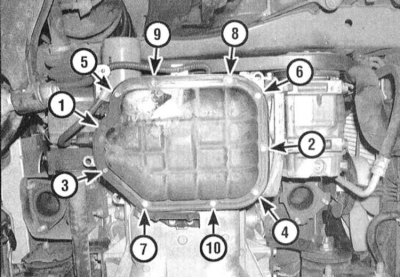
8.Apply a bead of RTV sealant to the mating surface of the oil pan flange and install the oil pan on the engine.
Note: The pan must be installed within 15 minutes after applying the sealant. Tighten the pan mounting bolts to the required torque in a strictly defined order.
9. Further installation is carried out in the reverse order of dismantling the components.
10. Allow the sealant to dry for about 30 minutes, then install a new oil filter and fill the unit with fresh engine oil. Start the engine and check the engine oil pressure. Make sure there are no leaks.