


SOHC Engine Components
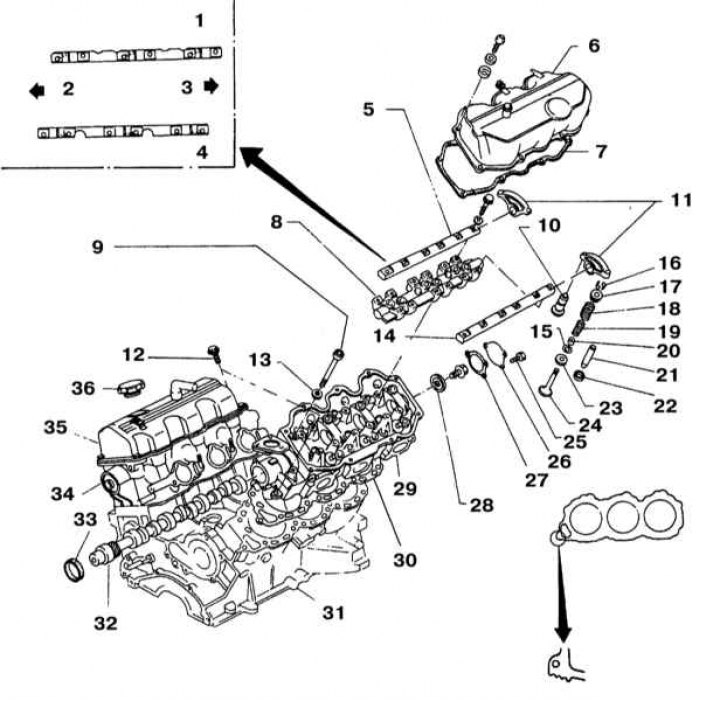
1 - Exhaust valve drive rocker arm shaft; 2 - Direction forward on the right head; 3 - Forward direction on the left head; 4 - Intake valve drive rocker arm shaft; 5 - Intake valve drive rocker arm shaft; 6 - Cylinder head cover; 7 - Sealing gasket; 8 - Assembly of valve tappet guides; 9 - Bolt; 10 - Hydraulic pusher; 11 - Valve drive rocker arm; 12 - Bolt M6 with washer; 13 - Washer; 14 - Exhaust valve drive rocker arm shaft; 15 - Inner spring seat; 16 - Split Lock Crackers; 17 - Valve spring plate; 18 - Outer valve spring; 19 - Inner valve spring; 20 - Oil deflector cap; 21 - Guide bushing; 22 - Valve seat; 23 - Outer spring seat; 24 - Exhaust valve; 25 - Bolt; 26 - Cylinder head rear cover; 27 - Rear cover sealing gasket; 28 - Camshaft thrust plate; 29 - Left cylinder head; 30 - Sealing gasket; 31 - Cylinder block; 32 - Left camshaft; 33 - Front camshaft oil seal; 34 - Right cylinder head; 35 - Cylinder head cover; 36 - Engine oil filler cap
DOHC Engine Components
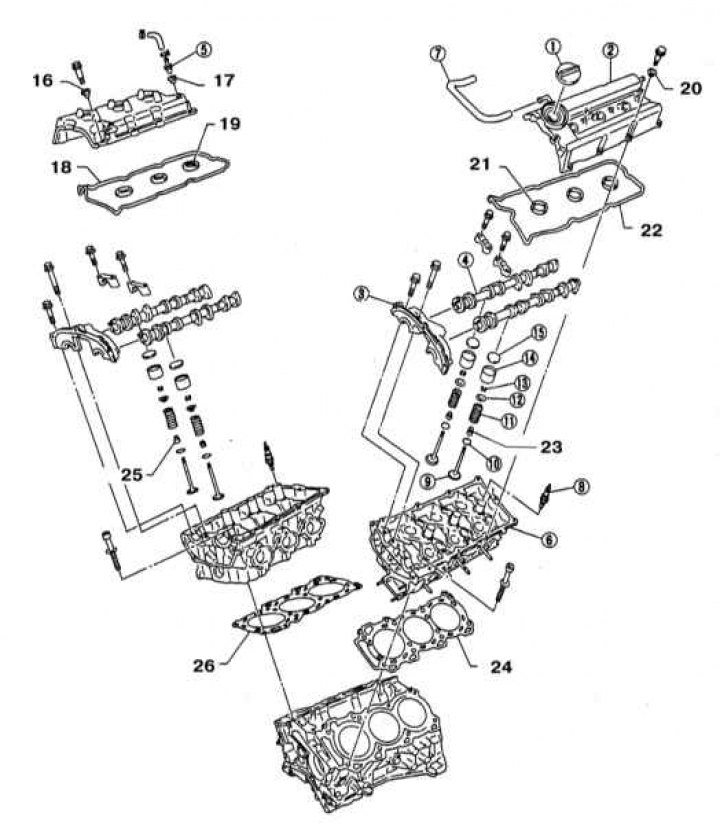
1 - Engine oil filler cap; 2 - Cylinder head cover; 3 - Camshaft holder; 4 - Camshaft; 5 - PCV valve; 6 - Cylinder head; 7 - Hose; 8 - Spark plug; 9 - Valve; 10 - Valve spring seat; 11 - Valve spring; 12 - Valve spring plate; 13 - Split lock crackers; 14 - Valve tappet; 15 - Adjusting washer; 16 - Washer; 17 - Sealing washer; 18 - Sealing gasket; 19 - Sealing washer; 20 - Washer; 21 - Sealing washer; 22 - Sealing gasket; 23 - Oil deflector cap; 24 - Sealing gasket; 25 - Oil deflector cap; 26 - Sealing gasket
1. The easiest way to disassemble an engine is to install it on a portable mounting stand. This kind of device can always be borrowed relatively inexpensively from a car service workshop. Before securing the engine on the stand, it is necessary to remove the flywheel/drive disk from it.
2. If it is not possible to use a stand, disassemble the engine by placing it on a sturdy workbench or by placing it securely on a hard garage floor. When working without a stand, make sure that the engine does not accidentally tip over.
3. If you plan to replace the engine with a remanufactured one, remove all attachments and external components from the old one and transfer them to the replacement unit. The components to be replaced include:
- a) Generator with brackets;
- b) Components of emission control systems;
- c) Distributor, spark plugs and spark plug wires - SOHC engines
- d) Thermostat with casing cover;
- e) Water pump;
- f) Components of the injection system (EFI);
- g) Intake manifold and exhaust manifold;
- h) Oil filter
- i) Powertrain suspension supports;
- j) Flywheel/drive disk;
- k) Engine Back Plate - SOHC Engines;
- l) Crankshaft rear oil seal holder.
Note: When removing external components from an old engine, try to remember the characteristic features of their installation. Record in a notebook the mounting positions of gaskets, seals, spacers and bushings, pins, brackets, washers, bolts and other small parts.
4. When selecting a diagram using a reduced block kit consisting of a cylinder block with a crankshaft and connecting rod and piston groups installed in it, also remove the cylinder heads, oil pan and oil pump from the old unit (for possible alternatives to the overhaul diagrams, see Section Alternative options for engine repair schemes).
5. When performing a complete overhaul of the old unit, disassemble it and remove all internal components. The optimal order of the engine disassembly procedure is given below:
SOHC engines
- a) Cylinder head covers;
- b) Assemblies of rocker arms with axles;
- c) Valve lifters with guide assembly;
- d) Timing belt covers with bolts;
- e) Timing drive (timing belt with toothed wheels);
- f) Cylinder heads;
- g) Camshafts;
- h) Oil sump with oil intake;
- i) Oil pump;
- j) Connecting rod and piston assemblies;
- k) Crankshaft and main bearings;
DOHC engines
- a) Cylinder head covers;
- b) Stamped section of the oil pan;
- c) Cast aluminum oil pan section;
- d) Front timing belt cover;
- e) Timing drive components (main and secondary chains with sprockets);
- f) Rear timing belt cover;
- g) Camshafts with valve tappets;
- h) Cylinder heads;
- i) Oil pump with oil pickup;
- j) Connecting rod and piston assemblies;
- k) Crankshaft and main bearings.
6 Before you begin disassembling the engine, prepare the following necessary materials and tools (see also Section Engine assembly procedure):
- a) Standard set of locksmith tools;
- b) A set of cardboard or plastic containers/polyethylene bags for organized storage of small components;
- c) Scraper for cleaning mating gasket surfaces;
- d) Countersink for removing stepped wear on the top of the cylinders;
- e) Puller for dismantling the torsional vibration damper;
- f) Set of micrometers;
- g) Telescopic bore gauge;
- h) Dial plunger type meter (DTI);
- i) Valve spring compressor tool;
- j) Honing for processing cylinder mirrors;
- k) Tool for cleaning grooves for installing piston rings;
- l) Electric drill;
- m) Set of taps and guides;
- n) Wire brushes;
- o) Cylindrical brushes for cleaning oil galleries;
- p) Solvent.