


Table of contents: Removal ↓ Installation ↓
Removal
1. Loosen the screw securing the remote control handle trim to the door panel. Remove the trim.
2. On models with manual window lift handle, remove the window handle using a clip removal tool. If you do not have this tool, pry up the handle trim with a thin, strong wire bent into a hook at the end. Lower the hook into the catch under the drive handle and, pulling the wire, remove the catch from the end of the handle, then remove the handle from the door. Alternatively, the handle can be removed using a strong cloth tucked under it. To remove the catch, pull firmly on the corners of the cloth.
3. On models with a separate armrest, loosen the mounting screws and remove the armrest from the door.
4. On models with power windows with individual switches, remove the switch from the door trim panel and disconnect its electrical connector. Be careful not to damage the switch panel.
5. On models with a window switch built into the armrest, proceed as follows:
- Remove the trim from the bottom of the door handle grip and loosen the screws underneath. Using a flat-head screwdriver, carefully pry the grip handle off the armrest assembly.
- Using a flat-head screwdriver, carefully pry the window switch panel out of the armrest assembly. Disconnect the electrical connector and move the switch panel away from the work area.
- Remove the screws securing the armrest to the interior door panel. Leave the armrest attached to the door trim panel.
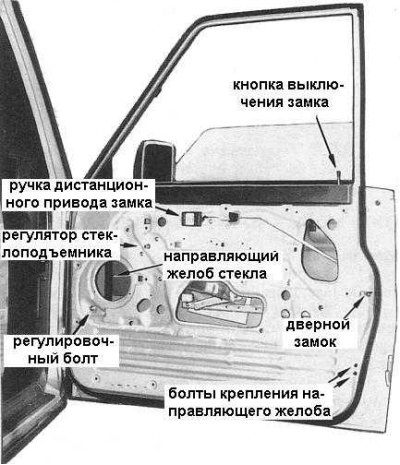
6. Insert a thin, flat-tipped screwdriver between the trim panel and the door frame as close to one of the clips as possible. Pry up and remove the trim panel clips one at a time. Remove the panel from the door (the front door with the trim panel, speaker and sealing film removed is shown in the accompanying illustration).
Note: When removing the door trim panel, the plastic clips should be left attached to the back of the panel. If the clips are left in the inner door panel, they may be damaged. If problems occur, use a suitable cutter and insert the blade between the trim panel and the door frame to cut the clip. Be careful not to damage the trim or paint on the door.
7. Remove the speaker mounting screws, disconnect the electrical wiring and remove the speaker from the door.
8. Carefully remove the polymer sealing film from the inner door panel.
Installation
Installation is carried out in reverse order.
1. Make sure that the polymer sealing film is correctly placed on the door panel. It is better to replace a torn or otherwise damaged film.
2. Replace damaged trim panel fasteners.
3. Carefully install the trim panel onto the door, snapping the clips into place one by one.
4. On models with manual window raise/lower drive, install the window lifter handle trim, the handle itself and its retainer on the door. Make sure that the relative positions of the handle and the window glass correspond to that on the opposite door.
Note: The window handle retainer must be installed into the handle before the handle is placed onto the regulator shaft journal.