Removing
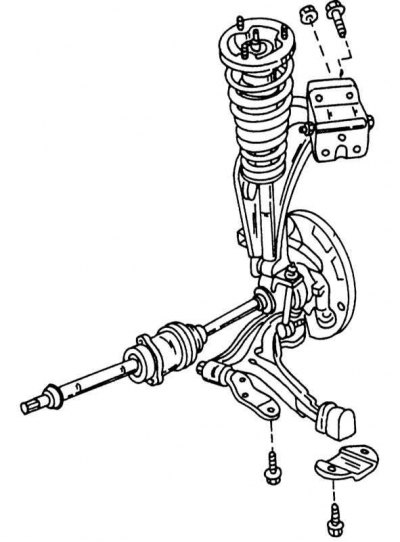
View of the front suspension from one side.
As you can see from the illustration above, Nissan's new front suspension has an unusual look. Although shock struts with coil springs and hydraulic dampers are used, the underside of the shock strut is equipped with a mount that is commonly used on a rear shock absorber. Removal and installation thanks to this constructive decision are carried out very simply.
It should be remembered that the suspension strut cannot be disassembled, i.e. if the shock absorber has lost its shock-absorbing properties, the entire strut should be replaced.
1. Raise the front of the vehicle and place it on stands.
2. Remove the wheel.
3. Place a lift under the transverse arm and raise it slightly.
4. On the inside of the engine compartment, loosen the three nuts that hold the shock strut to the support from above. Do not remove the nut in the middle as it holds the suspension strut in place. In case of replacement of parts of the suspension strut, it can be unscrewed.
5. Loosen the bolt and nut on the underside of the shock absorber, knock out the bolt and release the shock absorber.
6. Slowly lower the lift while simultaneously disengaging the steering knuckle from the suspension strut.
Dismantling the suspension strut
If it is necessary to disassemble the suspension strut before starting work, the following points must be taken into account:
The coil springs of the various models described in this manual differ from each other. In addition, various springs are installed depending on the installed engine. Please keep this in mind when ordering new parts. Springs are color coded. Also, the springs must not be interchanged if both springs are removed.
To replace the shock absorber, the rack is not disassembled. If the damping properties are lost or the piston rod is worn, the entire shock absorber must be replaced.
When replacing the coil spring, make sure that dirt does not get into the suspension strut.
Never clamp the suspension strut in a vise, but make a plate to which the strut can be screwed. The plate can be clamped in a vise.
The illustration below shows the replaceable parts of the suspension strut.
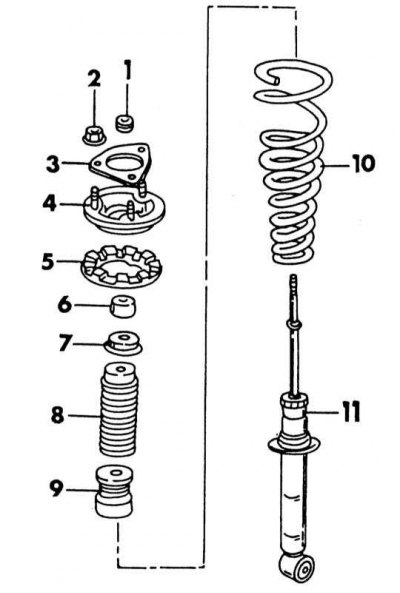
Separate shock absorber elements
1 - upper rubber bushing; 2 - nut, 45-55 Nm; 3 - gasket; 4 - upper spring support; 5 - upper rubber cushion; 6 - upper rubber bushing; 7 - cup; 8 - dustproof cuff; 9 - compression stroke buffer; 10 - helical spring; 11 - suspension strut
A spring compressor is required for disassembly.
1. Referring to the illustration below, compress the spring until the upper leg of the upright cannot be rotated by hand. Two clamping hooks can be used for this.
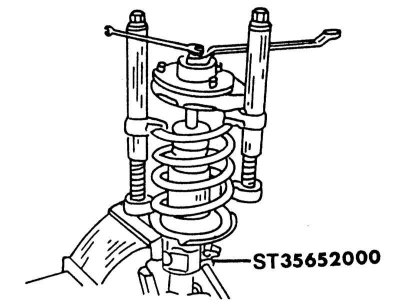
Loose piston rod nut. The spring is compressed by the decompressor and a wrench is used to hold the stem.
2. Loosen the piston rod nut on the inside of the top support while holding the piston rod with a wrench, as shown in the illustration.
3. Based on illustrations remove all parts of the upper support and then the coil spring from the spring strut. Be careful not to scratch or damage the piston rod.
4. Thoroughly clean the parts in washing gasoline and dry with compressed air. Keep all parts free from dust and dirt. Well check the details. Worn or damaged parts shown in the wiring diagram can be replaced with new ones.
Shock absorber assembly
Guided illustration, assemble the suspension strut, observing the following instructions:
1. Displace the air from the shock absorber by moving the piston up and down several times, while the piston must go through its entire stroke each time. Pull out the piston rod if the knuckle side is down. Push in the piston if the side of the steering knuckle is up.
2. Compress the spring with the compressor and put it on the suspension strut. Make sure that it sits correctly in the cup.
3. Put on in order all the parts shown on illustrations, on the suspension strut. Slide the compression stroke buffer, dust seal and cup onto the piston rod in the correct direction. Before putting on the upper suspension strut support, you need to find a recess on the outer circumference. Put on the support so that the notch, with the suspension strut installed, faces the inside of the vehicle. In this regard, follow the fastening of the shock absorber. An arrow is embossed in it, which on the left side should be turned back, and on the right side forward. The recess and the arrow should be oriented relative to each other.
4. Screw on a new piston rod nut while holding the piston rod as shown illustrations and tighten the nut with a force of 18-24 Nm.
5. Slowly release the spring compressor and check that the spring enters the cup on the shock absorber.
Installing the suspension strut
The suspension strut is installed in the reverse order of removal. Make sure that the brake hose is not twisted when connected.
1. After installation, turn the steering wheel from lock to lock and check that the hose does not bump into any parts of the car. The tightening torque values are given in Specifications at the beginning of the chapter.
2. Tighten the three nuts of the upper suspension strut support on the body mount with a force of 45-53 Nm. Drive the shock absorber bolt on the underside to the transverse arm.
3. Finally, bleed the brake system if the brake hose has been disconnected.