Removing
1. Using special equipment, discharge the refrigerant circuit.
2. Drain engine coolant.
3. Loosen the bolt (1) attaching the piping bracket, and then disconnect the piping of the high (IN) and low (A) pressure from the expansion valve as shown in the figure.
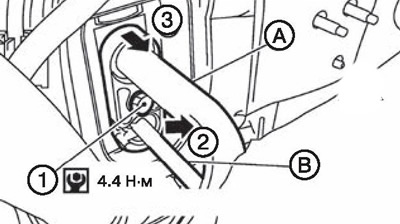
Attention. Seal the connector of the low pressure pipe 1 and the low pressure pipe 2 with a suitable material (e.g. vinyl tape) to prevent atmospheric moisture from entering the air conditioning circuit.
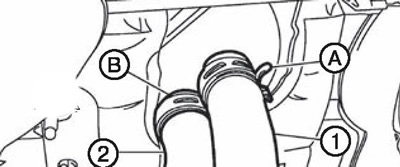
4. Remove clamps (A) And (IN), then disconnect the heater hoses (1) And (2).
5. Remove the dashboard.
6. Remove the body control unit (VSM):
- Loosen the fixing screws.
- Disconnect wire connectors.
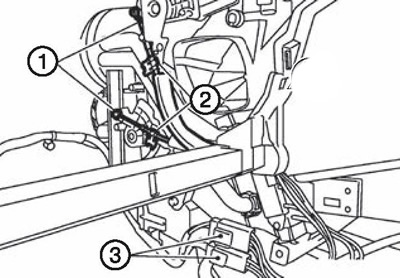
7. Disconnect heater connectors (3) and remove the connector bracket.
8. Disconnect the fan motor connector.
9. Remove control cable holders (1) And (2) from the air conditioning unit.
10. Remove the right leg air duct.
11. Remove the power steering control unit.
12. Disconnect the intake flap motor and ventilation motor connectors.
13. Remove the central air duct.
14. Disconnect the ventilation intake motor connector and remove the wire clamps.
15. Remove stand (1) dashboard.

16. Unscrew the fastening nuts (2).
17. Remove the heater drain hose.
18. Loosen the lower bolts of the air conditioner block on the right side.
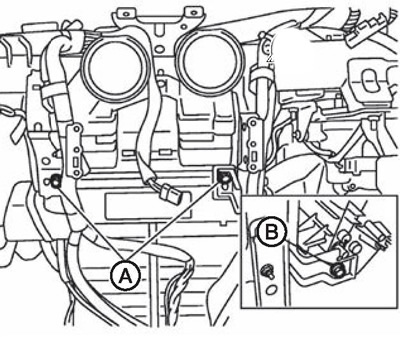
Note. Bolt tightening torques (A) And (IN): 6.9 Nm.
19. Unscrew the upper bolts of the air conditioner unit.
20. Remove the high and low pressure lines.
21. Remove the main harness clamps from the dashboard cross member.
22. To turn away bolts of fastening of a crossbar of the dashboard. Disconnect the electrical wiring retaining clips.
Note. Two people are needed to remove the air conditioning unit.
23. Remove the air conditioning unit assembly.
Installation
Installation is carried out in the reverse order of removal.
Attention.
- Replace the O-rings of the low-pressure and high-pressure pipelines with new ones. Apply compression oil to them before installation.
- The female parts of the conduit connectors are thin and easily deformed, so the pin portion of the conduit connector must be inserted slowly in a strictly axial direction.
- Insert pipes until you hear a click.
- After completing the piping connection, pull the connector by hand to make sure the connection is secure.
- When charging refrigerant into the air conditioning circuit, check the system for leaks.