


Table of contents: Removal ↓ Installation ↓
Removal
1. Remove the wheels, brake lines and hoses and ABS sensors from the trailing arms.
2. Unbolt the wheel hub lock nut. Using a wrench (special tool) unscrew the hub lock nut and the ABS sensor signal ring.
3. Remove the brake drum from the wheel hub.
4. Remove the parking brake cables and brake shoes from the support shield.
5. Disconnect the brake pipe and hose from the slave cylinder.
Attention:
When disconnecting the pipes, do not allow brake fluid to come into contact with painted areas.
Do not press the brake pedal after disconnecting the brake pipes.
6. If the trailing arm is disassembled, remove the wheel hub from it using special tools.

7. Remove the ABS sensor from the trailing arm.
8. Support the longitudinal arm with a jack and remove the shock absorber from it.
9. Remove the trailing arm bracket from the vehicle, loosen the upper and lower arm mounting bolts and nuts.
10. Slowly lower the jack, remove the spring from the trailing arm.
11. Remove the upper and lower arm mounting bolts and nuts and remove the trailing arm from the vehicle.
12. Remove the bracket from the trailing arm.
Installation
Installation is carried out in the reverse order of removal, taking into account the following.
Information copied from the portal NissanBook.ru
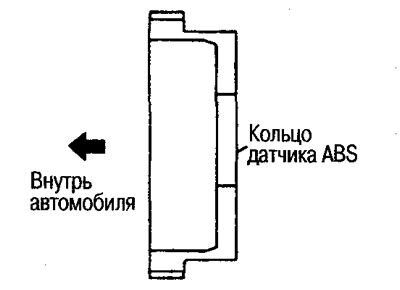
Install the ABS sensor signal ring as shown in the figure
Before installing the wheel and brake system components, check the hub torque. Attach a dynamometer to the hub bolt and measure the torque at 10±2 rpm.
- Torque: less than 1,750 Nm (0.178 kg·m)
- Dynamometer reading: less than 30.6 N (3.10 kg)
Tighten the trailing arm bracket mounting bolts in the order shown in the illustration
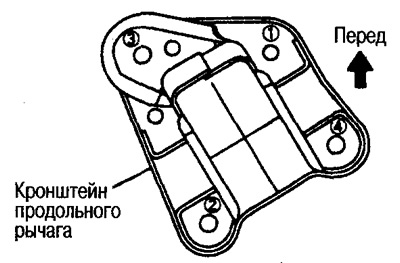
Note: Tighten bolt 1 by hand, tighten bolts 2, 3 and 4 to the required torque. Then tighten bolt 1.
After installation, perform final tightening of bolts and nuts with the vehicle unloaded and tires on the ground. Check wheel alignment and bleed air from the brake system.
When installing the brake pipe bracket, do not allow it to deform.
When installing the spring, please pay attention to the following.
1) Align the spring seat protrusion and the longitudinal arm hole.
2) The mark on the spring should be facing downwards.
3) Make sure that the spring seats and spring sockets are positioned as shown in the figure.
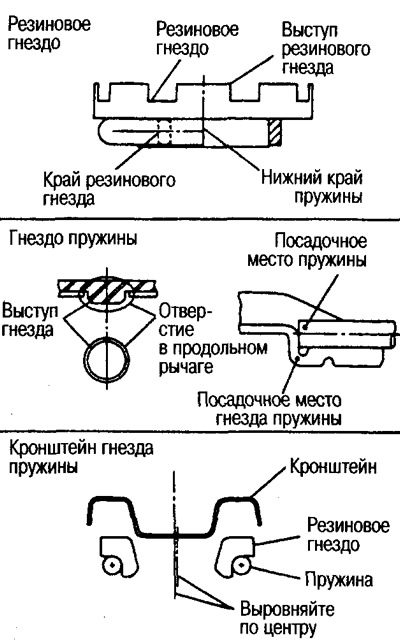
4) Make sure that the spring rubber seat seats are positioned as shown in the figure.
5) Align the centers of the spring and bracket.
6) Check the tightness of the spring seat and bracket.