


Table of contents: Heating, ventilation and air…↓ Control panel for the operation of…↓ Fan speed selection switch ↓ Switches for selecting the direction…↓ Air temperature regulator ↓ Closed air circulation mode…↓ Air conditioner switch " A/S" ↓ Control of deflectors ↓ Car interior ventilation ↓ Cooling the air in the car interior ↓ Heating the car interior ↓ Removal condensation and frost from…↓ Turning off heating and ventilation…↓ Climate control system ↓ Manual air flow direction selection…↓ Audio system ↓ Restoring the security code ↓ Unlocking a car radio ↓ Code indicator ↓ Rules for using the system in radio…↓ Range selection ↓ Manual setting mode ↓ Automatic tuning mode ↓ Radio station memory function ↓ Automatic memorization of radio…↓ Sound settings ↓ Balance adjustment ↓ Depth of sound ↓ Switching to the traffic broadcast…↓ Rules for using the system in…↓ Automatic CD changer ↓ Electromechanical receiving antenna ↓ CD player (if installed) ↓ Security system ↓ Unlocking the CD Player As mentioned…↓ Rules for using a CD player ↓ PLAY/ STOP Pressing this button…↓ SCAN The pre-listening function…↓
Heating, ventilation and air conditioning systems
With proper use of the heating and ventilation systems in the car interior, comfortable conditions are ensured and fogging of the windows is prevented.
If the car was not equipped with an air conditioning system when purchased, it can be mounted and installed at any time convenient for the owner - contact a Nissan service station.
Control panel for the operation of ventilation, heating and air conditioning systems
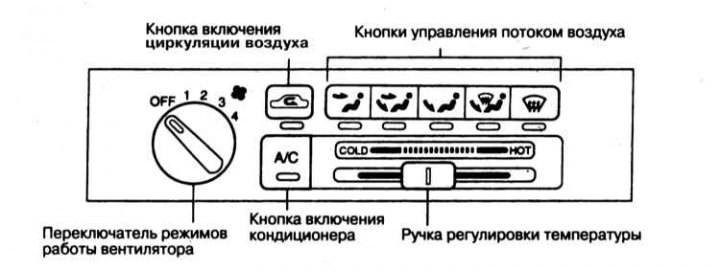
The general view of the control panel with the location of the handles is shown in the illustration.
Fan speed selection switch
The switch allows you to select the speed mode of rotation of the heater/air conditioner fan. The switch has five positions - OFF (Off) and 4 positions of different impeller speeds.
Switches for selecting the direction of air distribution
These push-button switches are used to select the direction of air flow distribution (upper level, footwells, glass blowing and two mixed modes).
Air temperature regulator
The slider control allows the operator to select the required temperature mode for the heating/air conditioning systems. Moving the control handle to the right increases the temperature of the air supplied to the car, and to the left decreases it.
Closed air circulation mode selection button
This button is used to select the air circulation mode in the passenger compartment. When the button is pressed, (oFF position) fresh outside air is supplied to the passenger compartment. This mode is used during normal long-term operation of the heater or air conditioning. When the button is pressed (the built-in indicator light should light up) the system switches to the closed air circulation mode in the cabin. This mode is usually selected when driving on very dusty or polluted road sections, as well as in the case of the need to quickly cool the air in the cabin with the air conditioner.
Note: When using the closed circulation mode for a long time, the air in the car interior becomes stagnant.
Air conditioner switch " A/S"
The "A/C" button is used to turn on and off the air conditioner. To turn on the air conditioner, start the engine, select the required fan speed mode (position 1-4) and press the "A/C" button), and the indicator lamp built into the button should light up. The air conditioner is switched off by pressing the button again.
Control of deflectors
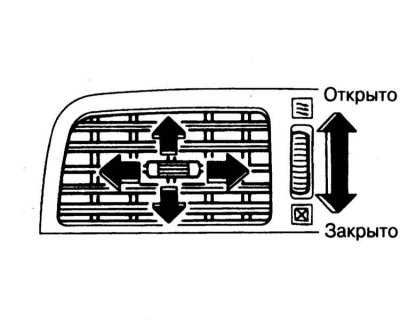
The central air duct nozzles of the instrument panel are equipped with special louvered deflectors, allowing you to adjust the deviation of the supplied air flow both in the horizontal and vertical planes. The deflectors are controlled using a lever built into the nozzle grille and a roller switch located next to the grille, the design of which allows you to completely turn off the air supply.
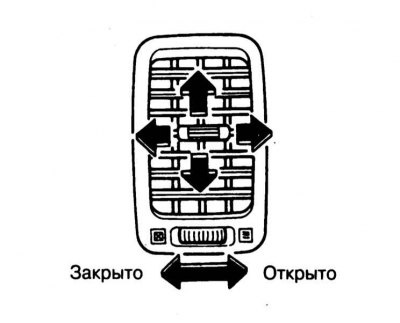
The side air vent grilles of the instrument panel have a similar design.
Instructions for using ventilation, heating and air conditioning systems
Below are detailed instructions for operating heating, ventilation and air conditioning systems in various climate conditions. The reader is provided with information on how to ensure effective ventilation, heating and cooling of the air in the car, as well as how to quickly remove condensation and frost from the glass.
All systems under consideration operate only when the engine is running. The engine coolant is used as the working fluid for the heater. If the engine is not warmed up to normal operating temperature, it will take several minutes before warm air begins to flow into the passenger compartment. The operation of the air conditioning system does not depend on the temperature of the engine coolant.
In the vast majority of cases, the best efficiency of systems providing a comfortable microclimate is achieved in the mode of supplying outside air to the passenger compartment. Long-term activation of the closed circulation mode, especially when the air conditioner is not working, leads to fogging of the windows and increased stuffiness of the air, so it is recommended to turn on this mode only if necessary and for a relatively short time, for example, when driving in an area with a smoky or polluted atmosphere. As soon as the need for insulation of the passenger compartment disappears, the supply of fresh air to the passenger compartment should be resumed.
Outside air enters the heating and air conditioning systems through the intake grille, which is located in front of the windshield and is equipped with a fairing. Periodically clean the openings of the intake grille from leaves and other debris that impede the passage of air.
Car interior ventilation
The supply and exhaust ventilation system ensures a constant exchange of air in the car's interior. Fresh outside air, entering through the front intake grille, circulates through the interior and is then removed through the outlet openings located near the rear window.
- a) Move the temperature control knob to the extreme left position. Make sure that the air conditioner is turned off;
- b) Select the air distribution mode corresponding to the icon
 . The closed air circulation mode must be turned off;
 - c) Having selected the appropriate fan speed mode, set the required intensity of air supply to the vehicle interior.
Cooling the air in the car interior
The interior cooling is carried out as follows:
- a) Turn on the air conditioner by pressing the "A/C" button - the indicator lamp built into the button should light up;
- b) Make sure that the air temperature control handle is moved to the extreme left position.
- c) Select the air flow direction corresponding to the pictogram
 ;
; - d) When the outside air humidity is high, switch on the closed circulation mode; when the humidity is low, switch on the fresh air intake mode;
- e) Having selected the appropriate fan speed mode, set the required intensity of air supply to the passenger compartment.
If the car has been standing in the sun for a long time and the air inside the car has become very hot, quickly reduce the temperature inside the car as follows:
- a) Start the engine;
- b) Turn on the air conditioner (A/C button). Check that the air temperature control knob is moved to the extreme left position;
- c) Having selected the appropriate fan speed mode, set the maximum intensity of air supply to the passenger compartment;
- d) Partially open the windows and select the air distribution direction corresponding to the pictogram
 . Turn on the fresh air intake mode.
Once the interior air temperature has dropped to an acceptable level, close the windows and set the air conditioning to normal mode (see above).
The air conditioning system increases the load on the vehicle's engine, so watch the coolant temperature gauge carefully when driving stop-and-go at low speeds in busy urban traffic or when climbing steep, steep hills. When the gauge approaches the red range, temporarily turn off the air conditioning until the engine temperature returns to normal.
Heating the car interior
To raise the air temperature in the car, perform the following manipulations.
- a) Start the engine;
- b) Select the air distribution direction corresponding to the pictogram
 . The closed air circulation mode must be turned off;
 - c) Having selected the appropriate fan speed mode, set the required intensity of air supply to the passenger compartment;
- d) By moving the air temperature control handle in one direction or another, set the desired level of air heating.
Heating the interior while simultaneously dehumidifying the air using the air conditioner
When the air conditioning system is operating, the humidity in the car's interior decreases, so turning on the heating and air conditioning systems at the same time makes the air in the car's interior warm and dry.
- a) Turn on the fan;
- b) Turn on the air conditioner;
- c) Select the air distribution direction corresponding to the pictogram
 . The air recirculation mode must be turned off.
 - d) By moving the air temperature control handle to one side or the other, set the desired degree of heating of the air entering the passenger compartment. In this mode, the cold air from the air conditioner is mixed with the warm air from the heater.
The combined activation of the heating and air conditioning systems can be used in all driving conditions when the ambient temperature is above 0°C.
Removal condensation and frost from glass
You can clean the inner surfaces of the glass from condensed moisture as follows:
- a) Turn on the fan;
- b) If the vehicle is equipped with the appropriate equipment, turn on the air conditioning;
- c) Select the air distribution direction corresponding to the pictogram
 . The closed air circulation mode must be turned off;
 - d) Set the air temperature control knob to a position where warm air is supplied through the windshield defroster nozzles;
- e) Turn on the rear window defroster to remove condensed moisture from the rear window surface more quickly. To turn off the air conditioner, press the A/C button.
To remove frost or ice from the outer surface of the windshield and side windows that has formed after parking the car outside in frosty weather, perform the following steps:
- a) Turn on the ignition by turning the key in the lock to the "ON" position;
- b) Select the air distribution direction corresponding to the pictogram
 . The closed air circulation mode must be switched off. Some versions of the car provide the possibility of automatic switching on of the fresh air supply mode and air conditioning by selecting the direction of distribution corresponding to the pictogram
  ;
; - c) Move the air temperature control handle to the extreme right position (maximum air heating) and turn the fan on to maximum speed;
- d) Start the car engine.
To clear the windshield of frost or ice more quickly in very cold weather, it is recommended to first turn on the closed air circulation mode. Once the windshield is free of ice, resume the supply of fresh air to prevent fogging of the glass.
In the windshield blowing mode, all air supplied to the passenger compartment enters through the slot nozzles located on top of the instrument panel at the base of the windshield, as well as through the side ventilation deflectors of the instrument panel. The temperature of the air blowing on the glass and the speed of cleaning the glass increase as the engine warms up. To speed up the process of removing condensation, frost or ice from the windshield, you can close the side ventilation deflectors (see illustration 4.10). In this case, all the air will go exclusively to blowing the windshield.
For safety reasons, do not drive until all vehicle windows are clear of condensation and the driver has adequate visibility.
Turning off heating and ventilation systems
To temporarily turn off the heating and ventilation systems, turn the air temperature control knob to the extreme left position and set the fan to the minimum speed mode.
The need to turn off the systems arises in the first few minutes after starting the engine in cold weather, as this ensures faster warming up of the engine to a temperature sufficient for the effective operation of the heater. In all other cases, keep the fan constantly on to avoid stagnation of air in the cabin.
Climate control system
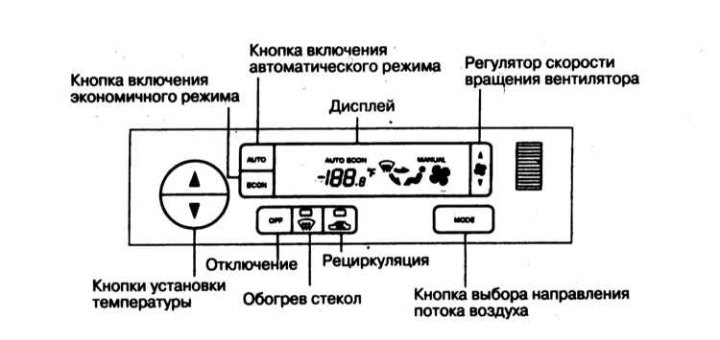
The appearance of the control panel of heating, ventilation and air conditioning systems equipped with a climate control system is shown in the illustration.
Start the engine and turn on the air conditioner.
Automatic cooling and dehumidifying heating
In this mode, the system automatically maintains the set temperature in the cabin regardless of fluctuations in outside air temperature. The distribution of air flows and the fan speed are also controlled automatically.
Press the "AUTO" button - the display should show the corresponding message.
Using the button located to the left of the control panel display, set the required temperature mode.
Note: The optimum temperature from the point of view of the system's efficiency is considered to be 25°C.
The automatic temperature maintenance and air distribution control mode is enabled.
Heating (economy mode)
Note: It is not recommended to use this mode if the windows are fogged up.
In this mode, the K/V does not work.
Press the economy mode button (ECON) - the display should show the corresponding message.
Select the required temperature mode of the heating system.
Note: To avoid malfunction of the heater, do not set the temperature below the ambient temperature.
The automatic temperature maintenance and air distribution control mode is enabled.
Condensate removal
1. Press the windshield defroster button - the indicator lamp built into the button should light up.
2. Select the required temperature mode.
3. To quickly remove condensation and frost from the outside of the glass, select the maximum fan speed.
4. Once the windshield is clear, press the "AUTO" button to return the system to automatic operation mode.
5. When the blower is on and the ambient temperature is below 2°C, the system automatically switches to the condensate removal mode and turns off the closed circulation mode. Supplying outside air to the passenger compartment accelerates the condensate removal process.
Manual fan speed control
Manual selection of the fan impeller speed mode is performed using the key switch located to the right of the display. To return the system to automatic mode, press the "AUTO" button.
Closed air circulation mode on/off button
When the closed circulation mode is switched on, the control lamp built into the switch button should light up. The mode is switched off by pressing the button again.
Note: It is not possible to activate the closed circulation mode if the system is set to remove condensate.
Manual air flow direction selection button ("MODE")
Using this button, you can select one of the following four modes of distributing air supplied to the passenger compartment:
- a)
 Air supply through upper level air ducts (central and side instrument panel deflectors);
 - b)
 Air supply through upper level ducts and footwells;
 - c)
 Air supply to foot wells;
 - d)
 Supplying air to the foot wells and to blow air onto the windshield and side windows.
Features of operation of the climate control system
At low ambient temperatures and a cold engine, the air supply to the foot wells is shut off in the first 150 seconds after the engine is started and is resumed only after the coolant has warmed up sufficiently.
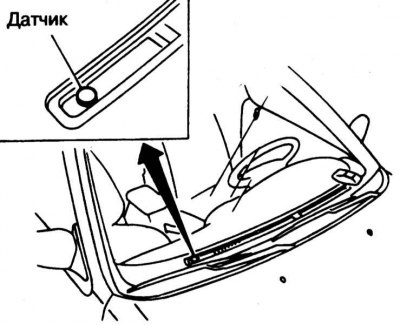
The car's dashboard has a temperature sensor built into it, which is used to maintain the temperature at a given level. Try not to place any objects near the sensor.
Audio system
Car radio
The radio only functions when the ignition is on (key in ON or ACC position).
For the best radio reception, the antenna should be fully extended. Radio reception is affected by the power of the transmitting station and its distance, interference from buildings, bridges, mountains and other obstacles - as a rule, short-term changes in reception quality are caused by the presence of such interference.
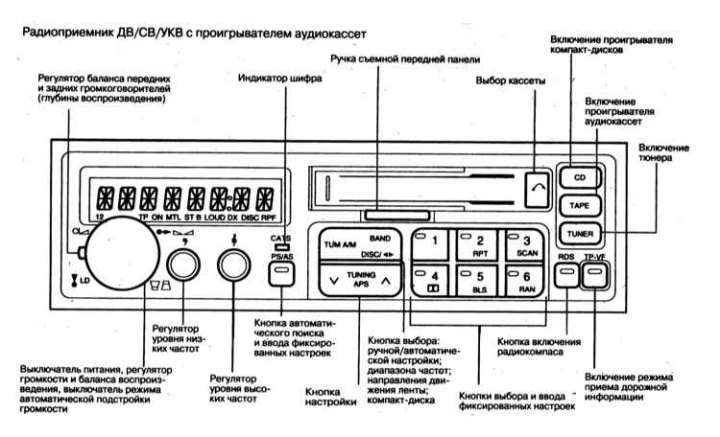
The appearance of the control panel of the car radio, which is included in the standard equipment of Nissan Maxima cars, is shown in the illustration. The radio is equipped with a removable front panel.
The radio includes a radio receiver for LW-MW-VHF ranges and a cassette player for magnetic recordings. In addition, the system includes a code security module and a CD player with an automatic disc changer. The tape recorder has high playback quality due to the use of a Dolby noise filter.
Dual Reception System
Reception of a signal in the VHF range is often accompanied by strong noises associated with good reflection of ultra-short waves from various obstacles. To improve the quality of reception, a dual reception system is used, based on two antennas. The first antenna is a conventional telescopic antenna. The second antenna - a wire type - is glued to the rear window of the car. The system automatically switches to the antenna that currently provides the best reception quality.
Security system
In order to minimize the risk of theft, the audio system is equipped with a security system using a four-digit digital code. Without entering the code, it is not possible to turn on the radio. During normal operation, the audio system is not blocked and operates as usual.
The security system is activated only when the module is removed from the instrument panel. The module can only be unlocked by entering a specific code. The code is individual for each radio, cannot be changed and is indicated on a special card, which is inserted into the glove compartment at the vehicle assembly site. If you have any questions about the location of the card, please contact your Nissan service station.
Keep the security code card in a safe place, preferably outside the vehicle. If you lose the card and do not have duplicate code entries, contact a Nissan service station.
Removable control panel
To remove the control panel, move its mounting handle to the left.
Before leaving the car in a parking lot, it is recommended to put the panel in the case included in the kit and take it with you. The case is designed to protect the panel from damage. To turn on the radio, install the panel in its regular place. To perform maintenance of the removable control panel at a Nissan service station, you must present a card with a security code.
Removal the security code
Attention! Please read the instructions below carefully and follow all directions exactly.
1. Certain types of vehicle maintenance that involve disconnecting the battery require deleting the security code of the car radio. If the code is not deleted beforehand, the system will be locked when the power is disconnected.
2. Turn on the radio - the display should show "CODE IN" (code entered).
3. Press any button (except "Sch", "B" and "PS/AS"), and "0000" will appear on the display.
4. Using the buttons for tuning to fixed radio stations, enter the required security code on the display.
5. Press the "PS/AS" code entry button.
6. Press and hold the 1 and 4 tuning buttons on the radio station.
7. Turn the module off and on twice with buttons 1 and 4 pressed (ON-OFF-ON-OFF-ON).
8. When "0000" appears on the display after the last time the radio is turned on, press any button (except "Sch", "B" and "PS/AS").
9. Using the preset radio station buttons, enter the appropriate security code.
10. Press the "PS/AS" code entry button - the display will start flashing "CLEAR" and the radio/tape recorder will turn on at the same time.
11. The security code removal is complete.
Attention! If you enter an incorrect code, the numbers entered will remain lit on the display, but the receiver/tape recorder will not turn on. Each time you turn on the radio after deleting the security code, the display will show and then disappear the inscription "CLEAR". To avoid theft of the radio module, do not leave the car in the parking lot with the code of the locking device deleted.
Restoring the security code
1. The code should be restored immediately after completing the vehicle maintenance procedures.
2. Turn off the radio.
3. Press and hold down the 1 and 4 tuning buttons on the radio station.
4. Turn the radio on and off while pressing buttons 1 and 4 - the display will show "CODE IN" (code installed).
5. Now the security code entry is complete and the security system is activated.
Unlocking a car radio
1. If the battery is disconnected for any reason, the audio system is blocked. After power is restored and the module is turned on, the display shows "CODE IN". To unblock the system and restore its functionality, do the following:
2. Turn on the power, the display will show "CODE IN".
3. Press any button (except "B", "Sch" and "PS/AS"), and "0000" will appear.
4. Enter the secret code (see above).
5. Press the "PS/AS" code entry button, the system will be unlocked and the radio/cassette player will be turned on. If you enter an incorrect code, the display will show "----". Wait about 10 seconds and try entering the code again.
Attention! The locking device is equipped with a protective mechanism that limits the number of incorrect code entries. After the first and second unsuccessful attempts, the system accepts the next entry after 10 seconds. After entering the wrong code 3 to 20 times, the interval between entries increases to 15 minutes. Further attempts lead to a complete lock of the system, after which it can only be unlocked at a Nissan service station.
Code indicator
The CODE indicator light indicates that the security system is in a state of readiness. Before leaving the car, you should always check the readiness of the security system by the indicator light. To turn on the security, press the "PS/AS" button after performing the following steps:
- a) Turn off the radio;
- b) Turn off the ignition;
- c) Remove the control panel - the indicator starts to flash. To turn off the indicator, press the "PS/AS" button again.
Rules for using the system in radio reception mode
Turn the power/volume knob and press the radio button (TUNER). Tune to the desired radio station. Use the volume knob to adjust the volume. Pressing the power/volume knob turns on/off the LOUD mode. In the LOUD mode, the display shows "LOUD".
Range selection
Switching the frequency range (VHF/MW/LW) is done using the BAND button; the control panel display shows the designation U, M or L, respectively.
Manual setting mode
To switch to manual setting mode, press the "TUM Vehicle" switch, and the indicator lamp built into the switch button should light up. Pressing the "Sch" and "B" buttons changes the frequency of the received signal by one step up or down. To continuously change the frequency, hold down the corresponding button.
Automatic tuning mode
To switch from manual tuning mode to automatic tuning mode, press the "TUM A/M" switch. In automatic mode, the receiver tunes to the nearest radio station. When you press the "Sch" and "Bl" buttons, the radio tunes to the next nearest radio station in the local search mode (LOCAL). If the station is not detected in the local frequency range, the system switches the sensitivity to the "DX" mode - the corresponding indicator should light up. If the station is not detected in the DX mode either, the receiver starts continuous alternating search. Automatic search is interrupted by pressing the "TUM A/M" switch.
Radio station memory function
The radio receiver allows you to fix six radio stations in each frequency range. To do this, do the following:
- a) Tune to the desired station;
- b) Press and hold any of the tuning buttons on the radio for more than 2 seconds - playback should stop;
- c) After the memorization process is completed, the indicator on the selected channel button lights up and playback resumes;
- d) Other channels are installed similarly.
When the radio power is turned off or the fuse blows, the radio memory is erased. In this case, you should repeat the procedure for tuning to the desired stations.
Automatic memorization of radio stations
1. To automatically memorize six radio stations, press the button and hold it for more than 2 seconds. Pressing the button for less than 2 seconds sets the frequency pre-scan mode. To identify the recorded radio stations, press buttons 1-6.
2. During the radio station memorization procedure, the channel number backlight and the indicator lamp on the corresponding channel button flash.
3. The automatic memory function searches for stations first in the local frequency range and then in DX mode. If after two search cycles in both modes less than 6 radio stations are found, the memory procedure is terminated and the radio receiver switches to the previously set frequency.
Sound settings
To achieve the best sound quality, adjust the tone quality using the BASS and TREBLE controls.
Balance adjustment
Pull out the Power/Volume/Balance knob and rotate it to adjust the volume balance between the right and left speakers.
Depth of sound
Use the "FADER" knob to adjust the volume balance between the front and rear speakers.
Switching to the traffic broadcast station reception mode (if any)
1. To turn on the mode, set the VHF (U) range and press the "TP-VF" button - the display will show "VF".
2. During the broadcast of the traffic information program, the radio automatically switches to the corresponding broadcast station, and the display shows the inscription "TP", while the playback volume automatically increases. If the tape recorder is working when the traffic information broadcast mode is turned on, a pause is automatically turned on. After the broadcast ends, the cassette playback resumes.
3. In the automatic tuning mode, when the "TP-VF" button is pressed, the tuner receives only those stations that are currently broadcasting a traffic information program.
4. Enabling the automatic memorization function while pressing the "TP-VF" button results in the radio receiver storing in its memory only those stations that are currently broadcasting a traffic information program.
Rules for using the system in magnetic recording playback mode
Set the ignition key to the "ACC" or "ON" position and press the tape recorder mode button (TAPE). Insert the cassette horizontally into the cassette receiver with the open side to the right. After loading the tape, the recording will begin playing.
Attention! Do not use force when inserting the cassette! The "TARE" button indicator shows the direction of film rewinding. To fast-forward, press the " F " button, which corresponds to the direction of the tape movement. To rewind, press the " B " button opposite to the one shown on the indicator.
Automatic Search Function (APS)
1. The APS function allows you to automatically skip to the beginning and end of the current recording.
2. To turn on the APS mode, double-click the "Sch" or "B" button, and the search for the beginning or end of the recording will begin (the control lamp built into the button will light).
3. With the "SCAN" button pressed (the built-in indicator light is on) double-clicking the "Sch"/"B" button triggers the forward or backward preview function.
4. The APS function may not work in the following cases:
- a) The recording level is too low;
- b) The tape contains spoken language;
- c) The intervals between records are less than 4 seconds;
- d) The pauses between recordings are too long;
- e) The recording goes without gaps;
- f) The pause is filled with loud background noise.
Changing the direction of the tape
Press the BAND/DISC/34 switch.
Function to find the beginning of the next record
To repeat the current recording, press the "RPT" button. During the repeat function, the built-in indicator lamp and the inscription RPT are lit on the button.
Dolby NR Noise Reduction System
If the magnetic recording is encoded using the Dolby NR system, then to eliminate high-frequency tape noise, press the "DOLBY NR" button - the control lamp built into the button will light up.
Dolby NR filters are manufactured under license from Dolby Corporation. The Dolby NR and double-D symbols are trademarks of Dolby Corporation.
Function to find the beginning of the next record
To go to the beginning of the next recording, press the "BLS" button - the control lamp built into the button should light up. This function only works if there are pauses longer than 10 seconds between recordings.
Removal the cassette
1. Press the cassette eject button
 , - playback stops and the cassette ejects from the cassette slot.
2. The cassette pops out even when the tape recorder is turned off, if the ignition key is in the "ACC" position. The cassette can only be inserted after the system power is turned on.
Use of metallized and chromed tapes
When playing cassettes with metallized or chromed tape, the player automatically switches to high-quality playback mode. During playback of such tapes, the corresponding indicator lights up.
Precautions when using a cassette player
1. To maintain good sound quality, Nissan recommends using cassette tapes with a playing time of less than 60 minutes.
2. Do not leave the cassette in the player. Store cassettes in protective cases and keep them away from direct sunlight, heat, moisture and magnetic materials.
3. When heated by solar radiation, the cassette may become deformed and become unusable.
4. Do not use cassettes with peeling labels that may become stuck inside the player.
5. If the tape in the cassette becomes loose, insert a pencil into one of the rewind hubs and wind the tape tightly onto the cassette roller. A loose tape may jam, which will degrade its sound quality.
6. Over time, the reading, clamping and turret heads become contaminated with fragments of the magnetic layer of the passing tape. Such contaminating layering leads to weakening and distortion of playback, due to which the heads should be periodically cleaned using a special cassette.
Automatic CD changer
1. This function is only available when the disc changer is installed and a CD magazine is inserted.
2. Turn the ignition key to the "ACC" or "ON" position and press the CD player button.
3. To change the disk in the magazine, press the switch "BAND/DISC/34".
4. Click "Sch" or "B" to go to the next or previous entry.
5. To quickly scroll the disk forward or backward, press the "S" or "B" button and hold it down for more than 1 second.
6. To replay the current recording, press the "RPT" button.
7. To enable the scan function, click the "SCAN" button. After the indicator light comes on, press the "S" or "B" button twice to start scanning forward or backward.
8. To play a randomly selected recording of the current disc, press the "RAN" button (random).
Electromechanical receiving antenna
1. Before turning on the radio, make sure that there are no people near the antenna outlet and that the antenna mast can extend without interference.
2. To avoid damaging the antenna during an automatic car wash, make sure it is completely retracted beforehand.
3. Dirt and foreign objects sticking to the antenna mast may cause the electric drive to jam. Wipe the mast with a damp clean cloth from time to time.
4. The antenna extends automatically when the radio is turned on. Turning off the tuner automatically retracts the antenna. If the radio is not turned off, the antenna extends and retracts when the ignition key is turned to the "ON" or "OFF" position.
CD player (if installed)
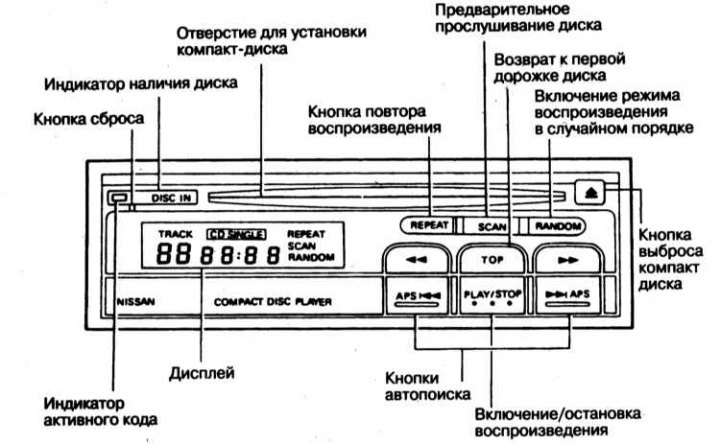
The appearance of the CD player control panel is shown in the illustration.
Security system
The design and operating principle of the CD player security system are similar to those described above for the car radio. The lock is activated when an unauthorized attempt is made to remove the player from the car, as well as when the power supply is disconnected from it.
Unlocking the CD Player As mentioned above, if the power is turned off for any reason, the CD player is locked. After power is restored and the player is turned on, "--Cod-"appears on the control panel display. To unlock the player and restore its functionality, do the following:
- a) Turn on the radio. The message "- -Cod-" appears;
- b) Press any button (except the disc eject button "
 "). The message "—0000" appears;
 - c) By pressing the search buttons:
 TOR,
TOR,  and
and  , enter the code, - the entered code is displayed on the display;
 - d) Press the "RANDOM" button to enter the code. The module will be unlocked and will start working. If you enter an incorrect code, the display will show "----". You should wait 10 seconds and try again.
Code indicator
The CODE indicator light is on, indicating that the security system is in a state of readiness. Before leaving the car, always check the system's readiness by turning off the radio and ignition. The indicator light starts flashing.
Rules for using a CD player
Warning! In cold or rainy weather, high humidity may cause the CD player to malfunction. In such cases, take the player out and dry it completely or ventilate it. On uneven roads, the player's reading head may stray from the track. If the air temperature in the car is high, the CD player may stop working. In this case, cool the car's interior before using it. Avoid exposing the CD player to direct sunlight.
1. Turn the ignition key to the "ACC" or "ON" position. Insert the disc into the disc drive (title side up). After partially entering the slot, the disc is picked up and loaded automatically, after which playback begins. After loading the disc, the display shows the number of records and the total playing time for 5 seconds. When loading an 8-cm CD, the display shows the inscription CD SINGLE.
2. If the radio or cassette player is on while the disc is loading, they are automatically switched off and the CD starts playing.
3. Volume, tone, balance and depth of sound are adjusted by the radio control knobs.
4. Before inserting a disc into the drive, make sure that there is no other disc by checking the "DISC IN" indicator lamp (see below). Attempts to insert a disc by force may cause various types of damage.
Disk presence indicator
When a CD is loaded into the player, the "DISC IN" sign lights up in red.
Button "RESET"
This button is designed to start the normal operation mode of the player. After any work with the player's electrical wiring, immediately after turning it on and before starting playback, be sure to press the RESET button for 2 seconds.
PLAY/STOP button
PLAY/ STOP Pressing this button during playback turns off the display and stops playback. Pressing the button again resumes playback from where it stopped.
Manual search buttons

Pressing this button will fast forward the current recording. Pressing and releasing the button will quickly play the recording.
 Pressing this button causes the recording to quickly scroll backwards.
Automatic search function

Pressing this button will take you to the next record. Pressing the button once will increase the current record number on the display by 1. If you keep the button pressed, the counter will continuously advance from one record to the next. To start playing from the desired record, set the number of that record on the display and release the button.
 Pressing this button will skip to the previous record. Pressing the button once will repeat the current record from the beginning. If the button is pressed continuously, the counter will continuously skip backwards from one record to the next. To start playing from a record with a number lower than the current record, set the number of that record on the display and release the button.
Back to top button
TOP Pressing this button during playback returns to the first track on the disc and plays it.
Repeat button
REPEAT This button is used to listen to the current recording repeatedly. After pressing this button, the display shows "REPEAT" and after the current recording ends, it is repeated from the beginning. In repeat mode, only the current recording is played. To return to normal playback mode, press the button again. The REPEAT inscription disappears.
The repeat function is not cancelled after the disc is stopped or after the power is turned off with the ACC switch.
Preview button
SCAN The pre-listening function allows you to quickly familiarize yourself with all the recordings on the disc. After pressing the "SCAN" button, the corresponding content appears on the display, and the player plays the first ten seconds of each recording in sequence. After the last recording, scanning of the entire disc is repeated. To turn off scanning, press this button again. The display disappears, and the normal sequential playback mode is resumed.
Random selection button
RANDOM After pressing this button during playback, the inscription "RANDOM" appears on the display, and the built-in microprocessor begins to randomly select the order of playback of records on the disk. To turn off random selection of records, press this button again. The inscription on the display disappears, and the normal sequential playback mode is resumed.
Note: The order of the entries is chosen randomly, which does not exclude the possibility of repeating the same entry twice in a row.
The random function is not cancelled after the disc is stopped or after the power is turned off with the ACC switch.
Disc eject button
 . Pressing this button ejects the disc. It does not matter whether the disc is playing or not. If you press the play button or press the play panel while the player's input panel is open, the disc is loaded automatically and then the play mode is turned on. If the player's input panel remains open for more than 15 seconds, the input panel automatically closes, protecting the compact disc from accidental damage. In this case, the play mode is not turned on automatically.
8cm CDs cannot be loaded into the player by pressing the play button. The autoload mode does not work in this case either.