


Table of contents: Main caveats ↓ Running in a new car ↓ Refueling a car ↓ Control operations ↓ Transportation of goods by car ↓ Starting the engine ↓ Peculiarities of driving a car with…↓ Peculiarities of driving a car with…↓ Position "P". In this position of…↓ Automatic transmission mode switch…↓ Car parking ↓ Brake system ↓ Recommendations for driving in…↓ Peculiarities of driving a car in…↓ Review ↓ Tire grip on the road surface ↓ Towing a trailer ↓ Towing device ↓ Rear view mirrors ↓ Attaching a trailer to a vehicle ↓ Trailer exterior lighting and…↓ Preparing to tow a trailer ↓ Safety precautions when towing a…↓
Main caveats
The Nissan car will provide the owner with optimal characteristics and will demonstrate high performance on roads with good and smooth surfaces. This is facilitated by low ground clearance and low-profile tires.
Be careful when driving on uneven and unpaved roads. Driving on them can cause damage to the suspension and/or underbody of the car. Be careful when driving over special speed limiters ("sleeping policemen"), which are located directly on the road surface - overcoming them at high speed is also fraught with serious damage to the suspension and/or underbody.
To avoid damage to the front or rear bumper, use caution when driving off curbs and trailer ramps. Remember that the low suspension makes it dangerous for this vehicle to drive up even normal-height curbs.
Running in a new car
In order to ensure the reliability and durability of the vehicle in operation, the following rules must be followed during the first 600 km of mileage:
- a) Do not start off at full throttle, avoid sudden acceleration;
- b) Do not brake too sharply. Normal running-in of new brake pads occurs over a period of 300 km, during which time you should, if possible, brake smoothly and with moderate intensity.
After repairing or replacing the engine, as well as after replacing the brake pads, it is necessary to observe similar restrictions and recommendations.
Refueling a car
Type of fuel used
To avoid detonation in the engine, use unleaded gasoline with an octane rating of at least 95 to fill the car (by research method - AI).
Using a car with leaded fuel can lead to failure of the catalytic converter and the engine itself. The environmental pollution factor should not be forgotten either.
Control operations
Do not forget to carry out maintenance work within the time periods specified in the Maintenance Schedule (see Chapter Settings and ongoing maintenance) monitor and adjust the levels of working fluids, as well as critical components and systems of the vehicle.
Monitor the adequacy of the readings of the meters and counters on the vehicle's instrument panel.
Transportation of goods by car
The vehicle is equipped with several containers designed to accommodate transported items.
The storage compartments located in the car's interior are designed to accommodate small items. These include the main storage compartment in the instrument panel, door pockets and pockets located in the seat backs, as well as a storage compartment built into the center console.
Large items should be placed in the luggage compartment of the car. The transportation of long items is made possible by the folding design of the rear seat backs.
It is important to remember, however, that improper transportation of cargo may adversely affect the vehicle's handling and stability, and therefore reduce safety. Before transporting any cargo in your vehicle, please read the information below.
Maximum load capacity of the vehicle
Warning! Exceeding the maximum permissible load capacity of the vehicle or improper placement of cargo may cause a traffic accident and result in injury or even death to the driver or passengers in the vehicle. Do not exceed the maximum permissible gross weight when loading the vehicle, as well as other restrictions mentioned in this Manual.
When transporting cargo in a vehicle, it should be taken into account that the gross vehicle weight must not exceed the maximum permissible value. The gross vehicle weight includes: the unladen weight of the vehicle, the weight of the driver and passengers, the weight of the towing device installed on the vehicle, as well as the weight of the trailer that falls on it. For any vehicle loading options, the axle loads must also not exceed the maximum permissible values. Information on the maximum permissible values of the gross weight and axle loads is provided in the Specifications.
Transportation of cargo in the passenger compartment of a vehicle
Securely fasten all items placed in the vehicle to prevent them from shifting in the event of a traffic accident.
Do not place large objects on the rear shelf of the passenger compartment - they narrow the driver's field of view and can be thrown forward in the event of a collision or sudden braking.
Make sure that objects placed on the floor behind the front seats cannot roll forward and cannot under any circumstances interfere with the driver's free manipulation of the control pedals or interfere with the correct adjustment of the front seats.
Keep the glove compartment closed while driving.
Carrying cargo in the luggage compartment or on a roof rack
Try to distribute the load evenly, placing the luggage as close to the seats as possible. Heavy loads should always be placed at the bottom, on the floor of the luggage compartment. Securely fasten the transported items with a strong cord so that they cannot shift while the car is moving. Never place luggage higher than the level of the front seat backs.
When transporting large or long items with the rear seats folded down, try to secure them securely with a strong cord to prevent the load from shifting during emergency braking of the car. Do not place luggage above the level of the seat backs to avoid reducing the driver's field of view.
If you need to transport long objects that do not allow you to close the trunk lid, remember that engine exhaust gases may enter the vehicle interior - take appropriate precautions.
When placing cargo on the roof rack, make sure that the total weight of the cargo does not exceed the permissible value. For more information, contact your Nissan dealer.
Starting the engine
1. Set the parking brake.
2. When the ambient temperature is low, turn off all auxiliary electrical consumers to reduce the load on the battery.
3. On models equipped with a manual transmission, depress the clutch pedal all the way and engage neutral gear.
4. On models with automatic transmission, make sure the selector lever is in the "P" or "N" position and depress the foot brake pedal.
5. Without pressing the gas pedal, turn the ignition key to the "START" position and turn on the starter. If the engine does not start immediately, continue to turn the crankshaft with the starter, remembering that the duration of continuous operation of the starter should not exceed 15 seconds. A second attempt to start should be made after at least ten seconds - a pause is necessary for cooling the starter electric motor.
6. If the engine fails to start after 15 seconds of continuous starter operation, or the engine stalls immediately after starting, try starting it with the accelerator pedal depressed halfway. After the engine starts successfully, release the accelerator pedal to avoid a sharp increase in engine speed.
7. If the engine still fails to start, fully depress the gas pedal and hold it down for the entire time the starter is operating - this will help remove excess fuel that has entered the intake manifold and engine cylinders. The duration of continuous operation of the starter, as in the previous cases, should not exceed 15 seconds. If the engine does not start after purging the cylinders, try to start it again with the gas pedal partially depressed. Release the pedal immediately after starting
Features of starting the engine in cold weather at high altitudes (altitude above sea level over 2400 m)
At low ambient temperatures, starting the engine is difficult. In high altitude conditions, where the air is very thin, starting the engine is even more difficult. Below are the instructions that must be followed when starting the engine in these conditions.
1. Turn off all auxiliary electrical consumers to reduce the load on the battery.
2. Press the gas pedal halfway and hold it in this position for the entire time the starter is turning the engine crankshaft. The duration of continuous engagement of the starter should not exceed 15 seconds. After the engine has successfully started, gradually release the gas pedal, preventing a significant increase in speed.
3. If the engine does not start, press the gas pedal all the way down and hold it down for the entire time the starter is operating. The duration of continuous operation of the starter, as in the previous case, should not exceed 15 seconds. If the engine still does not start, try again.
4. If the ambient temperature is below zero, or if the car has not been used for several days, let the engine warm up for 3-4 minutes before starting to drive.
Peculiarities of driving a car with a manual transmission
Warning! When driving on a slippery road surface, intensive engine braking or excessively sharp acceleration may lead to loss of control of the vehicle and an accident, which may result in serious injury to the occupants. Exercise particular caution when driving on a road surface that does not provide adequate traction for the vehicle's wheels.
1. To ensure smooth and shock-free shifting, all forward gears are synchronized. The gearbox has a locking device that eliminates the possibility of direct shifting from fifth gear to reverse gear. When shifting the gearbox "up" (to the highest levels) or "down" (to the lower levels) disengage the clutch completely. After moving the gearshift lever to the next gear, smoothly release the clutch pedal. While driving in the selected gear, completely remove your foot from the clutch pedal to avoid premature wear of the clutch mechanism components.
2. Engage reverse gear only after the vehicle has come to a complete stop. Attempting to engage reverse while driving can cause serious damage to the gearbox. Before engaging reverse gear, fully disengage the clutch and wait a short time (in a few seconds) pause.
Note: Instead of a pause, you can briefly engage one of the forward gears. The described techniques for engaging reverse gear allow you to prevent the shock engagement of reverse gear due to residual rotation of the gears.
3. To slow down the car, you can use engine braking by shifting the gearbox to one of the lower gears. Engine braking allows you to control the speed of the car at a safe level and prevents the brakes from overheating when driving on long descents with a significant slope. Shift the gearbox to lower gears sequentially, as the speed decreases, to prevent the maximum permissible engine speed on the tachometer from being exceeded. The tachometer needle should not go into the red zone of the scale. In all cases, you should focus on the values of the maximum permissible speed of the car in the corresponding gears (see below).
Peculiarities of driving a car with automatic transmission
Start of movement
1. Depress the foot brake pedal and move the selector lever to the drive position.
2. Release the parking brake and foot brake and gradually start moving.
3. Remember that the idle speed of a cold engine is always slightly higher than that of a warm engine. Extra caution should be exercised when changing gears (both forward and reverse) until the engine warms up.
4. To avoid jerking when starting to move, do not accelerate the engine at idle speed.
Precautions when driving
It is prohibited to switch the selector to the "P" or "R" position while driving.
The engine can only be started in the "P" or "N" positions of the selector lever. The engine should not start in other transmission positions!
When shifting from the "N" position to the drive position, the engine must be idling.
If the vehicle is stopped on a steep incline, it is necessary to depress the foot brake pedal (after first shifting the selector to the "N" position) to hold the vehicle in place and protect the transmission from overheating.
Avoid sudden starts and wheel spin. Do not accelerate the engine at idle speed when the car is stationary - this may lead to sudden movement of the car if the selector is set to the position "D", "R", "2", "1", or to engine failure if the selector is in the "N" or "P" position.
Do not start driving until the engine is fully warmed up.
When parking the air cleaner, depress the foot brake pedal and when the car has completely stopped, move the selector to the "P" position. Engage the parking brake and release the foot brake pedal.
To switch from "P", "R" or "2" to "1", press the lock button. All other positions can be switched on without pressing the button
Gear selector lever positions
Position "P". In this position of the range selector lever, the secondary shaft of the transmission is mechanically locked. Always move the range selector lever to the "P" position when turning off or starting the engine. In order to move the range selector lever out of the "P" position, it is necessary to depress the brake pedal, having previously released the gas pedal. Move the range selector lever to the right and move it out of the "P" position.
To avoid damage to the AT, move the lever to the "P" position only after the car has come to a complete stop. Note: Removing the key from the ignition switch becomes possible only after moving the selector lever to the "P" position.
Position "R". Techniques for operating the range selector lever when moving it to the "R" position (Reverse) from the "P" position are described above. Switch the lever to the "R" position from the "N" (Neutral) position only after the vehicle has come to a complete stop.
Position "N". Use the "N" (Neutral) position when starting a stalled engine while the vehicle is moving and when briefly stopping the vehicle with the engine running. If you need to leave the vehicle for any reason, first move the range selector lever to the "P" (Park) position. When moving the lever from the "N" position, depress the foot brake pedal.
Position "D". The range selector lever should be kept in this position at all times when the vehicle is moving under normal road conditions. The "D" (Drive) range provides automatic forward gear shifting depending on the vehicle speed and the degree of pressure on the accelerator pedal. While the vehicle is moving, you may notice that automatic upshifts occur later, i.e. at higher speeds, if the vehicle's engine has not yet warmed up to normal operating temperature. This ensures faster engine warm-up.
Position "2". When range "2" is engaged, the automatic transmission will constantly operate in second gear. When the vehicle stops, the gearbox does not shift to first gear. Constant engagement of second gear ensures good traction dynamics of the vehicle on climbs and the possibility of intensive engine braking on steep descents. Range "2" is recommended to be engaged when starting to move on a slippery road surface, as well as when driving in deep snow. This helps prevent strong slippage of the vehicle's drive wheels.
When the "2" range is engaged while the vehicle is moving, the engagement of the second gear in the transmission is automatically delayed and occurs only after the vehicle speed has decreased to a safe level at which the engine crankshaft speed does not exceed the maximum permissible value.
Avoid engaging position "2" at speeds above 115 km/h (models with VQ30DE engine)/85 km/h (vG20DE engine). When position "2" is selected, do not accelerate the vehicle beyond the specified limit.
Position "1". When range "1" is engaged, the automatic transmission will constantly operate in first gear. If range "1" is engaged at a speed of more than 60 km/h (models with VQ30DE engine)/65 km/h (vG20DE engine), then the transmission will first switch to second gear. The inclusion of an intermediate stage allows to avoid sharp and unexpected engine braking.
Automatic transmission downshifting (kick-down mode)
When overtaking, or to quickly pass a sloping section of the road, press the accelerator pedal all the way down - this will result in switching to a lower second or first gear, depending on the speed of the car.
Engaging the overdrive gear
During normal driving, the overdrive gear should be engaged with the selector lever in the "D" position. In the overdrive mode, the transmission automatically increases the gear as the vehicle speed increases.
The upshift mechanism only starts working after the engine has warmed up.
When driving up or down long slopes, when engine "braking" is applied, the overdrive gear should be disengaged. In addition, when driving at low speed for a long time, or on a long, smooth climb, the transmission may constantly switch between 3rd gear and overdrive, causing discomfort. In such cases, it is also recommended to disengage the overdrive gear. When the overdrive gear is disengaged, the corresponding indicator lamp lights up. After the driving conditions have normalized, engage the overdrive gear again.
To avoid increasing the vehicle's fuel consumption, do not drive at high speed with the overdrive gear disengaged for long periods of time.
Automatic transmission mode switch (if any)
This automatic transmission has three different driving modes - AUTO, SNOW and SPORT. Each mode is designed to optimize driving in certain road conditions. The modes are set by a switch located on the central console of the car.
Mode "AUTO"
The mode is intended for normal driving, in which gear shifting occurs automatically. The AUTO mode corresponds to the middle position of the switch ("A/T"). It is most effective during normal operation of the car with frequent stops, or when driving on the highway, when the conditions are almost unchanged. In this mode, the transmission shifts in such a way that the engine operates in the most economical way. When the accelerator pedal is pressed sharply, the transmission can switch to the SPORT mode. In this case, the "SPORT" indicator lights up.
Mode "SNOW"
The mode is intended for driving or starting the car on snowy or slippery roads. The SNOW mode corresponds to the switch position ", when set, the "/SNOW" indicator lights up. In this mode, the transmission switches according to the characteristics of driving on snow - to lower engine speeds and lower driving speeds - in order to ensure a quiet and comfortable ride.
Mode "SPORT"
The sport mode is designed for powerful acceleration with a sporty driving style or on a long climb. The SPORT mode corresponds to the "S" switch position, when set, the "SPORT" indicator lights up. In this mode, the transmission switches according to the characteristics of sporty driving - to higher engine speeds and higher vehicle speeds - in order to provide powerful acceleration when overtaking or climbing.
Crash protection
When the crash protection system is activated, all gears in the automatic transmission are locked in third gear. When the ignition key is turned to the "ON" position the "SPORT" indicator lights up for 2 seconds and then flashes for 8 seconds. The vehicle remains controllable. The crash protection system is activated under extreme conditions, such as when the steering wheel is turned hard and then braking hard. The protection may be activated even if all electrical circuits are functioning normally. To restore the vehicle to normal operation, turn the ignition key to the "OFF" position, wait 3 seconds and return the key to the "ON" position. If normal operation is not restored, contact a Nissan service station for inspection and, if necessary, transmission repair.
Car parking
1. When leaving the vehicle parked, always set the parking brake. Remember that the parking brake warning light mounted in the instrument panel only serves to remind the driver to release the parking brake before driving off. The lighting of the warning light does not guarantee that the parking brake is fully set. To avoid the vehicle rolling away on a slope, make sure that the parking brake is properly set.
2. First, set the parking brake, and then move the automatic transmission range selector lever to the "P" position. This sequence of actions prevents accidental starting of the vehicle and eliminates the transfer of a significant load to the transmission secondary shaft locking mechanism from the force rolling the vehicle. Relieving the transmission secondary shaft locking clutch from the force rolling the vehicle. Relieving the transmission secondary shaft locking clutch ensures that the lever can be easily moved out of the "P" position when the vehicle is subsequently started.
3. When parking your car on a hill, turn the front wheels away from the curb, and vice versa.
4. Before driving, make sure that the parking brake is fully released. Driving with the parking brake not fully released may cause overheating and failure of the rear wheel brakes. In addition, this may lead to malfunction of the ABS.
Recommendation for safe parking of a car
1. Make sure the roof hatch and all windows are closed.
2. Turn off all lighting devices.
3. Place luggage and valuables in locked compartments, or take them with you.
4. Lock the doors using the key or remote control with a single lock.
5. On models equipped with an anti-theft system, make sure that the system indicator on the instrument panel comes on, which indicates that the device is activated.
6. Never leave the vehicle with the engine running in areas covered with dry leaves, tall grass or other flammable materials. Remember that the catalytic converter housing can heat up to very high temperatures, which can cause a fire.
Brake system
Safety recommendations for operating models equipped with ABS
ABS does not reduce the braking distance of the car and can only ensure that the car remains under control during braking. In view of the above, it is necessary to constantly maintain a safe distance from the vehicle in front, based on the speed of the car and specific traffic conditions.
ABS does not prevent lateral skidding when the vehicle changes direction abruptly. For example, the vehicle may skid when taking a turn at too high a speed or when the steering wheel is jerked when changing lanes. Always maintain a safe vehicle speed, taking into account the road surface and traffic conditions.
ABS does not prevent the vehicle from losing directional stability. Avoid sharp jerks of the steering wheel during emergency braking.
The braking distance of a car equipped with ABS may be slightly longer than that of a model with a conventional braking system. This is especially noticeable when driving on unstable and uneven road surfaces (gravel, snow). When driving in such road conditions, reduce speed and increase the distance from the vehicle in front.
ABS malfunction indicator light
The anti-lock system includes a self-diagnostic unit. Externally, the self-diagnostic procedure of the system is manifested by small pulsations of the foot brake immediately after starting the engine. ABS failure diagnostics are also performed each time the car is braked.
If the system detects any fault, the corresponding indicator lamp lights up on the instrument panel. When the indicator lamp lights up, it means that the ABS is disabled. The service brake system remains fully functional, except for the automatic brake force regulation function performed by the ABS. If the ABS indicator lamp does not go out after starting the engine or lights up while driving, you should contact your nearest service station as soon as possible.
When the ABS and brake system failure/parking brake warning lights come on together, the brake force regulation function is also disabled, indicating that there is a fault in both the ABS and the brake system. The vehicle's brake system will continue to provide adequate braking, but avoid abruptly depressing the foot brake pedal. Contact your nearest service station without delay.
Recommendations for driving in adverse weather conditions
Anti-slip system (tracking control)
Some models may be equipped with traction control (tracking control), which allows you to start off and accelerate more confidently on slippery road surfaces. The system automatically limits the engine power as soon as one of the drive wheels loses traction and starts to slip. You can feel the activation of the anti-slip system by the reaction on the steering wheel.
Driving in rain, heavy fog or snowfall requires special skills from the driver, due to reduced traction of the wheels with the road surface and poor visibility. Always keep the car in good technical condition. When driving in bad weather, be especially careful. Avoid using cruise control (with the appropriate vehicle configuration) in adverse weather conditions.
Peculiarities of driving a car in adverse road conditions
Reduce speed and drive more slowly than usual in normal weather conditions on dry road surfaces. Remember that the car's response to control will be more sluggish and slow, even if the road surface appears only slightly damp. Try to operate all the car's controls smoothly. On wet and slippery road surfaces, a sharp jerk of the steering wheel or careless pressing of the brake pedal can lead to loss of control. At the beginning of the trip, not yet fully adapted to adverse weather conditions, exercise increased caution. This rule is especially useful when driving during snowfall. It should be remembered that when using a car in the warm season, many useful skills of driving a car on a slippery road surface are forgotten, which requires some time to restore them.
Be especially careful when driving in the rain, as lack of practice during the dry period does not allow you to quickly change over and adapt your reining style to the new conditions.
Note: After a long dry period, the first rains make the road surface especially slippery.
Review
For road safety in all weather conditions, it is very important to have a good view in all directions. You should also remember to ensure that your car remains clearly visible to drivers of other vehicles - remember that when driving on the highway, turning on the low beam will never hurt even in daylight. These requirements are more difficult to meet in adverse weather conditions.
Regularly check the condition of the windshield wiper blades and windshield washer nozzles. Always maintain the required fluid level in the washer fluid reservoir. Use only recommended brands of fluid to fill the windshield washer system. Monitor the condition of the working elements of the windshield wipers, replace them as soon as the brushes stop cleaning the glass properly. To prevent moisture condensation on the inner surface of the glass, use air blowing on the glass, if necessary, turn on the air conditioner.
Tire grip on the road surface
Check your tire pressure and tire tread wear regularly (depth of pattern). Both of these factors are extremely important in terms of good tire grip on the road surface and preventing aquaplaning, i.e. a sharp decrease in grip when driving into puddles. To ensure better vehicle control and driving safety when the winter season arrives, use studded tires.
While driving, constantly monitor the changing road conditions, which are often very unstable. The presence of wet leaves on the road may not be as dangerous as black ice. Often, a road surface that looks clean and dry can become icy in certain areas. Particularly dangerous conditions develop at air temperatures around 0°C, when puddles can alternate with ice, which makes the car's behavior especially unpredictable.
Be careful when downshifting an automatic transmission. On slippery surfaces, abrupt downshifting can cause the drive wheels to briefly slip and the vehicle to skid
The driver must exercise particular caution and attention when overtaking. Equally, you must be careful when your car is being overtaken by other vehicles. Splashes of water and dirt from under the wheels of the overtaken truck can dramatically impair visibility through the windshield. A gust of crosswind when overtaking a truck or bus is dangerous due to loss of control.
Towing a trailer
Warning! Incorrect placement of luggage, as well as transportation of excessively heavy loads on a vehicle or towed trailer, can significantly worsen the controllability and braking properties of the vehicle/road train, which is fraught with the creation of an emergency situation on the roads. Before starting to drive, always carefully check the correct loading of the vehicle and trailer.
The models of cars considered in this Manual are, of course, primarily passenger cars and are intended for the transportation of people and their luggage. However, subject to mandatory compliance with a number of general rules, which are given below, Nissan cars can also be successfully used for towing a trailer.
The maximum vertical load on the towing hitch of a vehicle with a gross trailer weight must not exceed 50 kgf. For trailers with a gross weight of up to 500 kg, the following rule should be followed: the vertical load on the towing hitch should be approximately 10% of the gross trailer weight. For example, if the gross trailer weight with cargo is 225 kg, the vertical load on the towing hitch should be approximately 22.5 kgf. Adjust the load on the towing hitch of the vehicle by placing the cargo on the trailer accordingly. For starters, it is recommended to place the cargo so that approximately 60% of its mass is in front of the trailer axle and 40% is behind. If the gross trailer weight exceeds 500 kg, try to distribute the cargo more evenly along the length of the trailer. Never load the trailer so that the rear of the trailer outweighs the front - this leads to unloading of the rear wheels of the vehicle, which worsens the traction of the tires with the road surface.
The gross vehicle and trailer weights must not exceed the corresponding maximum permissible values. Note: The gross vehicle weight includes: the unladen weight of the vehicle, the weight of the driver, passengers and luggage, the weight of the towing hitch and the weight of the trailer on it. Remember that the weight of the additional equipment installed on the vehicle and the weight of the trailer on the towbar (when towing a trailer), reduce the payload capacity of the vehicle by the corresponding amounts.
The most reliable way to check whether the vehicle and trailer are loaded correctly is to weigh them. Load the vehicle and trailer as they are usually used in a road train and weigh them on a truck scale. Determine the values of the gross vehicle and trailer masses, as well as the masses per axle of the vehicle and trailer. Compare the results of the measurements with the requirements of the Specifications.
Towing device
Attention! Installation of towing devices that do not correspond in their dimensions to the weight and dimensions of the trailer, or incorrectly installed on the vehicle, may cause damage to the body elements of the vehicle. The design of the towing device intended for installation on your vehicle must fully meet all necessary requirements. If necessary, consult a Nissan service station.
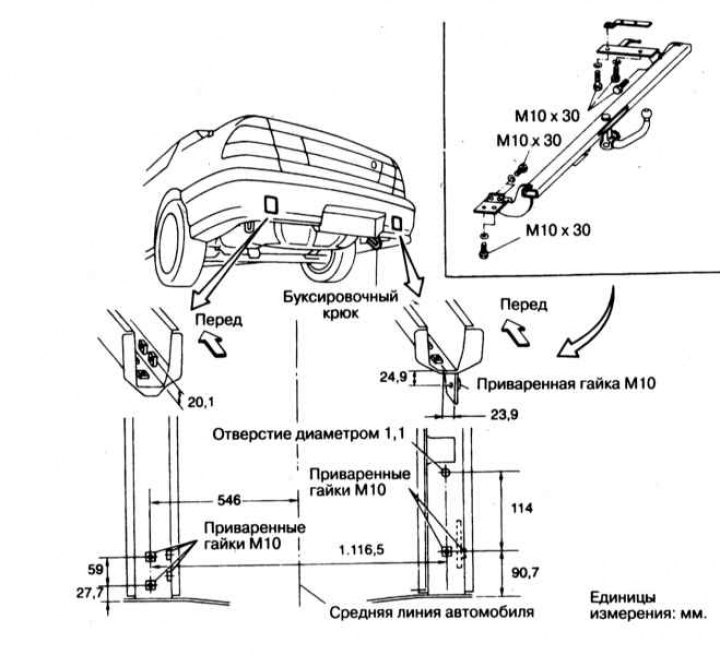
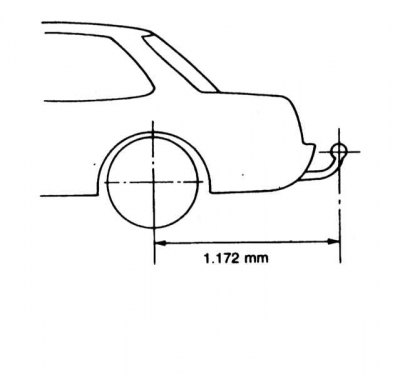
The towing device must be secured at several specially designated points on the base of the vehicle body so that the loads from the towed trailer are distributed more evenly and fall on the body reinforcement elements. It is prohibited to mount towing devices on the vehicle that rest only on the rear bumper, which is not designed to withstand such loads. The towing device must be installed by qualified personnel at a car service center.
Rear view mirrors
Towing a large trailer (such as a Caravan) usually requires the installation of additional rear-view mirrors with extended brackets on the vehicle. Check the requirements of local legislation and the Road Traffic Regulations regarding towing trailers by cars. Attach the trailer to the vehicle and assess the degree of deterioration of the rear view through the standard rear-view mirrors. If the view is unsatisfactory, then for safety reasons it is necessary to install special mirrors that provide the driver with an adequate view of the space behind the vehicle.
Attaching a trailer to a vehicle
If you are going to buy a trailer equipped with brake mechanisms, make sure that they have an electric control drive - the design of the hydraulic drive of the service brake system of your car does not provide for the possibility of connecting any additional circuits to it, in particular, to activate the brake mechanisms of the trailer. Any method of connecting the brake system of the trailer to the brake hydraulic drive of the car, no matter how attractive it may seem, will lead to a deterioration in the efficiency of braking of the car and a decrease in traffic safety.
When connecting a trailer to a vehicle, always use a safety chain. The ends of the safety chain must be securely fastened to the appropriate places on the trailer drawbar and on the vehicle's towing hitch. Make sure that the chain passes under the trailer drawbar - this will prevent the front end of the drawbar from falling onto the road in the event of disconnection of the coupling. The free length of the chain must be sufficient so as not to interfere with the road train's turns with minimal radii, however, the chain should not be allowed to drag on the ground.
Trailer exterior lighting and signaling devices
Since trailers of different brands may use different electrical wiring, the tow bar equipment should be assigned to car service specialists. In some cases, you may need to install a transition nozzle (adapter).
Before connecting the trailer's electrical equipment to the vehicle's electrical system, be sure to consult a service station.
Preparing to tow a trailer
1. Before starting to drive, you should carry out a control inspection and check of the vehicle and trailer.
2. Measure the vertical load on the towing hitch - use a standard floor scale.
3. Check the reliability of the trailer drawbar and safety chain fastening.
4. Check the technical condition of the tires and the air pressure in the tires on the car and trailer. Low air pressure in the tires significantly worsens the controllability of the car and the road train. At the same time, check the condition and air pressure in the spare wheel.
5. Once the trailer is fully loaded and connected to the vehicle, make sure that there is no excessive "sag" in the rear of the vehicle - if necessary, load the vehicle/trailer.
6. Check the proper functioning of the external lighting and signaling devices on the vehicle and trailer.
7. Check the current traffic regulations for the maximum speed of a road train consisting of a car and a trailer. If you are planning a trip to several countries, familiarize yourself in advance with the specifics of local requirements and restrictions regarding towing a trailer with a car, as each country may have its own restrictions. Note: In European countries, the speed limit for a road train consisting of a car and a trailer is set at 100 km/h.
Safety precautions when towing a trailer
It should be taken into account that the braking distance of a vehicle towing a trailer increases. Therefore, when driving with a trailer, you should maintain an increased distance from the vehicle in front. Try to avoid sudden braking and turns. This may lead to the jackknifing of the road train or even the overturning of the trailer.
Remember that the length of a road train is significantly greater than the length of a single car. When turning right, leave a significantly larger distance than usual between the edge of the road and the wheels of the right side of the car to avoid the trailer wheels hitting the curb. Keep in mind that when turning a road train, the trailer moves along an arc of a smaller radius than the car and may run into or collide with an obstacle that the car has easily passed. When overtaking another vehicle, do not rush to return to your lane, as this may lead to a collision between the overtaken car and the trailer.
A road train, compared to a single car, is more sensitive to the effects of crosswind gusts and aerodynamic disturbances from other cars. If you are overtaken at high speed by a heavy truck or road train, try to maintain a straight and uniform movement of your car. To reduce the aerodynamic disturbances acting on the road train from the car in front, reduce speed to get out of the turbulent flow.
When towing a trailer, the load on all the main units and systems of the vehicle increases. Therefore, if the vehicle is frequently used to tow a trailer, it is necessary to carry out periodic maintenance of the vehicle in accordance with the regulations typical for intense operating conditions (see Chapter Settings and ongoing maintenance).
The additional load on the vehicle increases even more when operating the road train in hilly terrain. When overcoming long climbs, carefully monitor the engine temperature using the pointer indicator on the dashboard. When the pointer approaches the overheating zone, turn off the air conditioner (if it is equipped and turned on) and continue driving. If the engine coolant temperature does not decrease or continues to increase, pull over to the side of the road and allow the engine to cool.
Note. The air conditioner should also be turned off when the speed increases rapidly on the descent when driving in hilly or mountainous terrain. If the engine coolant temperature is constantly rising when driving in second gear, slow down below the 60 km/h mark.
When driving in hilly or mountainous terrain, cyclic switching of the third and fourth gears of the automatic transmission may be observed. In this case, you should switch to a lower range "D3", which will prevent overheating and excessive wear of the friction elements of the AT. To avoid overheating of the brake mechanisms when driving on long descents, use engine braking. For effective engine braking, engage a lower range or one of the lower stages of the automatic transmission.
When stopping the road train on an incline, do not hold it in place by pressing the gas pedal - this may lead to overheating of the AT. Use the service brake system or the parking brake.
When operating an automatic transmission in manual mode, use third, second and first gears, depending on the vehicle speed and road conditions. When towing a trailer, do not engage fourth gear. The Specifications provide recommended speed ranges for using the various gears of the transmission.
When parking a road train for a long period of time, especially on a descent or ascent, take all precautions to ensure reliable braking of the vehicle and trailer. Turn the front wheels of the vehicle so that when the road train rolls down, they rest against the curb. Fully apply the parking brake and move the range selector lever to the "P" position. On models equipped with a manual transmission, engage first or reverse gear. Additionally, place wheel chocks under both wheels of the trailer.
Driving a road train in reverse presents certain difficulties and requires special skills and training from the driver. Reverse carefully and slowly, do not turn the steering wheel too quickly. When maneuvering in reverse in cramped conditions, it is useful to have someone standing outside to monitor the trailer's movements and direct your actions. Keep in mind that when you turn the steering wheel clockwise (to the right), the trailer moves to the left, and vice versa. When maneuvering a road train in reverse, it is recommended to hold on to the steering wheel rim from below (and not from above, as usual, when moving forward). With this grip, the usual correspondence between the direction of rotation of the steering wheel and the movement of the trailer is maintained: moving the hand to the left causes the trailer to turn to the left and vice versa.