


Table of contents: Initial checks ↓ Leak testing ↓ Checks on a stopped vehicle ↓ Line pressure check ↓ On-the-go checks ↓
Incorrect operation of the variator can be associated with five main reasons:
- improper engine operation;
- incorrect adjustments;
- improper operation of the hydraulic system;
- mechanical faults;
- malfunctions of the control computer or signal transmission circuits.
Diagnosis of the above faults should always begin with the most simple checks:
- level and condition of transmission fluid;
- checking and adjusting the variator ranges.
After this, take the vehicle for a test drive to determine whether the problem has been resolved or whether more detailed diagnostics are required. If the fault persists after preliminary checks and troubleshooting procedures, a more detailed diagnosis of the electronic CVT control system is required using specialized equipment in a workshop.
Initial checks
- Take a short drive to warm up the CVT to normal operating temperature.
- Check the transmission fluid level. We describe this operation in detail in the chapter "Car maintenance".
- If the fluid level is unusually low, add fluid until the level is up to the level indicated on the dipstick, and then check for signs of fluid leaks.
- If the fluid level is unusually high, drain the excess and then check the used fluid for coolant. The presence of coolant in the transmission fluid indicates damage to the walls of the cooling system radiator, which separates the coolant from the transmission fluid.
- If the working fluid is foaming, drain it and fill it with new one, and then check the drained fluid for the presence of coolant in it.
- Check the engine idle speed.
Caution: If the engine runs poorly, do not perform any tests on the CVT until the engine has been repaired and is operating normally.
- Check the variator ranges. Make sure the ranges are adjusted correctly and the selector lever moves without binding.
Leak testing
- Most CVT fluid leaks can be easily detected visually. Fixing a leak usually involves replacing the seal or gasket. If the leak location is difficult to locate, the procedure described below will help you do so.
- Determine the type of liquid leaking. You must be absolutely sure that it is not motor oil or brake fluid. Transmission fluid is dark red in color when new and light brown after some mileage.
- Try to find the location of the leak. Drive a few kilometers and then stop over a large sheet of cardboard. After 1-2 minutes, you will be able to determine the location of the leak by the drops of liquid that fall on the sheet of cardboard.
- Conduct a thorough visual inspection of the suspect part and the surfaces around it. Pay special attention to the surfaces sealed by gaskets. To examine hard-to-reach places, it can be convenient to use a mirror.
- If the leak location is still not found, thoroughly clean the suspected surface with solvent or cleaning agent and then dry it.
- Drive a car with a warm engine for several kilometers at different speeds. After the trip, check the suspicious part again.
- Once the leak location is located, it is necessary to determine the cause of the leak before repairs are made. If a gasket is replaced but the sealing surface is deformed, installing a new gasket will not stop the leak. It is necessary to straighten the deformed area.
- Before attempting to repair a leak, make sure the following issues have been corrected, otherwise new leaks may occur.
Caution: Some of the faults listed below cannot be identified without special equipment and experience. Such faults should be repaired in a workshop equipped with electronic diagnostic equipment.
Leaking gaskets
- Check the CVT oil pan periodically. Make sure all bolts are tight, in place, the gasket is in good condition and the pan is level.
- If there is a leak at the oil pan gasket, it may be caused by too high a transmission fluid level or too much fluid pressure, a clogged vent, oil pan mounting bolts that are too tight, a deformed oil pan sealing flange, damage to the sealing surface of the CVT housing, damage to the gasket itself, or pores or cracks in the CVT housing. If a sealant is used instead of a gasket to seal between the CVT housing and the oil pan, a poor-quality sealant can also cause a leak.
Leaks in the seals
- If there is a leak in the seal, the reasons for this may be as follows.
- High transmission fluid level or transmission fluid pressure too high.
- Clogged ventilation hole.
- Damaged oil seal hole.
- Damage or incorrect installation of the oil seal itself.
- Damage to the surface of the shaft passing through the seal.
- Excessive displacement of the variator shaft due to loosening of the bearing.
- Make sure the dipstick tube seal is in good condition and the tube is installed correctly. Periodically check the area around the speedometer drive gear or speed sensor for leaks. If traces of liquid are found, check the O-ring for damage.
Leaks in the variator housing
- If there are leaks in the variator housing itself, or if there are pores on the housing, then it must be repaired or replaced.
- Make sure the breather hose connections are tight and in good condition.
- Liquid comes out of the vent tube or fill tube
- If the specified fault exists:
- the variator is overflowing;
- the working fluid contains coolant;
- there are pores or cracks in the variator housing;
- the wrong dipstick is installed;
- the ventilation hole is clogged.
Checks on a stopped vehicle
- Check the amount of engine oil in the engine. Add oil if necessary.
- To warm the CVT fluid to 50-80°C, drive the car for approximately 10 minutes. Check the fluid level and top up if necessary.
- Apply the parking brake securely to prevent the vehicle's wheels from turning.
- Start the engine, press the brake pedal and move the CVT selector lever to the "D" range.
- While keeping the brake pedal depressed, gradually press the accelerator pedal until it stops.
- Quickly determine the maximum engine speed.
Read more on the website [NISSANBOOK]
Caution: Do not hold the accelerator pedal depressed for more than 5 seconds when performing this test.
- Move the selector lever to the "N" range.
- Allow the fluid in the variator to cool.
- Let the engine idle for at least 1 minute. The maximum engine speed should be 2700-3250 rpm.
- Move the selector lever to the "R" range.
- Let the engine idle for at least one minute and measure the maximum engine speed.
- Compare the results of measurements of maximum engine speeds in the variator selector lever positions "D" and "R".
♦ If in the "D" position the maximum engine speed is higher than the required value, and in the "R" position it is within the permissible limits, then the forward clutch is probably faulty.
♦ If in the "D" position the maximum engine speed is within the permissible limits, but in the "R" position it is higher than the required value, then the rear brake may be damaged.
♦ If the maximum engine speed in the "D" and "R" positions is below the required value, the one-way clutch of the engine and torque converter may be damaged.
♦ If the maximum engine speed is higher than the required value in the "D" and "R" positions, the primary or secondary pulleys, drive belt, or line pressure may be faulty.
♦ If in the "D" and "R" positions the maximum engine speed is within the permissible limits, then the one-way clutch in the torque converter is probably stuck. Further checks are required.
Line pressure check
Pressure testing channels
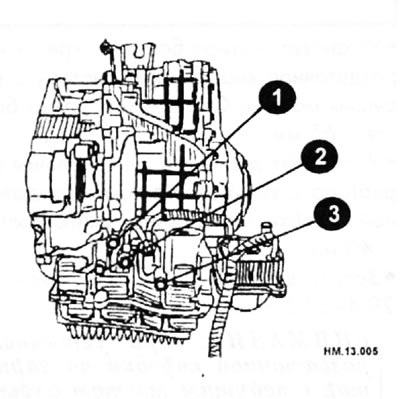
1 - linear pressure; 2 - forward clutch pressure; 3 - primary pressure.
- Check the amount of engine oil in the engine. Add oil if necessary.
- To warm the CVT fluid to 50-80°C, drive the car for approximately 10 minutes. Check the fluid level and top up if necessary.
Caution: The fluid heats up to a temperature of 50-80°C in approximately 10 minutes of driving.
- After warming up the variator, unscrew the plug of the inspection hole to determine the pressure of the working fluid and install the pressure gauge.
Caution: When using a pressure gauge, check that the inspection hole plug has a sealing ring.
- Apply the parking brake securely to prevent the vehicle's wheels from turning.
- Start the engine and measure the line pressure at idle and at maximum engine speed with the vehicle stopped.
Caution: Keep the brake pedal fully depressed when taking measurements.
- After completing the measurements, install the inspection hole plug and tighten it to a tightening torque of 5.0-10 N·m.
Caution: The sealing ring cannot be reused.
Linear pressure
| Engine rotation speed | Idle mode | Maximum rotation speed of a braked vehicle |
| Linear pressure, kPa (kgf/cm²) in ranges R, D, L | 750 (7,65) | 5300-5700 (54,06- 58,14) |
Evaluation of the results of line pressure measurements in idle mode
| Possible cause | |
| Low pressure in all ranges (P, R, N, D, L) | • Pump wear. • Pressure regulator valve or plug is stuck or the spring is weakened. • Liquid leaks in the channels mesh filter → pump → pressure regulator valve. • Engine idle speed is too low. |
| Low pressure only within a certain range | • Pressure losses of the working fluid in channels or devices related to the range that is switched on after pressure distribution by the control valve. • Malfunction in the accelerator pedal position sensor signal circuit. • Malfunction of the CVT working fluid temperature sensor. • Pressure control solenoid A malfunction (line pressure control solenoid): jamming in the off position, filter clogging, damage to the line. • Pressure regulating valve or plug is stuck. |
Evaluation of the results of measurements of linear pressure at maximum engine speed of a braked vehicle
| Possible cause | |
| The pressure does not exceed the idle pressure value | • Malfunction in the accelerator pedal position sensor signal circuit. • Malfunction of the TCM control unit. • Pressure control solenoid A malfunction (line pressure control solenoid): short circuit, stuck in the on position. • Pressure regulating valve or plug is stuck. |
| The pressure increases but does not reach the required value | • Malfunction in the accelerator pedal position sensor signal circuit. • Pressure control solenoid A malfunction (line pressure control solenoid): jamming, clogging of the filter. • Pressure regulating valve or plug is stuck. |
| The pressure is low only within a certain range | Pressure losses of the working fluid in channels or devices related to the range that is switched on after pressure distribution by the control valve. |
On-the-go checks
A driving test is performed using the CONSULT-II scanning tool. Since drivers may not have this tool, we will not describe how to perform this test and recommend that you consult a specialized workshop.