


Table of contents: Removal and installation the parking…↓ Removal and installation the parking…↓ Removal and installation the parking…↓
Removal and installation the parking brake shoes
Removal
1. Jack up the rear of the car and place it on supports.
2. Remove the propeller shaft from the vehicle.
3. Mark the installation position of the parking brake drum in relation to the drive flange and remove the drum.
4. Press the head of the pin against the brake shield with your finger, compress the shoe guide springs, turn the holders (spring plates) 90°, then remove the holders, springs and their seats from the brake mechanism assembly.
5. Remove the tension springs, spread and remove the retaining rings and washers securing the brake shoes to the actuator. Remove the shoes and adjuster from the brake assembly.
6. Check the regulator for free rotation, then screw the adjusting screw into the regulator cylinder until it stops. If necessary, clean and lubricate the regulator threads.
7. Check the residual thickness of the friction linings of the shoes, compare the result with the standard values (see size and adjustment tables at the end of the Manual), if necessary, replace the pads or install replacement shoes.
8. Check the brake drum for signs of wear, scratches, scoring and other damage. If necessary, resurface or replace the drum.
Installation
Installation is carried out in reverse order.
1. Install the brake drum in accordance with the mounting marks made during dismantling.
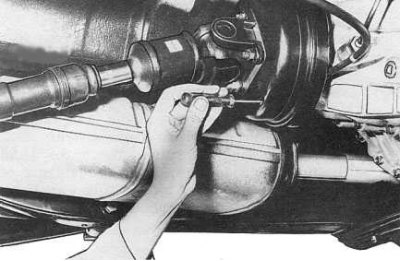
2. Lengthen the regulator so that the shoes come into contact with the walls of the drum, then shorten it, achieving a gap of 0.25÷0.40 mm (see accompanying illustration).
Removal and installation the parking brake cable
Removal
1. Remove the parking brake shoes.
2. Disconnect the cable end from the actuator lever.
3. Open the locking ring and remove it from the end of the cable sheath, separate the cable from the brake shield.
4. Remove the center console.
5. Release the retaining clip, squeeze the locking tabs, remove the pin and disconnect the cable from the parking brake control lever.
6. Loosen the cable sheath lock nut and release the cable from the bracket.
7. Pull the cable with the bushing through the body panel and remove it from the vehicle.
8. Check the condition of the plastic stop of the mounting pin. Replace the pin if necessary.
9. Check the condition of the cable; if any defects are found, replace it.
10. Check the cable bushing for signs of material aging. Replace if necessary.
Installation
Installation is carried out in reverse order.
1. Lightly lubricate the parking brake control lever ratchet and all sliding surfaces of the drive.
2. Adjust the position of the cable sheath so that the control lever is cocked by 7-9 ratchet clicks when a force of 20 kgf is applied.
3. Make sure that the control lamp on the instrument panel lights up when the lever is cocked to the click position and does not light up when the lever is fully cocked. If necessary, bend the support plate of the sensor-switch to adjust the moment of operation of the control lamp.
Removal and installation the parking brake control lever
Removal
1. Remove the center console from the vehicle.
2. Disconnect the drive cable from the parking brake control lever.
3. Loosen the lever mounting bolts, disconnect the wiring from the parking brake indicator lamp switch sensor and remove the lever assembly from the vehicle (the details of the lever installation are shown in the accompanying illustration).
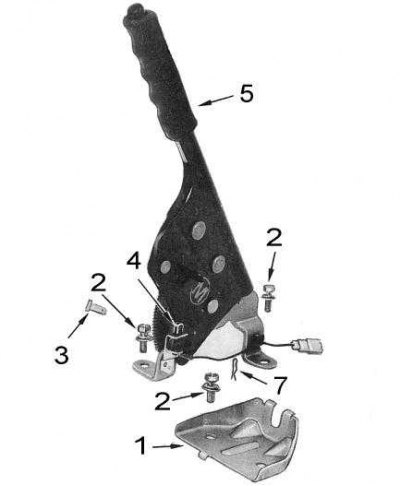
1 - bracket; 2 - bolt; 3 - finger; 4 - sensor switch; 5 - lever; 6 - clamp
4. Check the lever for signs of wear and damage. Replace if necessary.
Installation
Installation is carried out in reverse order.
1. Tighten the lever mounting bolts to the required torque.
2. Finally, adjust the drive cable and the parking brake indicator light switch.