


1. Disconnect the ground cable from the battery and remove the battery and its holder.
2. Remove the air intake hose.
3. Place the front of the vehicle on supports or drive the vehicle into an inspection pit.
4. Disconnect the automatic transmission shift valve harness plug and disconnect the reverse light switch cable.
5. Disconnect the shift cable on the side of the transmission and disconnect the throttle actuator for the transmission on the engine side.
6. Drain the transmission oil.
7. Remove the drive shafts as described in Chapter Clutch and drive shafts.
8. Disconnect the speedometer cable.
9. Place a lift under the engine. A hydraulic lift is best for this. Place a wooden shim between the lift and the oil pan.
10. Place a mobile lift under the gearbox and lift it slightly.
11. Disconnect the hoses from the oil cooler on the bottom of the radiator. Catch any oil that runs out.
12. Unscrew and remove the starter.
13. Unscrew the center support of the power unit suspension and remove it. Make sure that the engine and gearbox are securely supported.
14. Unscrew the cover on the back of the torque converter housing and unscrew the drive plate bolts from the torque converter. While doing this, turn the engine to access all the bolts. The converter should be held with a screwdriver so that it cannot turn.
15. Remove the engine/gearbox mounting bolts and separate the units. Mark the torque converter with a scriber so that it can be installed in its original position.
16. Remove the left automatic transmission mount.
17. Slowly pull out the mobile lift with the gearbox on it. Be careful not to damage the surrounding parts.
18. Installation of the automatic transmission is carried out in the reverse order.
(Data posted on the website: NissanBook)
19. Slide the torque converter onto the shaft and check that the distance from the end of the converter to the gearbox housing surface is 15.9 mm. The measurement is taken from the end of the gearbox surface to the front of the converter (illustration below).
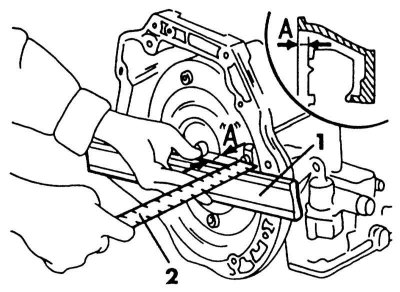
When installing the torque converter, measure dimension A in the specified manner using a steel ruler (1) and a measuring ruler (2).
20. Check that the marks on the converter match.
21. Lubricate the threads of the driven disk bolts with grease, tighten the bolts in order. It should be remembered that the bolts have different lengths and tightening torques. In addition, some bolts hold the gearbox on the engine, and some, on the contrary, the engine on the gearbox. Fastening is carried out as shown in the illustration below. Guided by the illustration, consider the following:
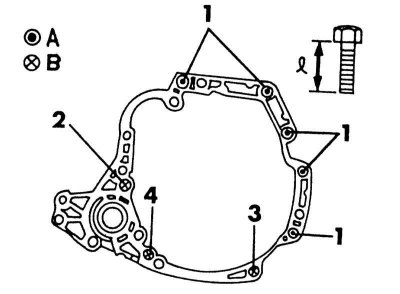
Fastening the gearbox to the engine in the version with the injection system
Length of bolts "I": 1 - 55 mm; 2 - 65 mm; 3 - 35 mm; 4 - 45 mm
Tightening torques: 1 and 2 = 70-80 Nm; 3 and 4 = 16-21 Nm
- The bolts at positions (1) on the top side and directly below them are 55 mm long and are tightened with a force of 70 - 80 mm.
- Bolt at position (1), bottom right (see illustration above) has a length of 50 mm and is tightened with a force of 70 - 80 Nm.
- The bolt at position (3) is 35 mm long and is tightened with a force of 16 - 22 Nm.
- The bolt at position (5) is 45 mm long and is tightened with a force of 16 - 22 Nm.
- The bolt at position (2) is 65 mm long and is tightened with a force of 70 - 80 Nm.
22. Fill the gearbox with oil (type Dexron II).
23. Connect the shift cable and adjust it (see section Automatic transmission adjustment).
24. Check the oil level in the final drive.