


Table of contents: Removal ↓ Installation ↓
Removal
1. Raise the front of the vehicle and support it on stands.
2. Remove the wheel.
3. Remove the disc and caliper.
4. Remove the speed sensor (on cars with ABS system).
5. Unscrew the wiring bracket fasteners and move the sensor to the side.
6. Disconnect the axle shaft from the hub only, move it to the side and secure it (see subsection 10.2).
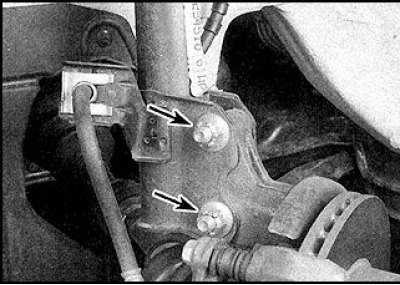
7. Unscrew the two nuts securing the strut to the steering knuckle (indicated by arrows), remove the bolts and disconnect the rack.
8. Remove the cotter pin and unscrew the nuts, press out the ball joint and the steering rod end from the knuckle eyes.
9. Press the hub out of the bearing. One of the inner bearing races should remain on the hub.
10. Press the bearing race off the hub.
11. Remove the outer seal.
12. Remove the inner seal.
13. Remove the retaining ring from the hole in the bearing knuckle.
14. If the remaining clip is loose, remove the clip.
15. Press the bearing out of the knuckle using a mandrel of suitable diameter, which rests only on the outer part of the bearing.
16. When pressing out, you should support the rear part of the knuckle.
17. The bearing can also be pressed out by striking the inserted inner race through a tubular mandrel.
Installation
1. Before installing a new bearing, thoroughly clean the inside surface of the knuckle.
2. Press the outer bearing race into place, using the mandrel to press against the outer edge only. Do not lubricate the outer part of the race to facilitate pressing.
3. Insert the snap ring into the groove in the knuckle bore.
4. Place grease into the seal cavity and carefully press the seal onto the outside of the steering knuckle.
5. Install the outer knuckle support.
6. Place grease into the seal and press the seal into the inside of the knuckle.
7. With the inner bearing race securely supported, carefully press the hub into the knuckle.
8. Check the hub for free rotation.
9. Attach the axle shaft and tighten the nut to the specified torque.
10. Install the brake disc and caliper.
For more information, see the website nissanbook.ru
11. Attach the lower control arm ball joint, install the new nut and tighten to the specified torque.
12. Secure the nut with a new cotter pin.
13. Attach the rack by replacing the bolts and nuts.
14. Tighten the bolts and nuts to the specified torque.
15. Attach the steering rod by replacing the nut and cotter pin.
16. Install the wheel and lower the vehicle.