


2. Loosen, but do not remove, the piston rod nut.
3. Install the pullers and compress the springs evenly until the upper mount is released.
4. Remove the piston rod nut, washers, gasket, upper mount, upper spring seat and compressed spring. Remove the rubber recoil buffer and dust cap from the strut.
5. Visually inspect all components of the rack, replace worn or damaged ones. Inspect the upper mount components especially carefully. Check the spring. If it is necessary to replace one of the rear suspension springs, it is recommended to change both springs at the same time.
6. Check the damping action of the strut. If the damping is weak, or there are oil leaks, if the piston rod is bent, has play or is damaged, the strut must be replaced.
7. Note that it is good practice to treat both rear suspension struts as a matched pair; therefore, they must be replaced simultaneously, even if only one is faulty.
8. Before attempting to disassemble the strut, consult your Nissan dealer. Depending on the damage, there are several options: the strut assembly is replaced completely, or only the damping parts are replaced. In the latter case, you need to prepare a repair kit of shock absorber parts and contact a specialist.
9. To disassemble the strut, clamp it in a vice and push the piston rod all the way to the bottom of the stroke, then unscrew the packing gland clamp nut.
10. If the strut is leaking from the packing gland seal and if it is not a cartridge type, the leak can be stopped by installing a packing gland seal kit, which is available separately. See items 16 and 17 below.
11. Remove the piston rod and cartridge (if any) or the rod, guide and inner cylinder, collect the spilled liquid Turn the rack over and pour out the remaining liquid, then clean the pipe, check for wear or damage, especially if there are visible signs of oil leaks; if the outer ring is damaged, the rack must be replaced.
12. When assembling, make sure that all parts are absolutely clean and dry.
13. Assemble the piston rod, guide and inner cylinder, install them on the outer tube. Press the piston rod completely into the outer tube, clamp the strut assembly in a vice. Fill in the exact specified amount of recommended fluid; any variations in the amount or type of fluid will affect the damping properties of the strut. Move the piston rod very gently to remove any air bubbles.
14. Before installing the packing gland nut, push the piston rod completely into the outer tube of the strut, check that the rod is clean. Then wrap the upper end with insulating tape to protect the sealing lips of the oil seal from damage. Apply grease to the sealing lips of the oil seal, install the oil seal (see Figure 10.24 and 10.25).
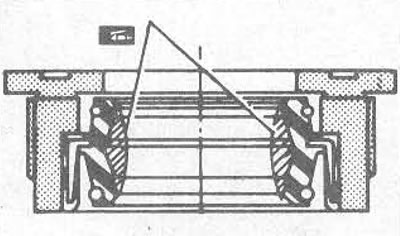
Figure 10.24. Mounting parts of the compression nut of the strut packing gland
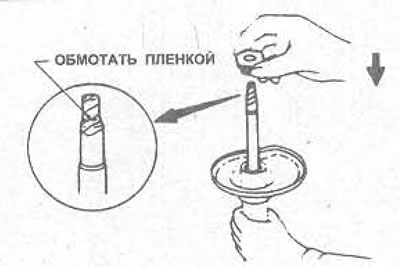
Figure 10.25. Wrap the upper end of the strut piston rod with adhesive tape and install the packing gland nut
15. When tightening the packing gland nut with the tightening force specified Specification note that the actual torque for the nut is given. To obtain this, a torque wrench must be used with a special adapter as shown in Figure 10.26 (Nissan #ST35490000) and a formula must be applied that relates the measured torque on the torque wrench to the true torque. Referring to Figure 10.27, the measured torque can be calculated as follows:
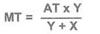
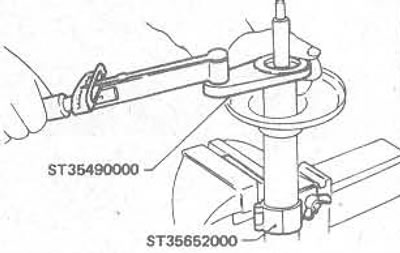
Figure 10.26. Special tools for tightening the compression nut of the strut packing gland
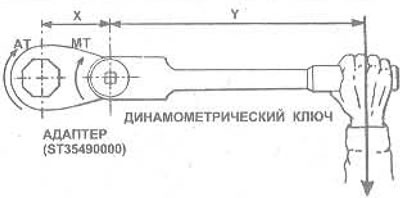
Figure 10.27. Method for calculating torque using a special adapterMT - Measured Torque (by torque wrench); AT - Actual Torque; X - Effective length of the adapter; Y = Effective length of torque wrench
16. If no special tool is available, the nut can be tightened by fitting a ring or double-ended spanner and applying a force measured by a spring balance attached to the outer end of the spanner. To calculate the force required, measure the distance from the centre of the nut to the balance point of the fastener. Note that a torque of 100 N·m (for example) is a turning force of 100 N applied to the end of the lever (spanner) 1 metre long, so the force applied must be reduced proportionally for a longer wrench, and vice versa for a shorter wrench
19. Once you have tightened the packing gland nut, prepare the restored strut (non-cartridge type), holding the strut vertically and pushing the piston rod all the way out, then turn it over and push the piston rod all the way in. Repeat this several times to bleed the main passages of the shock absorber.
20. Note that the suspension struts must be stored in a vertical position. If the strut is installed for long-term storage, clamp it vertically in a vice and move the piston rod all the way up and down several times to restore full damping action.
21. Reassemble in reverse order, noting the following points. Pull the piston rod out completely and check that the spring is properly compressed. Position the spring, upper support and upper mount as shown in Figures 10.28 and 10.29. Tighten the piston rod nut to the specified torque Specification, remove the spring compressors.
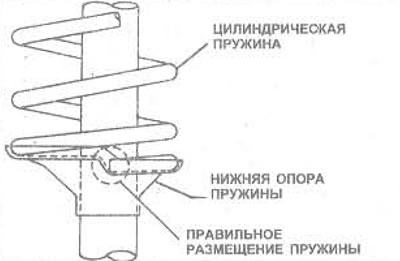
Figure 10.28. Correct position of the rear suspension coil spring
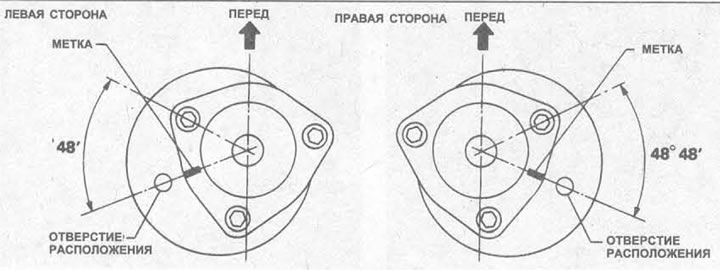
Figure 10.29. Correct locations of the upper rear suspension spring supports and upper mounts
22. Install the suspension strut and spring into the vehicle as described in Chapter 14 of this Section.