


Table of contents: Removal ↓ Installation ↓ Replacing the front end bushings of…↓ Replacing the spring earring bushings ↓
Removal
Rear suspension spring mounting parts
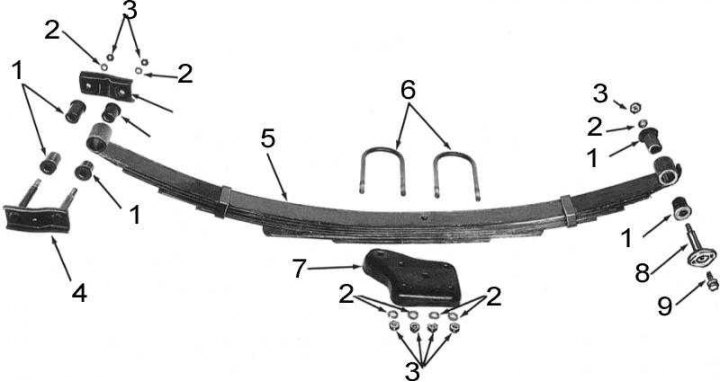
1 - bushings; 2 - washer; 3 - nuts; 4 - earring plate; 5 - leaf springs; 6 - U-bolts for ladder; 7 - support plate; 8 - anchor pin; 9 - bolt
1. Jack up the rear of the car and place it on supports placed under the frame.
2. Place the jack in the center of the rear axle housing and cock it, removing the load from the shock absorbers.
3. Disconnect the lower shock absorber support from the spring U-bolt plate, push the shock absorber upward, moving it away from the axle housing.
4. Lower the bridge, taking the weight off the springs, loosen the U-bolt nuts and remove the support plate.
5. Loosen the mounting nuts and remove the pins and shackle plates from the rear end of the spring.
6. Loosen the nut and bolt securing the anchor pin from the front end of the spring. Remove the pin and take the spring out from under the car.
7. Use a wire brush to remove all dirt and corrosion from the spring leaves. Inspect the spring leaves for cracks and chips. Check the tightness of the central bolt.
8. Check the rubber bushings, shackle pins, anchor pin and travel limiter for signs of wear and damage. Replace any defective components.
Note: The authors of this Manual recommend that in all cases the suspension springs be replaced in pairs, even if only one of them is faulty.
Attention! Remember that the springs are not interchangeable - the right one has a deflection of 22 mm more than the left one.
Installation
Installation is carried out in reverse order.
1. Do not tighten the U-bolt nuts of the U-bolt with a force exceeding 147 Nm, as this may cause deformation of the spring to the bridge mounting brackets or shearing of the U-bolts. Tighten the nuts with the required force evenly, in several stages, and ensure that the support plate is correctly positioned.
2. Do not tighten the clevis, anchor pin and lower shock absorber support nuts until the entire weight of the vehicle is transferred to its wheels. This will help avoid excessive loads on the rubber bushings when they are transferred to the working position.
Replacing the front end bushings of the spring
Note: Replacing the rubber bushings of the rear suspension spring anchor pins can be done without removing the springs from the vehicle.
1. Jack up the rear of the car and place it on supports placed under the chassis frame.
2. Place the jack in the center of the rear axle housing and cock it, lifting the front axle and spring assemblies.
3. Give away the fasteners (bolt with nut) anchor pin from the rear end of the spring.
The material is taken from a web resource NissanBook
4. Remove the rubber bushings from the spring.
Installation is carried out in reverse order.
1. Pre-lubricate the bushings with rubber lubricant.
2. Tighten the anchor pin mounting nut to 76÷102 Nm and the mounting bolt to 11÷15 Nm after the weight of the vehicle has been transferred to its wheels.
Attention! The final tightening of all fasteners with the required force must be done after the weight of the car has been transferred to the wheels, otherwise the bushings will be subject to excessive loads during the operation of the car.
Replacing the spring earring bushings
Note: Replacing the rubber bushings of the rear suspension spring earrings can be done without removing the springs from the vehicle.
1. Jack up the rear of the car and place it on supports placed under the chassis frame.
2. Place the jack in the center of the rear axle housing and cock it, lifting the axle and spring assemblies.
3. Loosen the mounting nuts and remove the clevis assembly from the rear end of the spring and suspension bracket.
4. Remove the rubber bushings from the spring.
5. Installation is carried out in reverse order.
6. Pre-lubricate the bushings with rubber component lubricant.
7. Tighten the fastening nuts to 76÷102 Nm.
Note: If the clevis assembly bolts cannot be properly aligned with the holes in the spring and suspension bracket bushings, insert a wooden block between the spring and the chassis beam, then support the end of the spring with a jack until the components are properly aligned.
Attention! The final tightening of all fasteners with the required force must be done after the weight of the car has been transferred to the wheels, otherwise the bushings will be subject to excessive loads during the operation of the car.