Note. The following procedures require a press, suitable mandrels and pipes.
Removing
1. If necessary, jack up the rear of the vehicle and place it on jack stands under the chassis frame.
2. Give nuts and a bolt of fastening of a cross jet bar to the back bridge and the chassis. Remove the bar from the vehicle. Details of the fastening of the transverse torque rod are shown in the accompanying illustration.
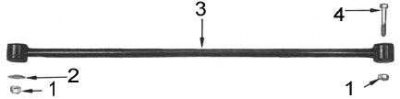
1 - nut; 2 - washer; 3 - transverse jet rod; 4 - bolt
3. Check the cross torque rod bushings for signs of wear and damage. Replace defective bushings:
- Support the rod under the sleeve to be replaced with a piece of pipe of suitable diameter (the sleeve must pass freely through the pipe).
- Using a tool whose mandrel will rest against the outer steel tube of the bushing, press the bushing out of the rod.
- Moisten the outer surface of the new bushing with soapy water and begin to gradually push the bushing into its seat using a piece of pipe that will rest against the outer steel tube of the bushing.
- Make sure the bushing is square and centered.
Installation
Installation is in the reverse order.
1. Carefully check the condition of the rod axle studs and bolts. Replace worn components.
2. Install the cross torque rod on the car, install all fasteners (nuts, bolts, washers).
3. Lower the vehicle to the ground, rock it several times, then tighten the chassis nut to 78÷107 Nm. Tighten the bridge nut with a force of 117÷158 Nm.
4. If necessary, firmly tighten the steering damper mounting nut.