Note. Transmission mounting bolts have different lengths, are not interchangeable and must be screwed strictly into their original places during installation.
1. Remove the battery from the tray (see chapter Engine electrical equipment).
2. Remove the air cleaner assembly and intake air path resonator (see chapter Power and exhaust systems).
3. Disconnect the wiring from the transmission solenoid valves, RPM sensor, start enable/backup light switch, VSS and, on models since 1995, the crankshaft position sensor (TFR). It would be wise to remove the CKP sensor to avoid damaging it when removing the transmission.
4. Disconnect the appropriate ventilation hoses.
5. Remove the left transmission suspension bracket.
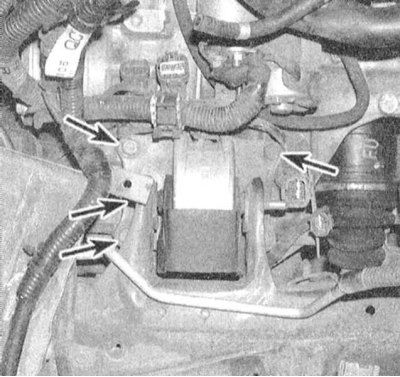
6. Turn out the top bolts of fastening of transmission to the engine.
7. Remove the starter (see chapter Engine electrical equipment).
8. Loosen the wheel nuts, jack up the vehicle and place it on jack stands. Remove wheels. Drain ATF (see chapter Settings and ongoing maintenance).
9. Remove the transmission fluid dipstick guide tube.
10. Disconnect the oil cooler lines.
11. Disconnect the shift cable from the transmission (see Section Checking, adjusting and replacing the shift cable).
12. Remove drive shafts (see chapter Clutch and drive shafts).
13. Remove the encoder access cover.
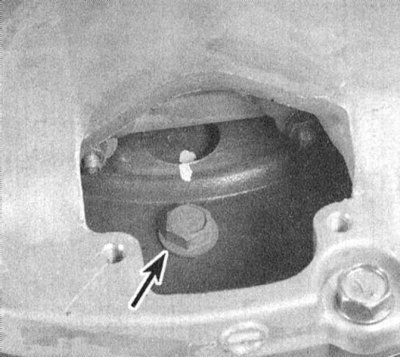
14. Mark the position of the rotation transducer in relation to the drive disk.
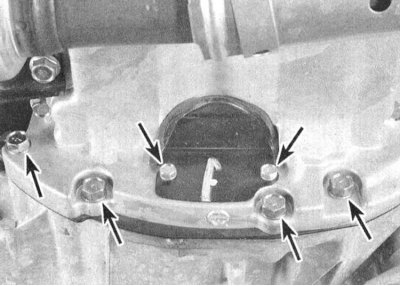
15. Turn out bolts of fastening of the converter of rotation.
16. Hang the engine on a winch or beam, or support it from below with a jack (do not forget to place a wooden block to distribute the load).
17. Support the transmission with a specially equipped jack and secure it on the jack with safety chains.
18. Remove the center beam (see chapter Engine).
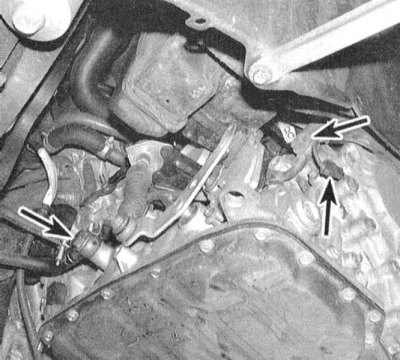
19. Turn out bolts of fastening to transmission of the pallet crankcase of the engine. Turn out a forward and a bolt of fastening of transmission to the engine and a back bolt of fastening of the engine to transmission.
20. Slightly lower the transmission on the jack and for the last time make sure that nothing prevents its separation from the engine.
21. Move the jack to the side while removing the transmission housing assembly from the drive pins. Make sure that the rotation transducer does not fall out - immediately fix it inside the separated assembly. Lower the jack and remove the transmission from under the vehicle.
Installation
1. Make sure that the rotation converter is securely mounted in the transmission. Measure the distance from the converter bolt hole to the transmission mating surface - it should be at least 19mm on 1993 models, 18mm on 1994 models, 14mm on 1995 to 1997 models. issue and 19 mm on models since 1998, otherwise turn the converter while pressing it inside the assembly - a click should be heard.
2. Having fixed the transmission assembly on the jack with safety chains, bring it to its regular place - make sure that the rotation converter does not slip out (try not to tilt the assembly).
3. Press the transmission against the engine, carefully sliding it with the receiving holes onto the drive pins.
4. Align the landing marks on the rotation transducer and drive plate.
5. Screw in bolts of fastening of transmission and tighten them with the demanded effort.
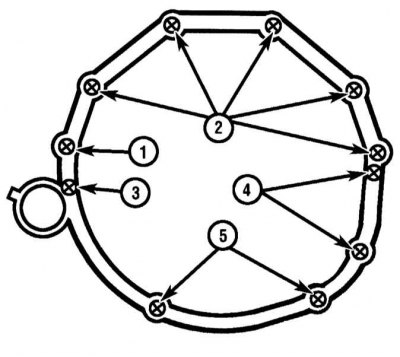
1 - Bolts 60 mm
2 - Bolts 45 mm
3 - Bolts 25 mm
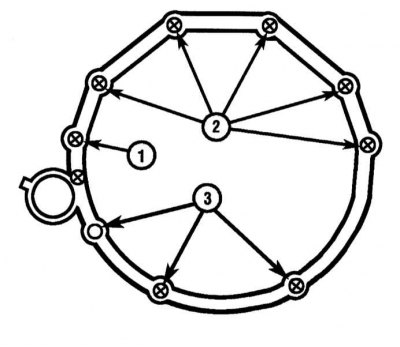
1 - Bolts 60 mm
2 - Bolts 45 mm
3 - Bolts 25 mm
4 - Bolts 20 mm
5 - Bolts 28 mm
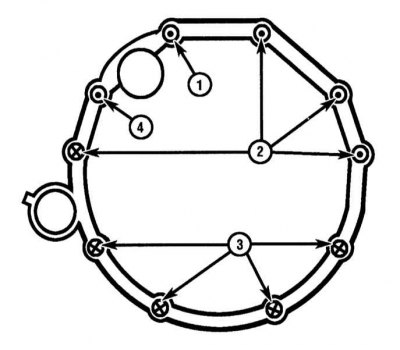
1 - Bolts 65 mm
2 - Bolts 52 mm
3 - Bolts 40 mm
4 - Bolts 124 mm
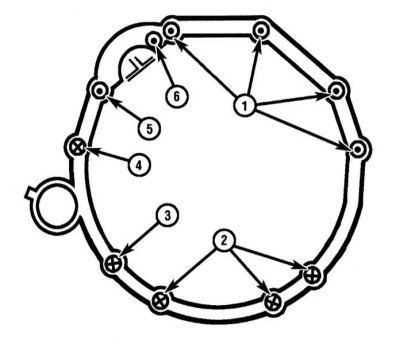
1 - Bolts 45 mm
2 - Bolts 30 mm
3 - Bolts 40 mm
4 - Bolts 45 mm
5 - Bolts 80 mm
6 - Bolts 65 mm
6. Alternately screw in the bolts securing the rotation converter to the drive disk, tighten them with the required force. Reinstall the transducer access cover and tighten securely.
7. Install center beam. Track reliability of a tightening of fixture.
8. Install the left transmission mount. Firmly tighten the mounting bolts and nuts.
9. Remove the jacks supporting the transmission and engine assemblies.
10. Replace the dipstick guide tube.
11. Install the starter (see chapter Engine electrical equipment).
12. Connect the shift cable (see Section Checking, adjusting and replacing the shift cable).
13. Connect the electrical wiring to the appropriate solenoid valves and sensors.
14. Connect the drive shafts to the transmission (see chapter Clutch and drive shafts).
15. Lower the vehicle to the ground.
16. Fill the transmission with the required amount of ATF of the required grade (see chapter Settings and ongoing maintenance). Carry out road tests of the car, check the unit for signs of leaks.