Note. To perform the procedures described below, you will need a special throne jack.
Attention! Attempting to remove the transmission without using a special jack can result in personal injury and damage to components!
Removing
1. Drive the car with the rear wheels onto the overpass. Set the parking brake and block the rear wheels with wedges.
2. Jack up the front of the car and place it on jack stands.
3. Disconnect the negative cable from the battery.
4. Remove the center console.
5. Release the clip, squeeze the lock tabs, remove the pin and disconnect the drive cable from the parking brake control lever.
6. Loosen the cable sheath jam nut and release the cable from the bracket.
7. Pull the cable through the floor panel, pulling it out of the car along with the grommet.
8. Drain the transmission oil.
9. Mark the position of the front and rear cardan shafts relative to each other, as well as their position relative to the main gear drive flange, transfer case flange and parking brake drum.
10. Give bolts and nuts and remove cardan shafts from the car.
11. Bend back the rubber protective cover, unscrew the nut that secures the shift rod to the transfer case control lever, remove the washer and spacer. Disconnect the shift rod from the control lever.
12. Give bolts of fastening of an arm and remove the lever of switching of a distributing box from a transmission case.
13. Disconnect the ventilation hoses and electrical wiring from the transfer case and transmission housings.
14. Place a trolley jack under the transfer case and secure the assembly to it with a sling or chain.
15. Give bolts of fastening of a distributing box to transmission and remove a box from the car.
Note. The weight of the transfer case is about 50 kg, and therefore the compilers of this manual strongly recommend the use of a trolley jack to remove it.
16. Remove the dipstick. Loosen the mounting bolt and remove the dipstick guide tube with O-ring from the transmission.
17. Give a bolt with a nut and remove rubber insulators from an arm of a suspension bracket of system of release of the fulfilled gases.
18. Disconnect the electrical wiring from the starter, give the fixing bolts and remove the starter from the car.
19. Give fixing bolts and remove a back guard of the engine.
20. Mark the mounting position of the rotation converter on the drive disk, then gradually loosen the converter mounting bolts.
21. Give a counternut of draft of the selector and disconnect draft from a rod of the selector.
22. Give the hollow bolts for connecting the oil cooler tubes, disconnect the pipes from the transmission, remove the sealing washers. Seal the open ends of the tubes. Give bolts of clamps of tubes of an oil cooler.
23. Give bolts of fastening of transmission to the engine.
24. Get a special jack under the transmission and fix the transmission on it with a chain.
25. Support the transmission with a jack. Give bolts and nuts of fastening of a cross beam to a frame of the chassis and transmission supports. Remove the cross member from the vehicle.
26. Carefully lower the jack, making sure that the hoses and wires connected to the engine are not taut. Remove the transmission assembly with the rotation converter. Appearance (on right) the automatic transmission removed from the car is shown in the accompanying illustration.
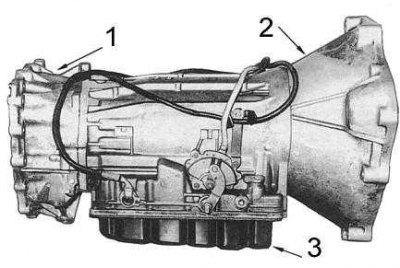
1 - extension casing
2 - rotation converter
3 - oil pan
Installation
Installation is in the reverse order.
1. Make sure that the rotation converter is installed correctly in the front of the transmission.
2. Check the cleanliness of the mating surfaces of the backplate of the motor and the rotation converter, lubricate the converter flange with Loctite 587 sealant (or its equivalent).
3. Raise the jack and align the transmission with the engine. Make sure that the mating surfaces of the rotation converter and the motor backplate are parallel to each other.
4. Tighten all fasteners to the required torque, restore the original connections of the electrical wiring and ventilation hoses.
5. Apply a bead of sealant around the starter flange mating surface. Install the starter on the engine.
6. Reinstall cardan shafts. Check alignment of landing marks.
7. Connect and adjust the parking brake cable.
8. Fill the transmission with the required amount of oil of the required grade (see tables of sizes and adjustments at the end of the guide).