


Table of contents: Removal ↓ Installation ↓
Gearbox housing installation details
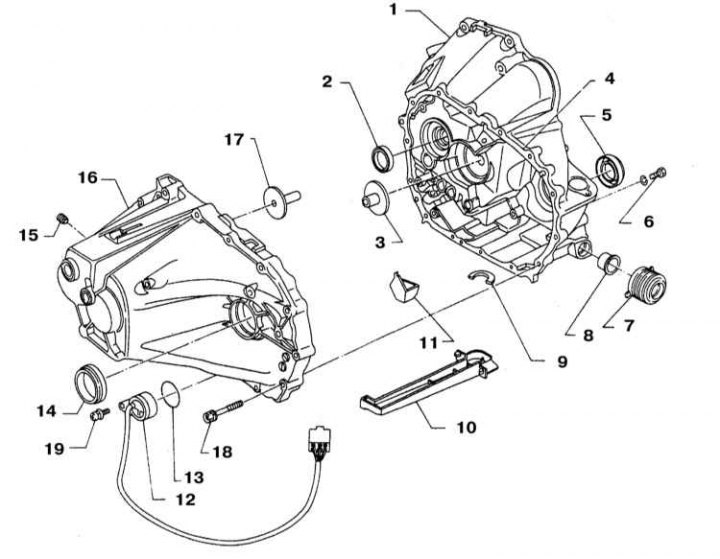
1 - Clutch dome; 2 - Seal; 3 - Oil flow (secondary shaft); 4 - Clutch dome surface mating with the gearbox housing; 5 - Drive shaft seal; 6 - Bolt (20÷29 Nm); 7 - Dust cover; 8 - Sealing cuff; 9 - Magnetic segment; 10 - Oil trough; 11 - Oil pocket; 12 - Reverse light switch sensor; 13 - Sealing ring; 14 - Drive shaft seal; 15 - Drain plug (25÷34 Nm); 16 - Manual transmission housing; 17 - Oil flow (primary shaft); 18 - Bolt (16÷21 Nm); 19 - Clamp bolt (3.7÷5.0 Nm)
Removal
1. Remove the battery with the tray (see Chapter Engine electrical equipment).
2. Remove the air cleaner with the MAF sensor and air intake (see Chapter Power and exhaust systems).
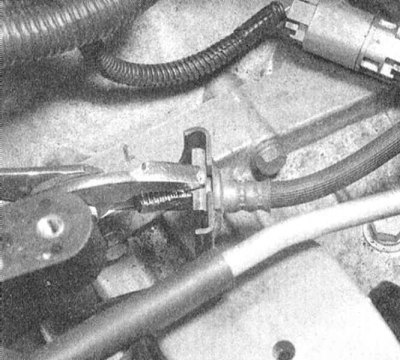
3. Remove the clutch hydraulic actuator cylinder from the manual transmission housing (see Chapter Clutch and drive shafts). Release the lock and release the clutch hydraulic line from its support bracket on the transmission housing.
Caution! Do not depress the clutch pedal with the slave cylinder removed.
4. Disconnect the electrical wiring from the VSS (see section Replacing oil seals). Disconnect the grounding buses.
5. On 1995 and later models, remove the crankshaft position sensor (see Chapter Engine management systems).
6. Remove the starter assembly from the gearbox housing (see Chapter Engine electrical equipment).
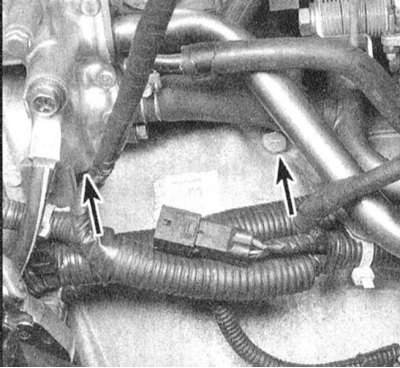
7. Remove the upper gearbox housing mounting bolts.
Note: The transmission to engine mounting bolts are different lengths and are not interchangeable, so they should be clearly marked when unscrewing.
8. Loosen the front wheel nuts. Jack up the car and place it on supports. Remove the front wheels.
9. Disconnect the wiring from the reverse light and starter circuit breaker switch sensors (see section Checking and replacing the reverse light switch sensor).
10. Remove the section of the exhaust system that runs under the power unit (see Chapter Power and exhaust systems).
11. Drain the transmission oil (see Chapter Settings and ongoing maintenance).
12. Disconnect the support rod and the shift control rod from the transmission (see section Removal and installation gear shift drive components).
13. Remove the drive shafts (see Chapter Clutch and drive shafts).
14. Support the engine with a jack (to distribute the load, place a wooden block between the jack head and the oil pan). The engine must remain supported during the entire time the transmission is removed from the vehicle.
15. Support the gearbox with a trolley jack and secure it to the jack with safety chains.
[Data taken from this portal www.NISSANBOOK.ru]
16. Remove the center cross member that runs under the powertrain assembly.
17. Slightly lift the power unit assembly and disconnect the left support of its suspension. If the vehicle is equipped with the appropriate equipment, also unscrew the bolts securing the engine oil pan to the transmission (see Chapter Engine).
18. Remove the remaining bolts securing the clutch dome to the engine block.
19. Make sure one last time that all communications are disconnected and nothing interferes with the separation and removal of the gearbox.
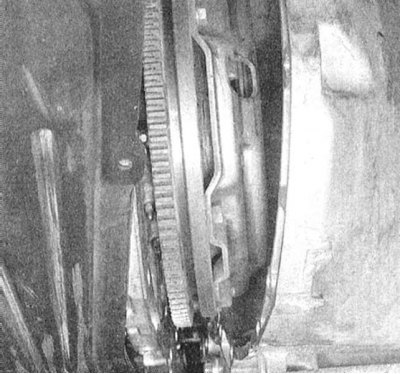
20. Lower the jack supporting the engine and begin to move the manual transmission assembly to the side, separating it from the unit. After the primary shaft journal is completely released from the clutch driven disk hub, lower the assembly and remove it from under the car. Try, if possible, not to tilt the gearbox removed from the car.
21. Take this opportunity to check the condition of the clutch components (see Chapter Clutch and drive shafts). It would be good practice to replace the clutch regardless of its current condition.
Installation
1. If removed, reinstall the clutch components (see Chapter Clutch and drive shafts).
2. Secure the transmission to the jack, as you did during dismantling, and carefully slide it under the car, lifting it to its normal position. Carefully engage the primary shaft with the splines of the clutch disc hub, making sure that the guide pins enter the corresponding holes in the mating surface of the engine. Do not use force under any circumstances - if the primary shaft does not enter the clutch disc hub, adjust the angle of the gearbox and slightly turn the shaft, achieving correct alignment of the splines.
Attention! Never tighten a skewed gearbox to the engine using the mounting bolts - this may lead to irreversible failure of the components!
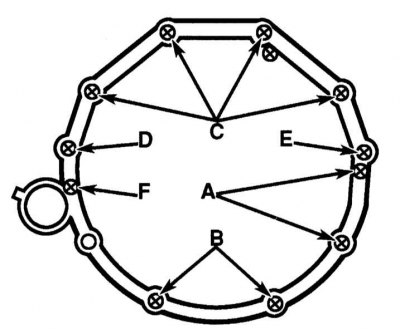
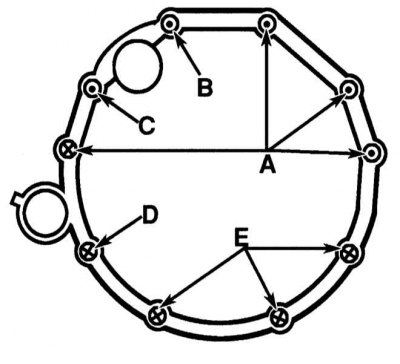
3. Screw in the bolts securing the manual transmission to the engine. Tighten the fasteners to the required torque.
 |
 |
4. Connect the powertrain suspension support (make sure the fasteners are tightened securely).
5. Reinstall the transmission mount and crossmember.
6. Remove the jacks supporting the gearbox and engine. Reinstall all components removed during transmission dismantling (see Chapters Power and exhaust systems, Engine electrical equipment and Engine management systems).
7. Make sure that the electrical and hydraulic lines are connected and routed correctly. Make sure that the gearbox is filled with the correct amount of transmission oil of the correct grade (see Chapter Settings and ongoing maintenance). Lower the car to the ground.
8. Connect the negative cable to the battery. Test drive the vehicle, check the engine and gearbox for signs of developing leaks.