


Checking the correct functioning
1. Disconnect the negative cable from the battery.
2. Disconnect the electrical connector from the start enable switch sensor.
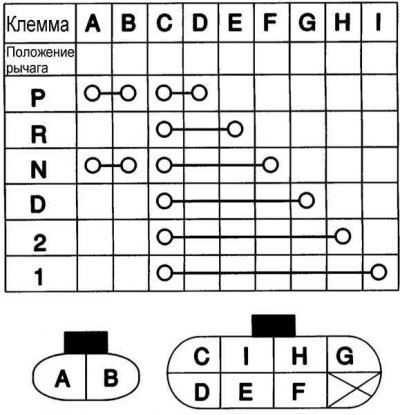
3. Check for continuity between the connector terminals at different positions of the selector lever (see accompanying illustration).
4. If there is no continuity in all tests, disconnect the selector linkage from the lever and repeat the procedure.
5. If the test gives a positive result, adjust the selector rod.
6. If the test results are negative, remove the start enable switch from the transmission and repeat the test again.
7. If everything is OK this time, reinstall the sensor switch and adjust it as described later in this Section.
8. If there is still no continuity in all cases, replace the start enable switch sensor.
Removal
1. Disconnect the negative cable from the battery.
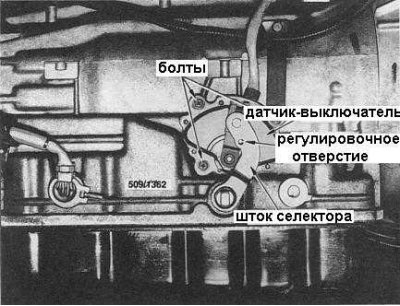
2. Disconnect the electrical connector of the start enable switch sensor (the appearance of the sensor-switch is shown in the accompanying illustration).
3. Shift the transmission to position I, loosen the mounting bolts and remove the start enable switch from the transmission.
Installation
Installation is carried out in reverse order.
1. Check the quality of the electrical contact of the connector terminals and the reliability of the latter's fastening.
2. Adjust the sensor switch.
Adjustment
1. Loosen the selector rod lock nut and disconnect the rod from the selector rod.
2. Move the selector lever to the "N" position.
3. Loosen the start enable switch sensor mounting bolts.
4. Insert the ø 4 mm rod into the hole in the selector rod.
5. Adjust the position of the sensor switch so that the rod fits into the hole in it. Keep the rod as perpendicular to the sensor switch as possible.
6. Tighten the sensor switch mounting bolts.
7. Connect the selector rod to the rod, tighten the lock nut and adjust the rod as described below.