Removing
Two hoists are required to remove the gearbox so that the engine and gearbox can be lifted separately.
1. Disconnect the ground cable from the battery.
2. Drain gear oil. The drain plug is located on the underside of the gearbox housing.
3. Remove power shafts from a transmission as it is described in the Head Clutch and drive shafts. At the same time, safety measures must be observed.
4. Disconnect the clutch cable from the release lever. The illustration below shows where the clutch cable is connected to the lever.
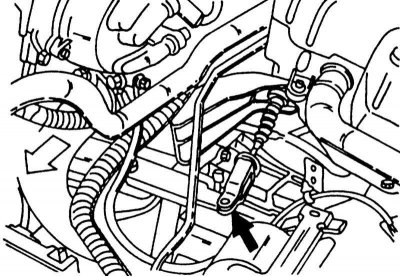
At the point indicated by the black arrow, disconnect the clutch cable from the release lever. The white arrow points to the front of the car
5 - Disconnect the speedometer cable.
6 - Disconnect the electrical wires from all sensors located in the gearbox.
5. Disconnect the cable from the starter, unscrew and remove the starter.
6. As shown in the illustration below, disconnect the shift bar and stabilizer bar from the gearbox.
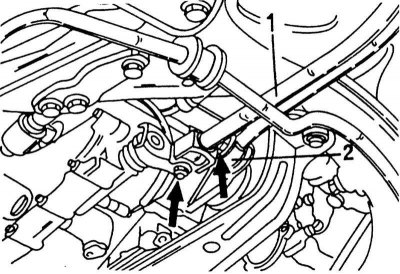
Disconnecting the shift rod with a manual gearbox installed
1 - switching rod
2 - thrust bar
7. Loosen all fasteners of the exhaust pipe of the muffler and remove it.
8. Place a lift under the oil pan. Put a piece of wood between them so as not to damage the pallet.
9. Place a second lift under the gearbox and lift it up slightly in the hangers. Now you can remove the bolts of fastening and suspension of the gearbox.
10. Remove the gearbox mounts on the rear side and on the left. Unscrew the suspension on the right side and on the back side. The illustration below shows the respective hangers.
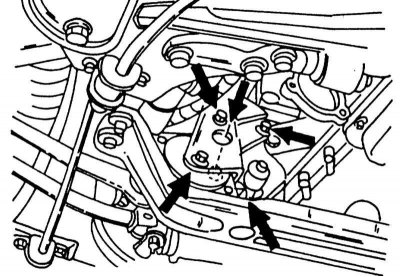 |  |
Both transmission mounts shown must be removed.
11. Loosen the bolts connecting the engine and gearbox. To do this, use a lift to get to the bottom bolts.
12. Disconnect a transmission from the engine and take out on the lift. When doing this, make sure that the gearbox cannot fall off the lift. Also make sure that it does not stumble upon any part of the engine and does not rest on the input shaft.
Installation
The gearbox is installed in the reverse order of removal, taking into account the following points:
1. Before installing, thoroughly clean the mating surfaces of the engine rear intermediate plate and clutch housing.
2. Lightly lubricate the splines of the input shaft of the box and the inner splines of the clutch disc.
3. Install the gearbox on the engine and insert the input shaft into the clutch disc. To do this, the crankshaft can be rotated back and forth by the V-belt until the splines match. Tighten the bolts only after there is no gap between the box and the engine. Insert and tighten the bolts to the specified torque, which is not the same on all models. Different length bolts are also used and some bolts hold the engine to the gearbox while others screw into the engine from the gearbox side.
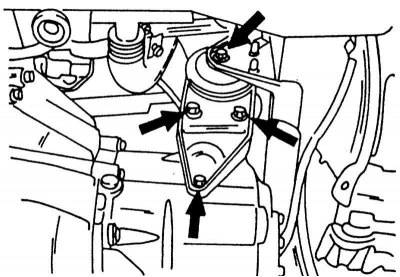
- In the case of a carbureted engine, tighten the bolts according to the illustration below. bolts (A) fasten the gearbox to the engine, bolts (IN) fasten the engine together with the thrust angle on the gearbox. All bolts are different lengths.

Mounting the gearbox on the engine in the variant with a carburetor
Bolt length "l": 1 - 70 mm; 2 - 80 mm; 3 - 30 mm; 4 - 25 mm
Tightening torques: 1 to 3 = 30-40 Nm
all others = 16-21 Nm
- On an injection engine, tighten the bolts as shown in the illustration below. These bolts also have different lengths and tightening torques. Again, some bolts hold the gearbox to the engine (A), and some engine on gearbox (IN).
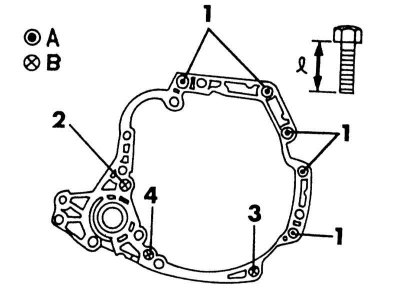
Mounting the gearbox on the engine in the variant with the injection system
Bolt length "I": 1 - 55 mm; 2 - 65 mm; 3 - 35 mm; 4 - 45 mm
Tightening torques: 1 and 2 = 70-80 Nm
4. When tightening the bolts, pay attention to the different torque values. Tighten the bolts evenly over several passes.
5. Install shift bar and stabilizer bar according to illustration.
6. Fill the box with oil. The oil quantity is not the same for all gearbox versions:
- 5-speed gearbox, 2.9L carbureted engine
- 5-speed gearbox, injection engine 3.5 - 3.7 l
7. Installation of power shafts see in the Chapter Clutch and drive shafts.
8. Attach the clutch cable and adjust the pedal play as described in Chapter Clutch and drive shafts.