


Table of contents: Removal ↓ Installation ↓
Note: The following procedures require a press, suitable mandrels and tubing.
Removal
1. Jack up the front of the vehicle on the appropriate side and place it on supports placed under the chassis frame and front axle assembly.
2. Remove the corresponding front wheel.
3. If the vehicle is equipped accordingly, loosen the anti-roll bar bolts and remove the bracket from the trailing arm to be replaced.
4. Remove the nut from the rear end of the trailing arm, remove the washer and bushing (see accompanying illustration). Disconnect the steering link ball joint from the steering knuckle on the corresponding side of the vehicle.
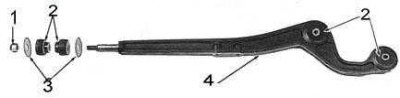
1 - nut; 2 - bushings; 3 - washers; 4 - longitudinal lever
6. Loosen the nuts of the bolts securing the trailing arm to the axle support bracket.
7. Place the jack under the front axle, then cock it, relieving the load on the trailing arm mounting bolts.
8. Remove the bolts by knocking them out with a brass drift (support the bar while knocking out the bolts)
9. Lower the rod away from the axle and remove the rear end of the rod from the support bracket on the chassis.
10. Inspect the trailing arm for cracks and signs of deformation; replace if necessary.
11. Check the condition of the bushings in the trailing arm. Replace defective bushings (see accompanying illustration):
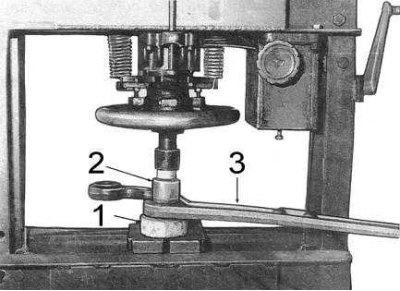
1 - pipe; 2 - mandrel; 3 - longitudinal lever
- Support the rod under the bushing to be replaced with a piece of pipe of a suitable diameter (the sleeve should pass freely through the pipe).
- Using a tool whose mandrel rests against the inner steel tube of the bushing, press the bushing out of the rod.
- Wet the outside of the new bushing with soapy water and begin to gradually push the bushing into its seat using a piece of pipe that will rest against the outer steel tube of the bushing.
- Make sure the bushing is seated perpendicularly and is centrally located.
Installation
Installation is carried out in reverse order.
1. If the bushings have been replaced, carefully check the condition of the rod axle bolts. Replace any worn components.
2. Install the trailing arm on the vehicle, install the fasteners (nuts, washers and rubber bushings), but do not tighten it completely at this stage. Lower the car to the ground.
3. Rock the car several times to settle the suspension components, then tighten the chassis nut to 93÷123 Nm. Tighten the axle nuts to 157÷216 Nm.
4. Install the anti-roll bar in place.