Removal and installation
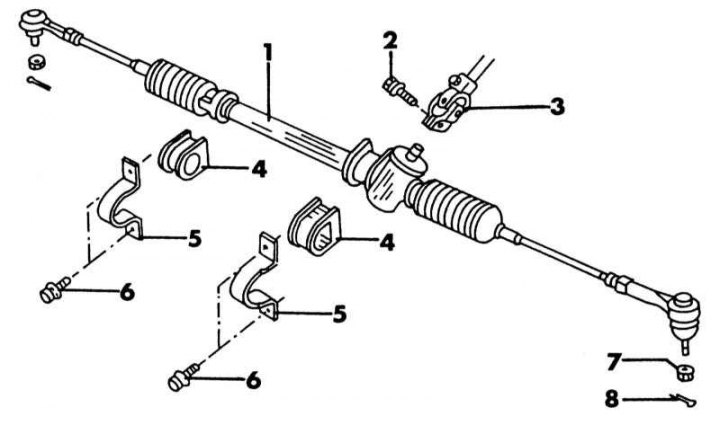
Place of fastening of a steering without hydraulic booster
1 - steering mechanism; 2 - bolt, 25-30 Nm; 3 - lower steering hinge; 4 - rubber support; 5 - mounting clamp; 6 - bolt, 73-97 Nm; 7 - castellated nut, 30-40 Nm; 8 - cotter pin, always replace
The illustration above shows how mechanical steering is installed in a vehicle. Removal and installation are carried out on the basis of this illustration:
1. Raise the front of the vehicle and place it on stands.
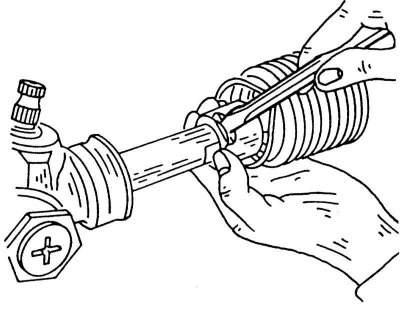
2. Remove the cotter pins from the castle nuts of the tie rod ends, loosen the nuts and disconnect the ball joints with a special tool, as shown in illustrations. The illustration shows a special puller, but any ball stud puller will work for this job.
3. Loosen the four steering gear mounting bolts.
4. Disconnect the lower joint from the steering gear.
5. Completely remove the steering mechanism mounting bolts, remove the steering mechanism along with the steering rods to the side. Installation is carried out in the reverse order, taking into account the following points:
6. Tighten the steering mechanism bolts with a force of 73-97 Nm.
7. Align the flattening of the steering gear with the threaded hole of the flange as shown in the illustration and carefully drive in the clamp bolt. Then tighten the nut to 25 to 29 Nm.
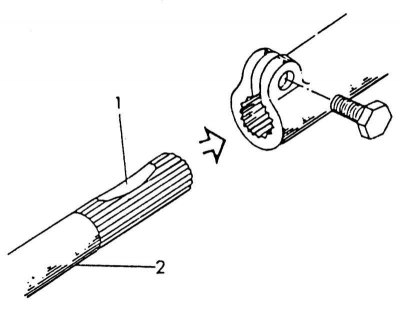
Flattening (1) must be in line with the clamping spline of the steering shaft (2).
8. When tightening the nuts of the tie rod ends, tighten them with a force of 30-40 Nm, regardless of the position of the cotter pin hole. Now check the position of the hole and tighten the nut further so that the cotter pin can be inserted. The tightening torque must not exceed 50 Nm.
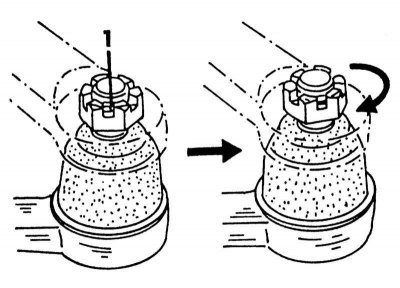
Tightening the castellated nuts of the tie rod ends. If the pin hole (1) does not lie on the line, tighten the nut as shown on the right.
9. Check that the steering wheel spokes are in the correct position when the wheels are in the middle position. It may be that the steering gear is turned one turn further.
Steering repair
Steering gear disassembly is not recommended, as in most cases the rack and/or rack housing must be replaced if the steering gear is suspected to be broken. Since both parts are the main elements of the steering gear, it is better to install a new steering gear. Replace both tie rods. To do this, the steering mechanism must be removed. The illustration below shows the relevant details.

Tie rod parts on one side
1 - tie rod; 2 - cuff collar; 3 - cuff; 4 - cotter pin; 5 - castellated nut; 6 - fastening clamp; 7 - locknut; 8 - tie rod end
1. Thoroughly clean the outside of the steering gear and clamp the steering gear in a vise.
2. Loosen the locknuts on both tie rods and unscrew the tie rod ends.
3. Pull off the cuffs after loosening the fastening collar.
4. Knock out the stop plate on the rack with a brass chisel as shown in the illustration.
Bending the lock plate from the steering rod on the rack mount.
5. While holding the rack on the inside with a wrench, unscrew the tie rods. Turn away steering drafts and remove washers. Lock washers must always be replaced.
6. Thoroughly clean all parts and replace worn parts.
7. Assembly is carried out in the reverse order, but remember the following points and adjustments:
8. Place a locking plate on the rack and screw in the tie rods. Tighten the tie rod while holding the rack, with a force of 78-98 Nm. Bend the tab of the lock plate onto the two surfaces of the tie rod pivot.
9. Screw on the tie rod ends and temporarily tighten the lock nut. The main length of the tie rods is 183.6 mm and is measured between the outer surface of the lock nut and the beginning of the collar. Set this length.
10. Install the seals and install the inner ends of the seals again on the rack housing.
11. After installing the steering mechanism, adjust the convergence to set the correct length of the steering rods and adjust the middle position of the steering.