2. Bend the ends of the cotter pins on the nuts of the steering rod joints and remove them with side cutters.
3. Loosen the tie rod nuts.
4. Disconnect the hinges with a suitable puller, as already shown in illustrations.
5. Loosen the hydraulic hose clamp and disconnect the hose.
6. Unscrew the union nut of the pipeline on the steering mechanism, remove the pipeline and collect the flowing liquid in a container.
7. Loosen the four steering gear mounting bolts.
8. Disconnect the lower hinge of a steering shaft from a gear wheel of a steering.
9. Also remove the upper clamping bolt of the steering universal joint so that the joint can be removed completely later.
10. Release the cable harness from its mounting on the intermediate frame.
11. Completely remove the steering gear mounting bolts and remove the mounting bracket.
12. Place a hoist with a wooden pad under the power unit, lift it until it is well tensioned, unscrew the middle motor carrier and remove it. The rear engine mount must also be removed.
13. Now remove the steering gear. To do this, first slide it to the left, then lower it and remove it from the right side of the car. Steering rods remain on the steering mechanism. When removing the cardan joint, it must disengage from the steering gear and steering column.
14. Installation of the steering mechanism is carried out in the reverse order, taking into account the following points:
15. Tighten the steering mechanism with a force of 73-97 Nm.
16. Align the flattening on the gear with the threaded hole in the flange and carefully drive in the clamping bolt without damaging the threads. Tighten the nut with a force of 25-30 Nm.
17. Tighten both hydraulic pipelines on the steering mechanism, being guided by an illustration. Tighten the low pressure pipe (1) with a force of 20-25 Nm, high pressure pipeline (2) with a force of 15-25 Nm.

Two fittings on servo control
1 - low pressure pipeline
2 - high pressure pipeline
18. When connecting both steering rods, proceed as on a normal steering (see also illustration).
19. Check that the steering wheel spokes are in the correct position when the wheels are in the middle position. It may be that the steering gear is turned one extra turn.
Steering repair
As already mentioned for non-power steering, it is not worth repairing. In case of significant damage, it makes sense to install a new steering mechanism.
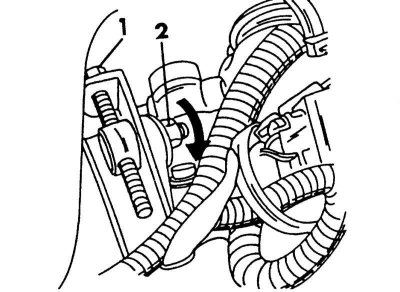
Separate elements for adjusting the tension of the steering pump belt on a carbureted engine
1 - adjusting bolt
2 - locknut
Checking the tension of the steering pump V-belt
The position of the steering pump drive belts for both engine versions is shown in the illustrations below. Also in p. "Belt tension checked..." the dimensions that the belts should be pressed through when pressed with your thumb are given.

The location of the drive belts on the injection engine. Check the tension at the points indicated by the arrows
1 - belt pulley of the water pump; 2 - belt pulley of the power steering pump; 3 - belt pulley of the generator; 4 - crankshaft belt pulley
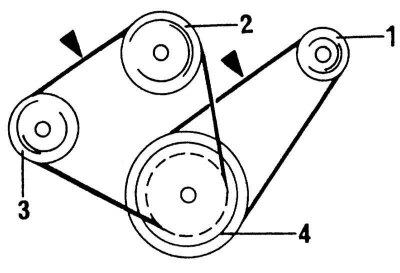
The location of the drive belts on the injection engine. Check the tension at the points indicated by the arrows.
As well as the location, the adjustment of the belts is different on a carbureted and injection engine. Both belts have a tensioner that also looks different. If adjustment is necessary, do the following:
1. On the injection engine, following the illustration, loosen the bolt (2) and tighten the adjusting bolt (1), until the required tension is reached. Then tighten the bolt (2) with a force of 16-22 Nm. After adjustment, check the tension in the illustrations place and compare with the required value.
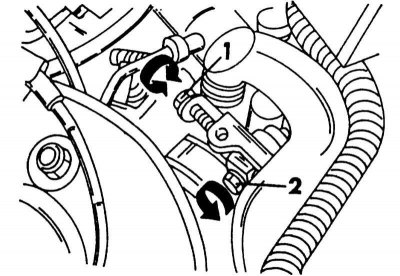
Elements for adjusting the tension of the steering pump belt with an injection engine installed
1 - adjusting bolt
2 - locking bolt
2. On a carbureted engine, following the illustration, loosen the locknut (2) on the inside of the tensioner and turn the adjusting bolt (1), until the required tension is reached. Tighten locknut (2) with a force of 6-9 Nm.
3. If the V-belt is too loose, the pump will not be able to generate the necessary steering pressure. The consequence may be a slow response of the wheels to steering wheel turns.
Filling the steering and removing air from the system
1. Place the car on a level surface.
2. Warm up the engine.
3. Run the engine at 1000 RPM or less and turn the steering wheel from lock to lock to increase the hydraulic oil temperature.
4. Unscrew the cover of the steering compensation tank and check that the oil level is between the two marks on the dipstick (illustration). If the check is carried out on a cold liquid, the oil level lies slightly lower on the rod.
5. If required, add fluid (which is used in automatic transmissions), and adjust the level.
6. Screw the cover back on.
7. If the system has been emptied, the air must be removed from it:
8. Put the front of the car on supports.
9. Turn the steering wheel from lock to lock two or three times.
10. If fluid level drops, add fluid.
11. Check the fluid level in the reservoir as described above.
12. Start the engine and let it idle.
13. Turn the steering wheel from lock to lock two or three times.
14. Lower the vehicle back onto its wheels.
15. Let the engine run at 1000 rpm.
16. Turn the steering wheel from lock to lock several times.
17. Turn the steering wheel to the middle position.
18. Turn out a cover of a compensatory tank and check up liquid level. Start the engine now and check if the level in the reservoir rises. If the level rises by more than 5 mm, the bleed operation must be repeated as there is still air in the system.
19. Reinstall the cover.
Fluid replacement
If the fluid has been in use for a long time, the pump or steering gear has been removed, or the hydraulic oil has mixed with air, the fluid must be replaced:
1. Put the front of the car on stands.
2. Disconnect the return hose from the compensation tank and drain the liquid into a container underneath.
3. Turn the steering wheel from lock to lock until all fluid is out of the system.
4. Fill the system with fluid and bleed air as described in the previous paragraph. Be sure to use the correct fluid for this. Dexron oil is usually used, but your Nissan dealer may offer a different one.
5. Make a test drive and check that the steering responds well to the rotation of the steering wheel in motion and in place.