


Remove the snap ring from the groove on the inner end of the drive shaft as it should always be replaced. If only the drive shaft needs to be removed, follow the instructions below:
1. Loosen the wheel nuts and steering knuckle nut with the wheel on the ground and place the front of the vehicle on stands.
2. Unbolt the brake caliper from the steering knuckle and tie it to the front suspension with a piece of wire. Do not leave the caliper hanging by the brake hose. Do not press the brake pedal again until the caliper is reinstalled.
3. Remove the tie rod ball joint nut and remove the joint using a suitable puller from the steering linkage arm (see sections Steering without power steering and Power steering (servo control)).
4. Disconnect the ball joint on the top side of the steering knuckle (see section Front suspension), pull the steering knuckle outward and tap the drive shaft out of the steering knuckle with a light metal hammer. To avoid damaging the drive shaft threads, screw the nut back onto the shaft until the outside is flush with the shaft. Be careful not to damage the rubber seals on the drive shafts. You can wrap a thick rag around the rubber seal. You may need a puller to remove it.
5. Remove the drive shaft from the transmission. If you have an automatic transmission, you must remove the right shaft before you can push the left shaft out. When removing the shaft from the transmission, proceed as follows:
- When removing the right shaft (illustration below) without a thrust bearing, insert a large screwdriver or pry bar, as shown in the illustration below, into the gap between the joint and the gearbox and press out with a strong jerk of the screwdriver.
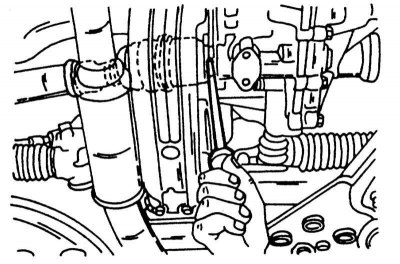
Place a screwdriver behind the CV joint to pry the CV joint away from the transmission (right drive shaft).
- When removing the right shaft with the thrust bearing, place a screwdriver in the position shown in the illustration below and press the shaft out in the same way.
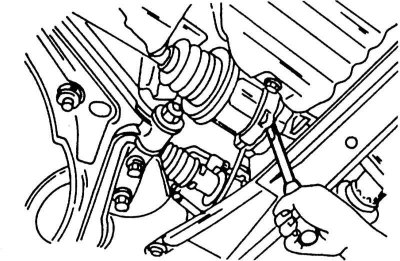
Removing the drive shaft from the gearbox with the thrust bearing installed (right shaft).
- When removing the left drive shaft with a manual transmission installed, use a large screwdriver. Insert it into the location shown in the illustration below and push the screwdriver handle inwards with a short jerk until the shaft retaining ring pops out of its groove.
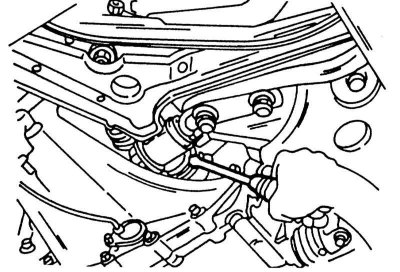
Removing the drive shaft from the gearbox with a manual transmission installed (left shaft).
- Removal the left drive shaft with the automatic transmission installed is a little more difficult, as the shaft must be driven out from the other side of the transmission with a long screwdriver, which must have a blade that goes all the way through so as not to damage the handle. The screwdriver installation is shown at the top in the illustration below. The screwdriver must be installed in the place shown. Be sure not to damage the differential gear or the gear shaft in the process. Installation is carried out in the reverse order. Always replace the seal on the corresponding side of the transmission. Nissan workshops use seal installation mandrels. Since in most cases such mandrels are not available to amateurs, extreme caution must be exercised when driving in the seal.
Removing the left drive shaft with the automatic transmission installed. Knock out the shaft with a screwdriver. Position the screwdriver 5 mm in front of the bevel gear axis:
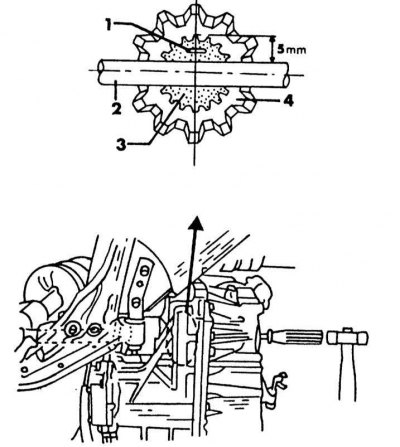
1 - screwdriver; 2 - differential gear shaft; 3 - drive shaft; 4 - differential gear
6. Install a new circlip on the end of the shaft and insert the shaft with the splines into the differential gear. Press the shaft firmly until the circlip snaps into the groove in the gear. Then pull the shaft firmly to check that the circlip has snapped into place. Perform all other work in reverse order. After the wheels are on the ground again, tighten the drive shaft nut to 235 - 310 N·m, install the nut lock and cotter pin the nut and shaft nut lock. All other tightening torques are specified in Specifications at the beginning of the Chapter.