


Table of contents: Removal ↓ Installation ↓
Removal
Attention.
- Before starting work, turn off the ignition, disconnect both terminals of the battery and wait at least three minutes.
- Do not use pneumatic or electric powered tools.
1. Remove the driver's airbag module.
2. Remove the steering wheel (see Chapter 18 "Steering").
3. Remove the upper and lower steering column covers.
4. Disconnect the side connectors (A) of the contact disk housing.
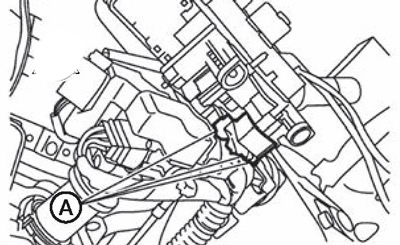
Note: Disconnect the side connectors after removing the contact disk.
5. Loosen the mounting screws and remove the contact disk clamps.
6. Pull and remove the contact disk.
Attention.
- Do not disassemble the contact disk.
- Do not apply grease to the contact disc.
- Do not allow oil, grease, solvents or water to come into contact with the contact disc.
Installation
Installation is carried out in the reverse order of removal.
Note.
- Correctly align the contact disk when installing the steering wheel. Make sure that the installation mark of the contact disk and the center mark (B) match and are in the neutral position.
- The neutral position is determined by turning it to the left 2.5 turns from the extreme right position, ending with the installation pin (A) at the top.
- Set the steering wheel to the straight-ahead position of the vehicle, then install its hole (C) directly onto the mounting pin of the contact disk.
- After completing the work, perform the EAMQDATGREERAK procedure to identify possible failures in the system.
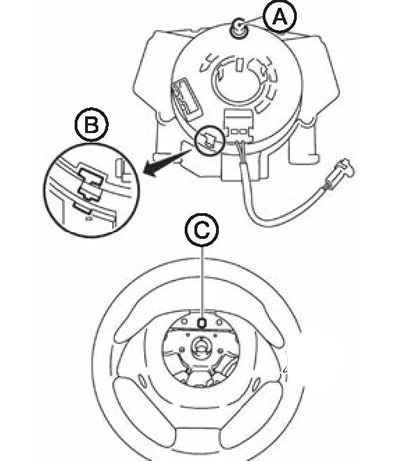
Note: Secure the airbag module wires with a special hook.
Attention.
- Be careful not to damage the wires during installation.
- If the airbag malfunction indicator on the instrument panel lights up, it is necessary to erase the malfunction codes from the self-diagnosis system memory using the CONSULT-UI device. If the indicator still lights up, perform the self-diagnosis procedure of the system to identify the malfunction.