Headlight beam adjustment
Headlight switch
Turn the headlight switch to the ON position and set the headlight beam switch to the «ABOUT» (standard reflector angle position).
Attention:
When the headlight is on, do not touch any of its components with your hands (metal part, control box, wiring, lamp, holder, etc.). Adjust only with the adjusting screws.
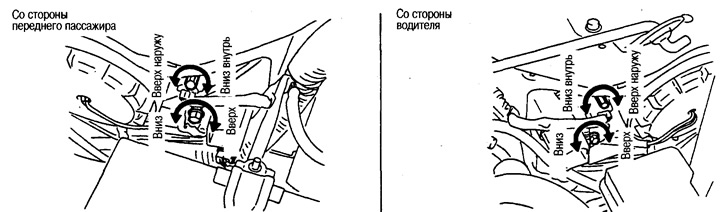
Adjust with the adjusting screws. Tighten the screw first, then adjust by loosening it.
Adjust the direction of the headlights with the adjusting screws.
Preparatory work before adjustment
1. Bring the pressure in all tires to the required one.
2. Make sure there is no foreign cargo in the vehicle.
3. Clean the headlights from dirt.
Caution: Do not clean headlights with organic solvents.
4. Start the engine.
5. Put a person in the driver's seat.
Screen Adjustment
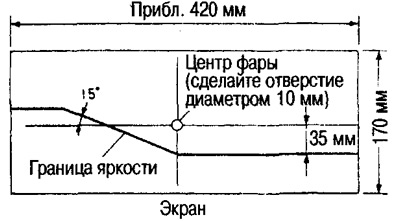
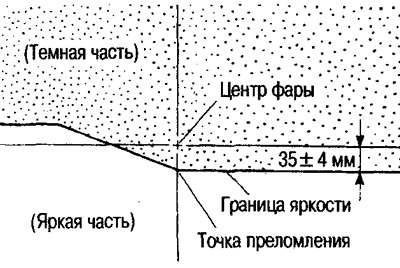
1. Take a sheet of thick white paper and draw a diagram of the border of brightness on it, as shown in the figure.
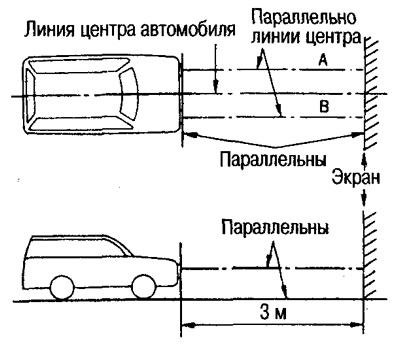
2. Position the vehicle as perpendicular to the wall or screen as possible (at a right angle with a smooth road surface).
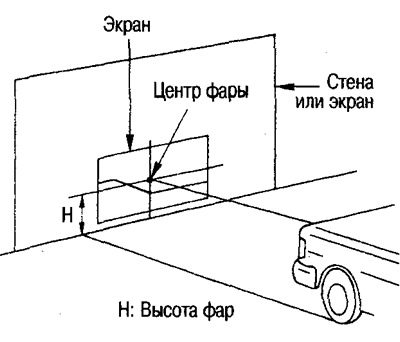
3. Mark the same position on the wall or screen as the center position of the headlights.
4. Adjust to the headlight center hole on the screen parallel to the flat road surface.
5. The distance between the screen and the headlights should be 3m so that the distance between the screen and each headlight is the same (A=B).
6. To prevent the light from the headlight, which is not being adjusted, from falling on the screen, cover it with a screen.
7. Turn on the lights (dipped beam).
8. Use the adjusting screws to adjust the position of the brightness limit of the headlights falling on the screen, as shown in the figure.
Removal and installation
See section «Halogen headlights».
Disassembly and assembly
Attention:
When replacing a bulb, remove the xenon headlight itself.
Insert the lamp firmly; If the xenon lamp is not fully inserted into the socket, high voltage leakage or corona discharge will occur. This may cause the lamp and/or socket to melt.
When the headlight is on, do not touch any of its components with your hands (metal part, control box, wiring and cartridge).
After removal and installation of a headlight carry out adjustment of a direction of light of headlights.
When disposing of the lamp, do not break it. Place the lamp in a plastic bag and seal tightly.
1. Disconnect the negative cable from the battery or remove the power fuse.
2. Remove the headlight from the vehicle.
3. Remove the plastic cover.
4. Turn the chuck in the direction of the arrow and release it from the mount.
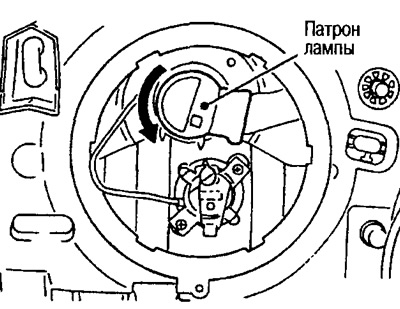
5. Remove the cartridge spring, remove the lamp.
Plastic Cap Torx Bolt:
HID Control Box Nuts:
Eyeliner «masses»:
- Bottom Beam Bulb: 12V-55W (H1)
- Top low beam lamp: 12V-35W (D2R)
- Marker lamp: 12V-5BT