


Table of contents: Removal and installation ↓ Post-installation check ↓
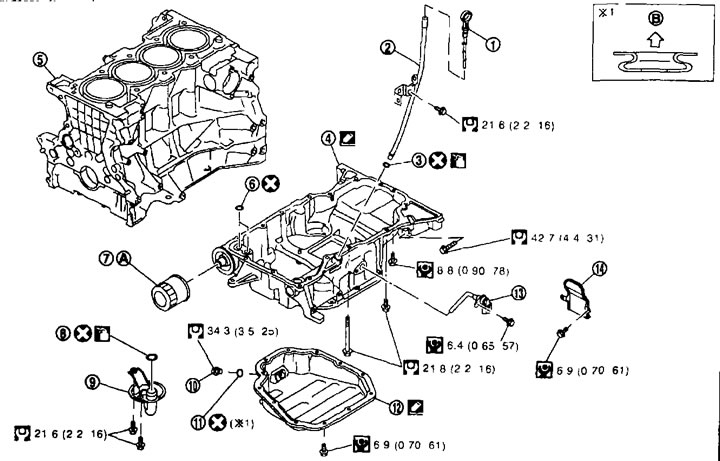
Oil pan (upper) and coarse oil filter 1. Oil dipstick; 2. Oil dipstick guide; 3. O-ring seal; 4. Oil pan (upper); 5. Cylinder block; 6. O-ring seal; 7. Oil filter; 8. O-ring seal; 9. Coarse oil filter; 10. Drain plug; 11. Drain plug washer; 12. Oil pan (lower); 13. Oil level sensor [(with European General Type Approval (WVTA)]; 14. Back cover; A. See chapter "Lubrication system and engine cooling system"; B. Towards the oil pan.
Removal and installation
Removal
Caution: To avoid getting burned, do not drain the engine oil when the engine is hot.
1. Remove the engine protection from the bottom.
2. Drain the engine oil. See chapter "Lubrication system and engine cooling system".
3. Remove the oil pan (lower). See above.
4. Remove the dipstick and dipstick guide.
5. Separate the lower steering column joint from the steering gear assembly side and remove the lower steering column shaft. Refer to Chapter "Steering".
6. Separate the outer tie rod ends from the steering knuckle. See chapter "Steering".
7. Remove the rear torque rod. See below.
8. Remove the stabilizer link. See chapter "Front axle and suspension".
9. Remove the front suspension beam. See chapter "Front axle and suspension".
10. Remove the air conditioning compressor with the pipes connected and temporarily secure it to the vehicle with a rope (on models with air conditioning). See chapter "Ventilation and air conditioning system".
11. Remove the coarse oil filter.
12. Remove the oil pan (upper) as follows:
a. Loosen the bolts in the reverse order shown in the figure.
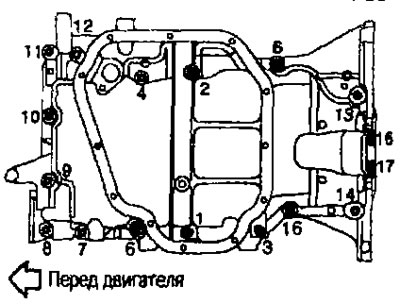
b. Insert the cutter (special tool) between the oil pan (upper) and the cylinder block. Move the cutter around the perimeter, tapping its end with a hammer.
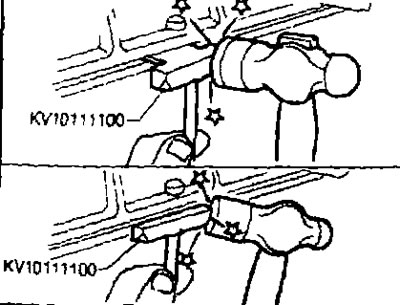
Caution: Do not damage the contact surfaces.
13. Remove the O-rings from the front cover side.
Installation
1. Install the oil pan (upper) as follows:
- Use a scraper to remove any remaining old sealant from the contact surfaces.
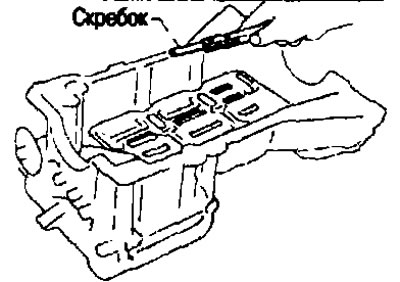
- Also remove any remaining old sealant from the contact surface of the cylinder block.
- Remove any remaining old sealant from the bolt holes and threads.
Caution: When removing old sealant, do not scratch or damage the contact surfaces.
- Apply the sealant in a continuous line using a syringe (suitable special tool) to the areas shown in the figure.
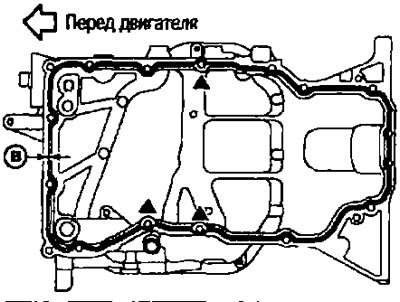
in: 4.0-5.0 mm.
Use brand name sealant or equivalent.
Attention:
- In areas marked by queens
(3 places) Apply sealant to the outside of the bolt holes.
- Installation should be completed within 5 minutes after application of the sealant.
c. Install the O-rings on the front cover side.
Caution: Do not allow the O-rings to become displaced.
d. Tighten the bolts in the order indicated by the numbers in the figure.
Note: Bolt locations are shown below.
M6 x 20 mm: No.16, 17.
M6 x 25mm: No.6, 11, 13, 14, 15.
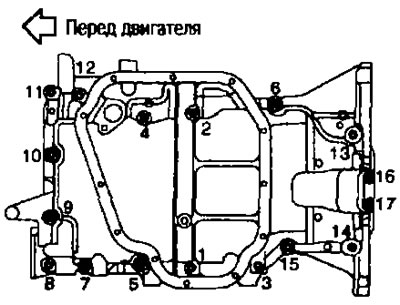
M8 x 60 mm: No.7, 8, 9, 10.
M8 x 100 mm: No.1, 2, 3, 5, 12.
Tightening torque. See above.
2. Install the coarse oil filter.
3. Install the front suspension beam. See chapter "Front axle and suspension".
4. Install the oil pan (lower). See above.
5. Screw the plug into the oil pan drain hole.
- For the installation direction of the washer, see the component illustration above
6. After this operation, installation is carried out in the reverse order of removal.
The article is located on the website NissanBook.ru
Note: Fill the engine oil at least 30 minutes after installing the oil pan.
Post-installation check
1. Check the oil level and top it up. See chapter "Lubrication system and engine cooling system".
2. Start the engine and check for engine oil leaks.
3. Turn off the engine and wait 10 minutes.
4. Check the oil level again. See chapter "Lubrication system and engine cooling system".