


Table of contents: Removal ↓ Installation ↓
Components of the GTZ assembly
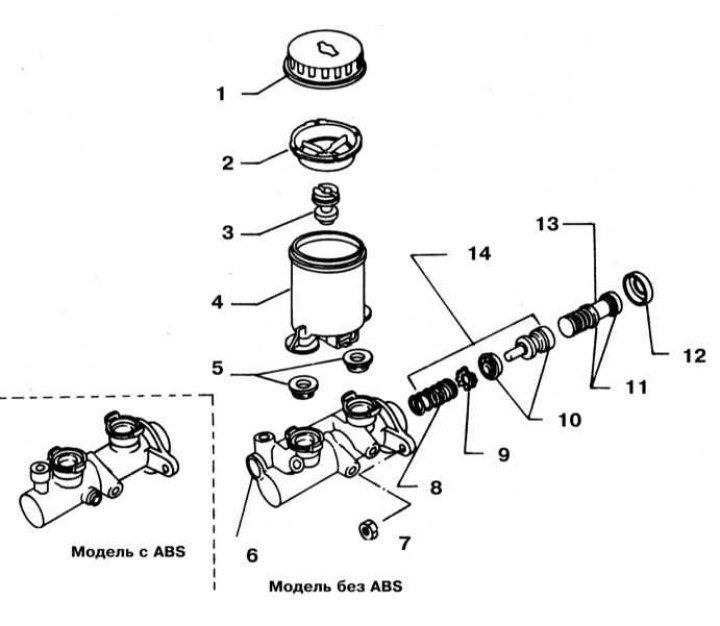
1 - Tank cover; 2 - Mesh filter; 3 - Float; 4 - Tank body; 5 - Pass-through bushings; 6 - Built-in two-way pressure regulator (metering valve); 7 - Nut (8÷11 Nm); 8 - Return spring; 9 - Spring plate; 10 - Piston with sealing cuff; 11 - Piston with sealing cuff; 12 - Locking cap; 13 - Primary piston assembly; 14 - Secondary piston assembly; 15 - Models without ABS; 16 - Models with ABS
Note: A failed brake master cylinder must be replaced. Manufacturers do not recommend attempting to perform a refurbishment of the brake master cylinder.
Removal
1. Disconnect the negative cable from the battery.
Warning! If the car stereo system is equipped with a security code, make sure you have the correct combination to activate the audio system before disconnecting the battery!
2. The design of the master brake cylinder is shown in the illustration.
3. Disconnect the electrical wiring from the brake fluid level switch sensor.
4. Pump out as much liquid as possible from the master cylinder reservoir (use a syringe or a rubber bulb).
5. Place rags under the fittings and have caps or plastic bags available to plug the open ends of the brake lines to prevent dirt from entering the system.
Attention! Brake fluid is an aggressive chemical compound and when in contact with body panels it destroys the paintwork. Before starting the procedure, cover the fenders and the front panel of the car with special covers or just old blankets. Using a special open-end wrench with a slotted head, loosen the nuts of the nipple assemblies connecting the brake lines to the brake master cylinder.
6. Pull outward slightly to separate the brake lines from the master cylinder fittings. Immediately plug the open ends of the tubes.
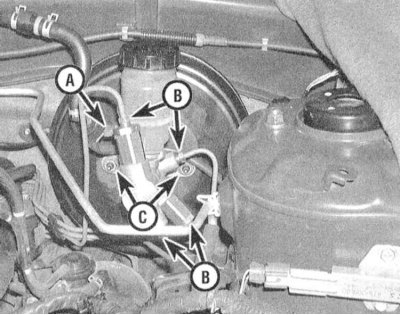
A - Contact connector for connecting the electrical wiring of the brake fluid level sensor-switch
B - Nipple connectors for connecting hydraulic lines
C - Fastening nuts
7. Loosen the two mounting nuts and separate the master cylinder from the brake booster assembly. Remove the cylinder from the mounting studs and lift it out of the engine compartment (be careful not to spill the hydraulic fluid filling the assembly onto the painted body panels). Remove and discard the old sealing gasket of the brake master cylinder seat on the brake booster unit - the gasket must be replaced during assembly.
Installation
1. Before installation, the new brake master cylinder must be bled on a workbench. For convenience, clamp the cylinder mounting flange in a vice with soft jaws. Then you will have to simultaneously manipulate the piston in the cylinder and observe the flow of brake fluid pushed out through the outlet nipple.
2. Connect a pair of tubes from a special bleeding kit to the master cylinder outlet fittings (ask in car accessories stores).
3. Fill the reservoir with fresh brake fluid of the required grade (see Chapter Settings and ongoing maintenance).
4. Slowly push the pistons into the cylinder (it will be most convenient to use a large Phillips-head screwdriver), - air should start to exit the pump chambers into the reservoir. It is important that the ends of both tubes are completely immersed in the brake fluid in the reservoir to eliminate the possibility of air being sucked back into the cylinder when the pistons are released.
5. Continue pumping until the liquid being pushed out through the tubes is completely free of air bubbles.
6. Disconnect the tubes one by one, immediately plugging the open ends of the inlet holes. Close the master cylinder reservoir with a lid.
7. Place the brake master cylinder onto the studs on the booster assembly and tighten the mounting nuts, hand tight for now.
8. Screw the brake line nipples into the cylinder. Since the cylinder is not yet firmly secured, its position can be adjusted slightly to make it easier to screw in the nipples - try not to strip the threads.
9. Tighten the brake master cylinder mounting nuts to the required torque, then tighten the nipple connections securely.
10. Fill the brake master cylinder reservoir with fresh brake fluid and bleed the hydraulic system (see section Bleeding the brake system). For bleeding the master cylinder on a car (if you haven't done it on the workbench) you will need an assistant to operate the foot brake pedal. Ask the assistant to press the pedal several times, then lock it in the lower position. Loosen the union nut, releasing the mixture of air and brake fluid from the cylinder. Repeat the procedure until the fluid being pushed out is completely free of air bubbles. Proceed in a similar manner to bleed the second union.
Note: Keep a clean rag handy to immediately remove any traces of brake fluid that gets on painted body surfaces.
11. Before operating the vehicle, make sure that the brakes are functioning properly.