Removal and installation

1. Cover the right front mudguard with a protective cover. The location of the GTZ and related components in the engine compartment of the vehicle is shown in the accompanying illustration.
2. Release the clamp and disconnect the electrical connector from the bottom of the brake fluid reservoir.
3. Disconnect the hydraulic tubes from the GTZ body. Seal the ends of the pipes and bores on the cylinder body to prevent dirt from entering the hydraulic system and to minimize fluid loss.
4. Give nuts of fastening ГТЦ, take aside a basic arm of the control valve of the vacuum amplifier and remove the main cylinder from the car.
Removing
Note. If brake fluid is accidentally spilled on the painted surfaces of the car body, immediately wash it off with plenty of water and allow the surface to dry naturally - do not wipe it with a rag.
Installation
Installation is in the reverse order.
1. Before installing, fill the GTZ reservoir with clean brake fluid and swing the cylinder pistons several times so that the fluid begins to be pushed out through the holes for installing the brake pipes.
2. Tighten all fasteners to the required torque.
3. Track reliability of fastening of electroconducting to the bottom part of the tank.
4. Finally, bleed the system.
5. Carry out a road test of the vehicle. Checking the proper functioning of the brakes.
Disassembly
1. After removing the GTZ, drain the brake fluid from its reservoir. GTZ components are shown in the accompanying illustration.
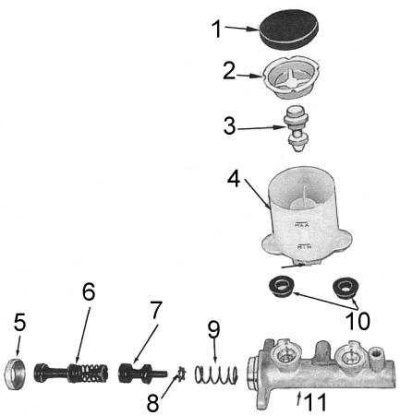
1 - cover; 2 - mesh filter; 3 - float; 4 - reservoir; 5 - restrictive cover; 6 - assembly of the primary piston; 7 - secondary piston; 8 - remote washer; 9 - spring; 10 - terminals; 11 - sealing sleeves; 12 - GTZ building
2. Carefully pry the reservoir out of the rubber grommets. Remove the tank cap and remove the strainer and float.
3. Remove the tank seals from the GTZ body and discard them.
4. Bend the lock tabs of the limiter cover out of the groove at the end of the GTZ body, remove the limiter cover from the cylinder. If the locking tabs are damaged, replace the restrictor cover.
5. Remove the assembly of the primary and secondary pistons with a return spring from the cylinder - remember their seating position.
Note. If necessary, tap on the end face of the GTZ with a block of wood to release and then remove the pistons.
Cleaning and checking the condition
1. Wash all GTZ components with methanol.
Attention! Do not use gasoline, kerosene or other cleaning solvents for this purpose.
2. Check the patency of all fluid channels.
3. Check the GTZ mirror for signs of wear and cavities. Replace cylinder if necessary. Do not attempt to restore the cylinder bore by honing it.
4. Check the return springs for cracks and weakening of the developed force. Replace defective ones.
5. If the piston cups will be replaced, remember the installation position of the old (on both pistons). Use a blunt tool to remove the cuffs and discard them. If you are going to use a proprietary GTZ overhaul kit, throw away the old pistons as well.
Note. Where possible, be sure to use special branded repair kits that include new cuffs and pistons. The use of such branded kits will greatly extend the life of the unit.
Assembly
Assembly is carried out in the reverse order of disassembly.
1. Lubricate the piston cups with clean brake fluid or special grease before installation (for rubber components). When dressing on the pistons, make sure that the cuffs are oriented correctly.
2. Lubricate the mirror of the master cylinder with clean brake fluid and install the return spring and piston assemblies into the cylinder (in the same order).
3. Push the pistons into the cylinder, install the restrictor cover and bend the lock tabs into the groove at the end of the GTZ body.
4. Lubricate the sealing sleeves of the reservoir with clean brake fluid or special grease (for rubber components) and fit the bushings into the cylinder body.
5. Push the tank into the grommets, install the float and strainer into the tank.
6. Install the GTZ on the car.