


Table of contents: Checking ignition systems and…↓ Checking the power supply system ↓ Checking mechanical systems ↓
Checking ignition systems and electrical equipment
1. Turn on the ignition and make sure that the indicator lamp on the instrument panel is lit properly.
2. Turn on the starter and check that it turns the engine steadily.
3. Turn on the headlights and check their brightness.
4. If the headlights do not light, or the starter does not turn the engine, proceed as follows:
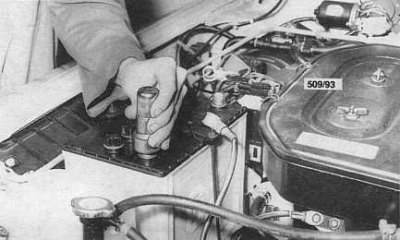
- Disconnect the battery cables and clean both terminals and terminal clamps (see accompanying illustration). Reconnect the wires and tighten securely (but not excessively) tighten the clamps.
Note: If the contact is poor, the terminals will usually become noticeably hot after just a few attempts to start.
- Check the condition and reliability of the battery ground busbars to the engine, the engine to the frame. Also check the busbar contacts for signs of oxidation and contamination.
- Check the condition of the wire going from the battery to the starter, as well as the external condition of the starter traction relay. Also check the cleanliness and reliability of the wire terminals.
- Repeat the checks in the first three paragraphs of the subsection. If the starter still does not turn the engine or the lights do not light, one of the following situations may occur.
The starter or lamps do not work
- The battery is faulty or low.
The headlights are on but the starter is not working
- The fuse link on the battery has failed.
The starter drive is jammed when engaged with the flywheel ring gear
- The starter traction relay is faulty.
- The ignition switch is faulty.
- On models with AT - the starter circuit cut-off switch, fuse or relay is faulty.
The headlights are dim and the starter turns too slowly
- The battery is discharged or the starter motor is faulty.
- The battery is discharged due to a break or slipping of the alternator drive belt. One or more cans in the battery have burst.
Models with contact breaker
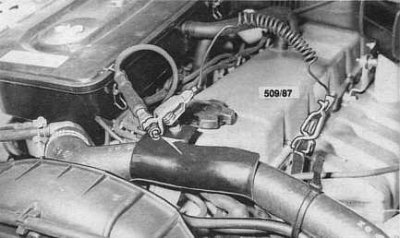
1. Set the spark plug gap to 6 mm for the spare spark plug of the type being serviced. Ground the spark plug body securely with a jumper wire (see accompanying illustration), or by pressing the spark plug firmly against a securely grounded point on the engine block (tie it with a cord or tape). Remove the spark plug wire and connect it to this test spark plug.
2. Ask an assistant to turn on the starter.
3. A spark should jump between the electrodes of the test plug. If there is no spark, or it is yellow and weak, proceed to the procedure in the next paragraph. If the spark is strong enough, skip the checks below.
4. Disconnect the ignition coil wire from the distributor cap and connect it to a test spark plug. Repeat the above test. If a strong, bright blue spark is produced at the spark plug, the cause of the failure is a faulty distributor cap, rotor, rev limiter switch screen, or spark plug wire. If there is still no spark, turn off the ignition and perform the following tests:
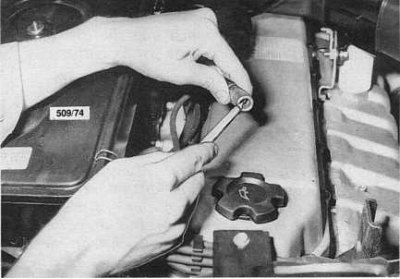
- Check the condition of the spark plug wires (see accompanying illustration), - they must be dry and without cracks in the insulation.
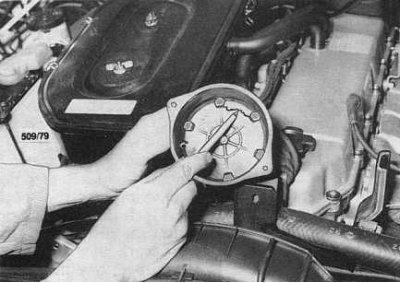
- Check the distributor cap for moisture and dirt. Inspect the inside surfaces of the cap and distributor speed limiter screen for cracks and carbon tracks (see accompanying illustration), paying particular attention to the areas between the spark plug contact segments in the cover and the electrodes in the screen.
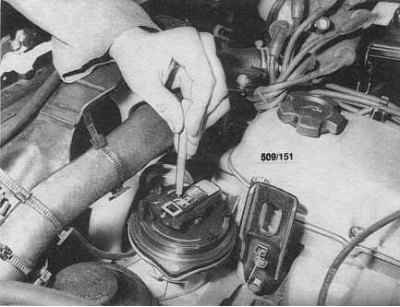
- Check the distributor runner for cracks, dirt deposits and burnouts of the metal nose. Make sure that the runner button rotation limiting spring is in place and in good condition (the accompanying illustration shows the runner spring being tested on a 4.2L model).
- Check the cleanliness, dryness and reliability of the fastening of the contact connections of the ignition wires and the ignition coil in the distributor cap.
- Make sure the carbon brush in the center of the inside surface of the distributor cap is dry and clean.
- Check the condition and reliability of the fastening of the HV wires on the ignition coil. Make sure that there are no signs of oxidation of their terminals.
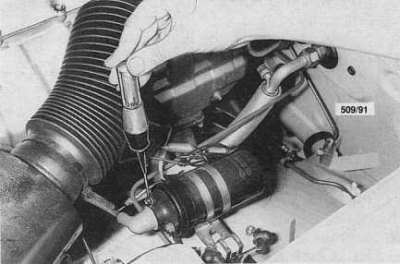
- Make sure that current reaches the coil when the ignition is turned on. Use a test lamp between the HB positive terminal of the coil and a good ground point (see accompanying illustration). Make sure the breaker contacts are open, or insulate them with dielectric tape for the duration of this test. If the test lamp lights when connected to the ignition switch side of the coil and does not light when connected to the breaker side of the contacts, the primary winding of the coil may be damaged. Remove the coil or test it by replacing it with a known good one.
- Check the condition of the breaker contacts, clean them and adjust them if necessary.
- Check the condition and reliability of the distributor ground wires.
- Repeat the test. If there is still no spark, or a weak yellow spark, one of the following faults may be present.
The lamp does not light
There is an open circuit between the ignition switch and the positive terminal of the coil. Again, using a test lamp, make sure that the power supply to the ignition switch and the low-voltage connector of the engine wiring harness is working properly.
Note: If a test lamp is not available, the LV lead can be disconnected from the ignition switch side of the coil and connected to a reliable ground to check for current. Similarly, the second LV lead can be disconnected from the distributor and grounded to check for current. Ensure that the breaker contacts are open during the test in step g) (isolated), and the ignition is on (the key is in the ON position).
The coil, capacitor or spark plug wires are faulty
A coil failure is indicated by severe burnout of the breaker contacts or the presence of deep cavities on them - replace the capacitor and breaker contacts.
If, after performing the above checks and correcting the identified defects, it is possible to achieve a spark of sufficient efficiency, but the engine still does not start, remove all spark plugs and check their condition and the size of the interelectrode gaps.
Models with electronic ignition
1. Set the interelectrode gap of the replacement spark plug of the type being serviced to 6 mm. Securely ground the spark plug body using a jumper wire, or by firmly pressing the spark plug to a securely grounded point on the engine block (tie it with a cord or tape). Remove the spark plug wire and connect it to this test spark plug.
Caution! When working with or near electronic ignition systems, certain precautions must be taken to avoid the risk of electric shock when coming into contact with the primary and secondary circuit components of the system.
Before disconnecting or connecting any components of the electronic system, turn off the ignition to avoid electrical shock and damage to the ignition system.
2. Ask an assistant to turn on the starter.
3. A spark should jump between the electrodes of the test plug. If there is no spark, or it is yellow and weak, proceed to the procedure in the next paragraph. If the spark is strong enough, skip the following tests.
4. Disconnect the ignition coil wire from the distributor cap and connect it to a test spark plug. Repeat the above test. If a strong, bright blue spark is produced at the spark plug, the cause of the failure is a faulty distributor cap, rotor, rev limiter screen, or spark plug wire. If there is still no spark, turn off the ignition and perform the following tests:
- Check the condition of the spark plug wires - they should be dry and without cracks in the insulation.
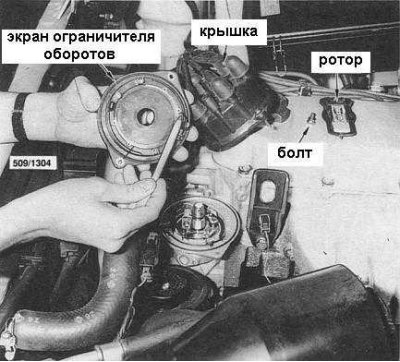
- Check the distributor cap for moisture and dirt. Inspect the inside surfaces of the cap and distributor speed limiter screen for cracks and carbon tracks (see accompanying illustration), paying particular attention to the areas between the spark plug contact segments in the cover and the electrodes in the rev limiter screen.
- Check the distributor runner for cracks, dirt deposits and burnouts of the metal nose. Make sure that the runner button rotation limiting spring is in place and in good condition (the accompanying illustration shows the rotor spring being checked on a 4.2L model).
- Check the cleanliness, dryness and reliability of the fastening of the contact connections of the ignition wires and the ignition coil in the distributor cap.
- Make sure the carbon brush in the center of the inside surface of the distributor cap is dry and clean.
Note: Do not perform any further tests on the electronic ignition system as there is a risk of electrical shock from high voltages present in the primary and secondary circuits of the system. Refer to the Electronic Ignition System Section for procedures.
5. If, after performing the above checks and correcting the identified defects, it is possible to achieve a spark of sufficient efficiency, but the engine still does not start, remove all spark plugs and check their condition and the size of the interelectrode gaps.
Checking the power supply system
If the fuel tank is guaranteed to contain fuel, the first check should be to check for fuel in the carburetor float chamber. On carburetors equipped with a viewing window, visually check for fuel in the chamber. The fuel level should reach the middle of the viewing window.
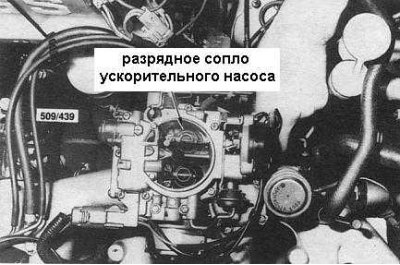
To perform the following check, remove the air cleaner assembly and look into the carburetor filler neck with the choke open. While still looking into the filler neck, open and close the throttle valve several times by moving the throttle rod by hand. If fuel is injected through the accelerator pump discharge nozzle when the throttle valve is moved, this means that the float chamber is full and the fuel system is functioning properly (see accompanying illustration).
If injection does not occur, proceed as described below.
1. Disconnect the ignition coil NB connector to prevent accidental engine starting while performing the test.
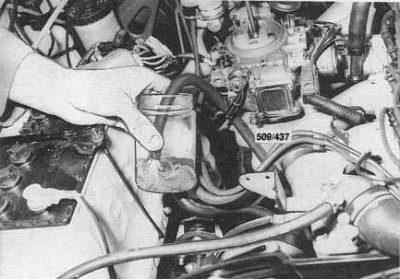
2. Disconnect the fuel supply hose from the carburetor and lower it into a drain container. Ask an assistant to turn the starter several times and watch the fuel being pushed out of the hose. If the fuel is being pushed into the container properly, skip the procedures described in the three following paragraphs; if not, proceed to these procedures.
3. Disconnect the hoses and remove the fuel filter from the engine compartment. Make sure that the filter can be blown through in both directions. Replace it if necessary. Install the serviceable filter in place, securely fastening the hoses with clamps.
4. On 4.2L models, disconnect the fuel line from the gas tank at the inlet side of the fuel pump. Remove the fuel filler cap and have an assistant listen for sounds coming from the filler cap. Blow into the fuel line toward the gas tank. If the line is clear, the assistant should hear a bubbling sound in the tank.
Note: The above check cannot be performed on 3.0L models because they are equipped with an in-tank electric fuel pump with a one-way check valve. If fuel supply is not restored after cleaning the fuel filter, refer to the Fuel System Section for more information and perform the appropriate check to ensure the electric fuel pump is functioning properly.
5. Connect the fuel line to the fuel pump and check for fuel delivery from the pump. If there is no fuel delivery to the carburetor side of the pump, one of the following failures may be present.
3.0L models
- The fuel pump is faulty.
- The fuse is blown.
- The electrical wiring is faulty.
- The control unit is out of order.
- The fuel lines are blocked.
Models 4.2L
- Gurgling in the tank when blowing through the fuel line is not heard
- The fuel line is blocked or has a break.
- The fuel intake line mesh filter is clogged.
There is a gurgling sound, but there is no fuel supply from the pump
The fuel pump is faulty. See the relevant Section on diagnostics of pump faults.
If fuel is flowing properly into the fuel line on the carburetor side and the engine still does not start, perform the following checks:
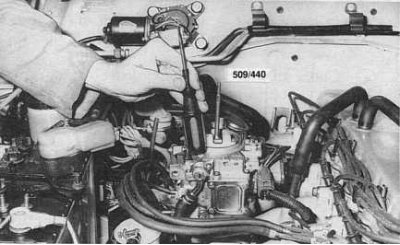
1. Make sure that the carburetor has not been flooded due to excessively vigorous pumping of the gas pedal when trying to start the engine. Also make sure that the choke is not jammed in the closed position if the engine has warmed up to normal operating temperature. The consequences of carburetor flooding can sometimes be eliminated by tapping on the float chamber in the area of the needle valve and its seat (see accompanying illustration).
2. Remove the spark plugs and check that the electrodes are not flooded with fuel. If necessary, thoroughly wipe and dry the plugs before installing them back.
3. If carburetor flooding occurs, check the float with the needle valve for signs of jamming. Also check if the float is punctured, which has caused it to fill with fuel.
4. Check if the air cleaner filter element is clogged.
5. If the carburetor is not flooded and fuel is supplied to it properly, the following are possible reasons for failure:
- The fuel filter is blocked.
- The needle valve is stuck or blocked.
- The check valve does not close properly.
- There are air leaks in the intake manifold or through the carburetor support flanges due to deformation or destruction of the gaskets.
- The brake booster hose is punctured or the connection between the booster and the intake manifold is loose.
Late-model 4.2 L models equipped with fuel injection (EFI)
Note: Due to the complexity of the EFI systems, the authors of this Manual recommend that the reader, if performing the following checks does not allow identifying the cause of the failure, (the engine still won't start), please refer to the relevant Section dedicated to this for more information diagnostics of faults in fuel injection and engine management systems below in this Chapter.
1. Make sure there is enough fuel in the gas tank.
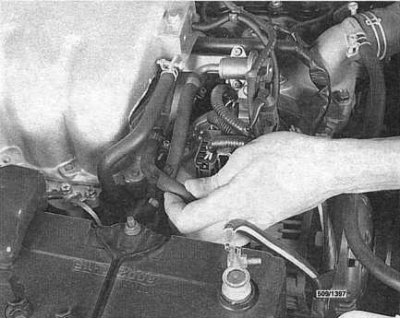
2. Clamp the fuel supply hose at the midpoint between the fuel filter and the fuel line (see accompanying illustration) and ask an assistant to turn on the ignition. The fuel pump relay should make a clearly audible click, and there should be noticeable pulsations in the hose, indicating that the fuel pump is supplying fuel properly. If the external noise level is low, you can also hear a buzzing sound through the fuel filler neck emitted by the pump for about five seconds after the ignition is turned on.
3. If the relay clicks but the pump does not function, check the 15-amp fuel pump fuse in the relay box in the vehicle's engine compartment. If the fuse is good, check for power at the pump terminals when the ignition is turned on for five seconds.
4. If the relay does not click when the ignition is turned on, replace it.
The article was copied from here: www.NissanBook.ru
5. If the fuel pump is functioning properly, but the pressure in the fuel hose does not rise, check the fuel lines and filter for patency. If after eliminating all the detected defects the engine still does not start, remove the spark plugs and check them for traces of fuel on the electrodes. Thoroughly rinse and dry the plugs before reinstalling them. If the spark plugs are not flooded, but the engine still does not start, refer to the Section dedicated to diagnostics of faults in fuel injection and engine management systems below in this Chapter.
Checking mechanical systems
The following procedures are to be performed if the starter turns the engine normally. Otherwise, depress the clutch to disengage the engine from the transmission (models with manual transmission).
If the starter still cannot turn the engine, then the cause of the failure is not a transmission malfunction - remove the starter and try to turn the engine by hand. This test will help determine whether the cause of the failure is a jammed or broken starter, or whether there is a mechanical failure of internal engine components such as connecting rod and piston assemblies, crankshaft, etc. If the starter is OK and the engine does not turn by hand, Refer to the Section dedicated to diagnostics of the causes of mechanical engine failures below.
It should be remembered that the only correct way to check the compression pressure in the engine cylinders is to check using a compression tester. The compression test method described below allows only a rough estimate of the overall mechanical condition of the engine.
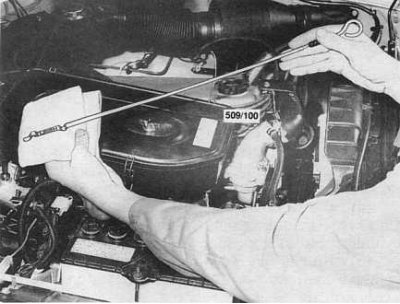
1. Remove the radiator cap and check the coolant level in it. If the level has dropped excessively, carefully inspect the power unit for signs of external leaks. Remove the engine oil dipstick and inspect its blade for signs of oil foaming (see accompanying illustration). If the oil on the dipstick blade has a milky consistency, while its level is rising, skip the next three steps and proceed to perform further checks.
2. Disconnect power from the ignition system by disconnecting the positive cable from the ignition coil.
3. Remove all spark plugs except one.
4. Turn on the starter and listen to the sounds made by the cranking engine. Alternately move the spark plug into different cylinders, repeating the check. The sound made when the cylinder with low compression is operating will be noticeably different by ear. In addition, a serviceable cylinder will create noticeable resistance to cranking the engine, while cranking the engine with a spark plug installed in a cylinder with low compression will occur freely.
5. If, during the above checks, coolant leaks or traces of coolant are detected in the engine oil or on the spark plugs, the condition of the cylinder head gasket should be checked, the block should be inspected for cracks, and the flatness of the mating surfaces of the head and block should be measured.
6. If, during the evaluation check of the compression ratio, a weakening or uneven distribution of compression pressure is found, a piston defect and a burnt or defective valve should be added to the list of possible causes listed in the previous paragraph.
7. If no signs of internal coolant leaks are found during the above checks, continue the diagnostic procedure by performing the following checks.
8. Remove the distributor cap and make sure that when the starter is on, the distributor rotor rotates synchronously with the engine.
9. Remove the cylinder head cover and, with the starter on, the valves open and close properly as the engine cranks.
10. Next, if the runner or valves are not functioning properly, the following options are possible.
The runner does not rotate, but the valves function properly
- The distributor drive gear or its shaft is cut off.
Neither the runner nor the valves are functioning
- There is a defect in the camshaft or timing belt (3.0L)/chain (4.2L).
If no deviations from the norm are detected during the correct execution of all the listed checks, it remains only to check the correctness of the ignition advance angle and valve timing. It should be noted, however, that if the cause of the failure is a violation of the ignition advance angle setting, it is necessary to find out the cause of this violation, especially if the engine started and functioned properly until the last moment.
Note. To check the ignition timing and valve timing, remove the distributor caps and cylinder heads and turn the engine clockwise by the crankshaft pulley so that the piston of the first cylinder is in the TDC position of the end of the compression stroke. In this case, the valves of the first cylinder should be closed, and the distributor runner should turn with its nose toward the BB segment of the spark plug wire of the first cylinder in the distributor cap.