Distributor maintenance
The distributor cap should be cleaned inside and out at regular intervals to remove carbon deposits, dust or moisture. Also clean the distributor slider. For cleaning, use a cloth soaked in gasoline; at the same time check the cover for cracks. Replace the distributor slider if the contacts are badly worn.
Brass contacts must never be ground or filed. Keep the outer surfaces of the high voltage cables clean and dry to ensure proper current flow in the ignition system. Remove all wires from the distributor, clean and check the contacts. Wires must not be shortened to correct bad contact ends. Always replace wires.
Removal and installation of the distributor of ignition
If the distributor is removed from the engine, it must be installed in its original position in order to maintain ignition control. For this reason, mark all the elements and, without turning the motor shafts, insert the distributor so that the grip is installed in its previous position.
1. Disconnect the ignition cables from the ignition distributor cover or remove the cover from the distributor by depressing the spring latches.
2. Disconnect the cable from the side of the distributor and disconnect the piping from the vacuum device, if connected.
3. Turn the crankshaft so that the piston of the 1st cylinder is in the TDC position of the compression stroke (see illustration for injection engine or illustration for carburetor) and mark the position of the nozzle of the distributor slider relative to the outer edge of the distributor body, as shown in illustrations.
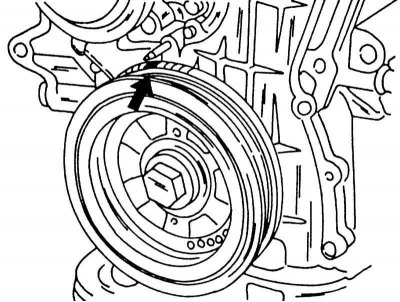
The piston of the 1st cylinder is in the TDC position, if the mark "0" coincides with the tip of the pointer.
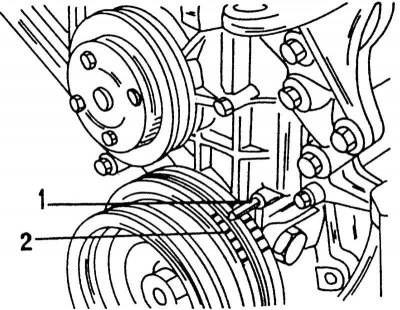
When the piston of the 1st cylinder is in the TDC position, the pointer (1) and label "0" on belt pulley (2) must match.
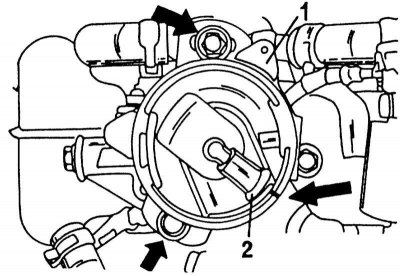
Before removing the distributor (2) hold on the hull (arrow) line opposite the slider (2).
4. Loosen the distributor bolts and remove the distributor from the engine.
5. If the crankshaft did not turn or the distributor was not repaired, install the distributor in its original position. If the distributor was dismantled or installed after the engine was rebuilt, the following must be done:
6. Set the piston of the 1st cylinder to the TDC position of the compression stroke, i.e. all valves must be closed (To do this, remove the cylinder head cover).
7. Turn the distributor slider so that it is opposite the mark applied on the edge of the housing, as seen from illustrations.
8. Insert the distributor in this position and screw on. Connect all cables and put a vacuum pipeline on the distributor.
9. Finally, check the ignition timing (Chapter Ignition timing adjustment).
Ignition distributor repair
At present, the repair of ignition distributors is hardly carried out, so we will not describe work on injection and carburetor engines with a catalyst, where the distributor is part of an electronic system that cannot be interfered with. Only the distributor of an engine without a catalyst can be repaired if spare parts are available in the distribution network. The distributor has a conventional design.
If the distributor is seriously damaged, it must be replaced without fail.
Gap adjustment
This work is only required on the distributor of an engine without a catalytic converter. For flawless spark generation at a certain moment, there must be a gap between 0.3 and 0.5 mm between the four vertices of the distributor ignition sensor rotor and the stationary stator. To measure, remove the distributor cap and turn the crankshaft until one top of the rotor is against the stator, as shown in the illustration below. Insert a feeler gauge into the existing gap as shown in the illustration. Loosen both screws if necessary (arrows) and slide the stator outward until the clearance is the desired value. Then tighten the bolts again and measure the gap again.
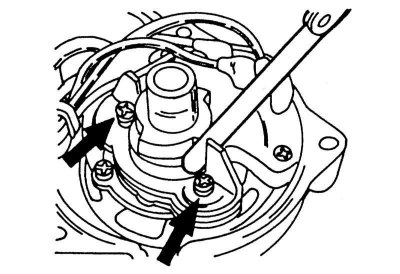
Measuring the gap between the rotor and stator of the ignition sensor.
Checking vacuum and centrifugal adjustments
These works are also only required on vehicles without a catalytic converter. Vacuum adjustment can only be accurately measured with electronic instruments. However, the performance test of the vacuum device can be carried out as follows, if there is a stroboscope:
1. Locate the notch in the crankshaft pulley and mark with paint. To do this, unscrew the screwed plates to get to the belt pulley.
2. Connect a stroboscope according to the instruction to it and start the engine. Leave the engine to idle.
3. Increase the engine speed by pointing the strobe lamp beam at the crankshaft belt pulley. In this case, the serif begins to shift, which is first caused by the operation of the centrifugal regulator mechanism.
4. Ask an assistant to disconnect the hose from the ignition distributor and at the same time observe the mark on the belt pulley. If the hose is disconnected and reconnected, the mark on the belt pulley in the strobe beam should move back and forth.
5. If this is the case and the movement is smooth, it can be assumed that the vacuum adjustment is working properly.
6. Otherwise, the vacuum device may be damaged. Also, the vacuum hose may have leaks. To check the centrifugal mechanism, first remove the distributor cap and grip the slider as shown in the illustration below. Turn the slider to the left and release again. The slider should immediately return to its previous position.
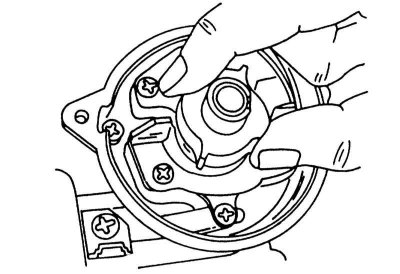
Checking the centrifugal weights of the distributor.
7. Start the engine and aim the strobe light at the pulley again. At different speeds, the mark should move in the beam of the strobe lamp, which indicates the operation of the adjusting mechanism, but this check does not show whether the adjustment is carried out correctly at different speeds. This can only be accurately measured with a special instrument.
Distributor repair
Repair of the ignition distributor of a transistor or electronic ignition system is not currently carried out, therefore, descriptions of these works are not provided. In case of serious damage, the distributor must be replaced.