


Table of contents: General overview ↓ Preparation ↓ Engine bay on the left ↓ Engine compartment on the right ↓ Under the car ↓ Removal ↓ Disconnection ↓
Attention.
- The vehicle must be parked on a level, hard surface.
- Install wheel chocks in front and behind the rear wheels.
- If there are no rigging eyes on the engine, install them on the engine using bolts, the parameters of which are given in the spare parts catalog.
- When working, take precautions, do not apply excessive force and strictly follow the provisions of this manual.
- Do not begin work until the engine cooling system and exhaust system have cooled to a safe temperature.
- Use only designated points to lift and support the engine.
- Depending on preference, a two-post or four-post lift can be used. If a two-post lift is unavoidable, install a hydraulic stand under the rear axle to prevent the center of gravity from shifting rearward when the engine is removed.
General overview
The engine is removed through the bottom of the car. After removing the engine and gearbox assembly, they must be separated.
Preparation
1. Relieve fuel pressure.
2. Drain the coolant from the radiator.
Attention.
- Drain the coolant only after the engine has cooled down completely.
- Do not allow coolant to come into contact with the drive belt.
3. Remove the following parts:
- Protective engine sump.
- Engine cover.
- Right and left front mudguards.
- Front wheels with tires.
- Battery with shelf.
- Air intake with air filter housing assembly.
- Upper and lower radiator hoses, CVT fluid radiator hose and cooling system fan.
- Front exhaust pipe.
Engine bay on the left
1. Disconnect all engine wire harness connectors around the left engine mount pad, then temporarily secure the wire harness to the side of the engine.
(Data posted on the website www.nissanbook.ru)
Note: Place plastic bags over the wire connectors to prevent dust or foreign material from getting on them while removing the engine.
2. Disconnect the fuel supply line from the engine side.
3. Disconnect the heater hoses and install plugs on them to prevent coolant from leaking.
4. Disconnect the control cables from the gearbox.
5. Remove the ground cable from the gearbox side.
Engine compartment on the right
1. Disconnect the vacuum hose from the intake manifold.
2. Modifications with the air conditioning system: remove the air conditioning compressor without disconnecting the pipes from it and hang it on a rope or wire.
3. Disconnect the expansion tank hoses.
Under the car
1. Remove the left and right front ABS wheel sensors from the steering knuckles.
2. Remove the brake calipers with the brake lines connected from the steering knuckles. Hang the calipers on the car body using a rope or wire to relieve the load on the brake lines.
3. Disconnect the outer sockets of the steering rod ends from the steering knuckles.
4. Remove the rear engine thrust rod.
5. Remove the drive shafts (left and right).
6. 4WD modification: remove the propeller shaft.
7. Remove the anti-roll bar struts.
8. Disconnect the intermediate shaft of the steering column assembly.
9. Remove the front suspension subframe.
10. Prepare the gearbox for disconnection: unscrew the gearbox connecting bolts located at the rear on the side of the upper oil pan.
Removal
1. Using a trolley with a lifting platform or similar device (for example, a transmission jack), securely support the lower part of the engine and gearbox assembly.
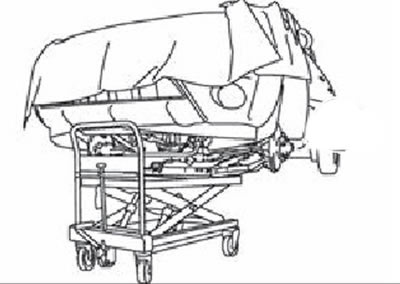
Note: Use wooden blocks to achieve the most stable position for the power unit.
2. Loosen the four mounting bolts on the right mounting pad (from the front cover side).
3. Loosen the two mounting bolts (A) on the left mounting pad (from the gearbox side).
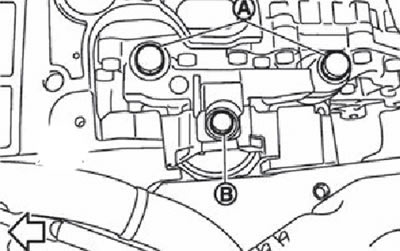
Note: The arrow in the figure shows the front of the engine.
Caution: Do not remove the bolt (B) connecting the cushion to the bracket (non-separable part).
4. Carefully lower the jack or lift the vehicle to remove the engine and gearbox assembly. Strictly observe safety precautions when performing the procedure.
Attention.
- Make sure that engine and gearbox parts do not catch on the vehicle body.
- Before lowering the engine and gearbox, make sure once again that all wires and hoses are disconnected.
- It is necessary to remember about the upcoming shift of the center of gravity. If necessary, support the rear of the car with jacks at the lifting points to prevent the car from falling off the lift.
- If necessary, support the vehicle from behind with a jack or suitable device.
Disconnection
1. Install the lifting eyes on the front engine cover at the front left side and on the cylinder head at the rear right side.
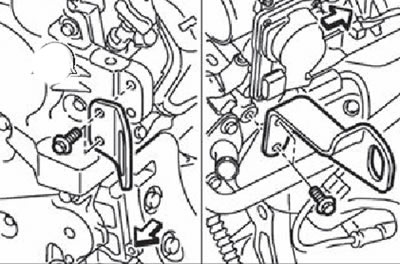
The arrow points towards the front of the engine
Note.
Tightening torque of the bolts for fastening the rigging eyes:
- From the front engine cover: 32.9 Nm.
- From the cylinder head side: 25.0 Nm.
2. Remove the starter.
3. Using a garage winch, lift and separate the engine from the gearbox assembly.