


Table of contents: Installing the transfer case housing ↓ Installing the ring gear ↓ Assembling the adapter body ↓ Installing the drive gear sleeve ↓
Installing the transfer case housing
- Select the adjusting washer for the ring gear bearing.
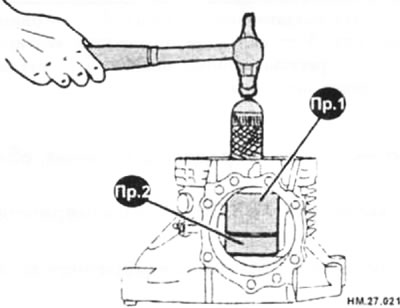
- Using a drift and tools (Pr1 and Pr2), install the selected adjusting washer and the outer race of the ring gear bearing.
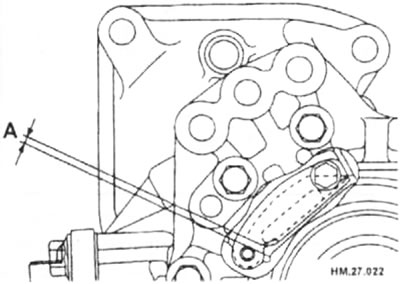
- Install the oil deflector and tighten the new mounting bolts to a torque of 6.9-8.8 N·m. The gap between the oil deflector and the transfer case housing A = 1.0-3.5 mm.
- Using a drift, drive the seal in until it is flush with the housing surface.
- When checking the overall preload, measure the preload without the oil seal first, and then install the oil seal.
- Discard the old seals and replace them with new ones.
- Apply general purpose grease to the seal lips and gear oil to the seal circumference.
- Before installing the plug into the transfer case housing, apply the recommended sealant to it and tighten the plug to a torque of 15-19 N·m.
- Apply the recommended type of sealant to the vent hose fitting and install the fitting onto the transfer case housing.
- Install the ring gear.
- Install the adapter housing.
- Install the drive gear bushing.
- Check the backlash, preload, tooth contact and runout of the connecting flange.
Note: Measure total preload without oil seal.
Installing the ring gear
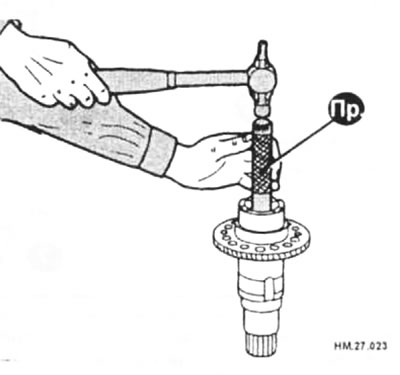
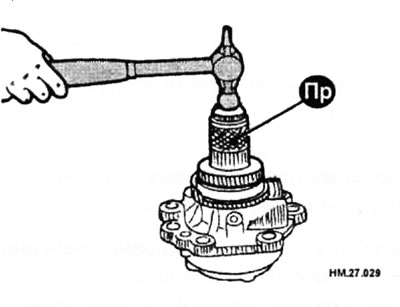
- Using the drift (Pr), drive the seal onto the ring gear.
- When checking the overall preload, measure the preload without the oil seal first, then install the oil seal.
- Discard the old seals and replace them with new ones
- Apply general purpose grease to the seal lips and gear oil to the seal circumference.
- After installing the oil seal, it should be located 56.5 mm from the end of the ring gear.
- Thoroughly clean the back of the ring gear, threaded holes and ring gear mounting bolts from grease. To remove the sealant for threaded connections, use a compound for removing old gaskets).
- Apply thread sealant to the first 1-2 threads under the tapered portion of the ring gear threaded hole in several places.
- Install the ring gear and apply corrosion preventative oil to the threads and mounting bolt locations. Tighten the bolts to the specified torque in two stages.
The first stage (temporary delay): 25-29 N·m.
The second stage (final tightening): 82-1 15 N·m.
- Final tightening of the bolts after their temporary installation should be carried out no more than 90 seconds later.
- If any thread sealant comes out, wipe it off quickly.
- Apply transmission fluid to the inner race of the ring gear bearing located at the transfer case housing. Using a drift, install the inner race of the ring gear bearing.
- Apply transmission oil to the inner race of the ring gear bearing at the adapter housing. Using the mandrel (Pr), install the inner race of the ring gear bearing.
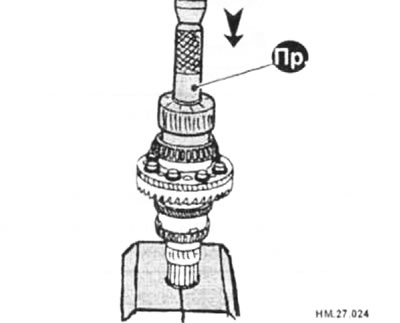
- Install the ring gear into the transfer case housing.
- Install the adapter housing.
- Check the backlash, preload, tooth contact and runout of the connecting flange.
Note: Measure total preload without oil seal.
Assembling the adapter body
- Select the adjusting washer for the ring gear bearing.
- Install the oil chute.
- Using a drift, install the selected adjusting washer and outer race of the ring gear bearing into the adapter housing.
- Using a mandrel (Pr), drive in the seal so that it is flush with the surface of the housing.
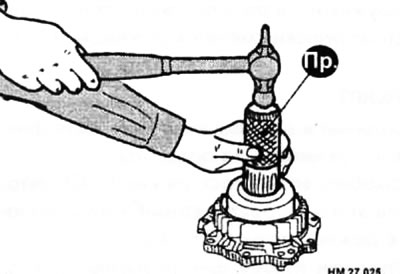
- When checking the overall preload, measure the preload without the oil seal first, and then install the oil seal.
- Discard the old seals and replace them with new ones.
- Apply general purpose grease to the seal lips and gear oil to the seal circumference.
- Apply the recommended type of sealant to the drain plug and tighten the plug onto the adapter body to a torque of 9.8-19.6 N·m.
- Apply a thin, even coat of multi-purpose grease to the new O-ring and install the O-ring onto the adapter body.
- Install the adapter housing onto the transfer case housing and apply corrosion-preventing oil to the threads and mounting surfaces of the mounting bolts.
- Tighten bolts A (standard length - 45 mm) and bolts B (standard length - 30 mm) torque of 14-16 Nm.
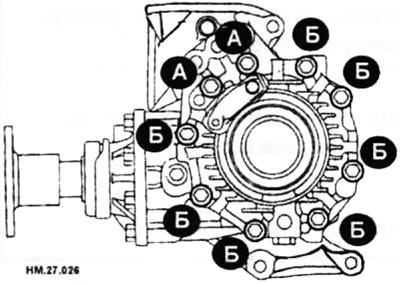
- Check the backlash, preload, tooth contact and runout of the connecting flange.
Note: Measure total preload without oil seal.
Installing the drive gear sleeve
- Select the drive pinion bushing adjusting washer.
- Using the drift (Pr), install the outer race of the rear bearing of the drive gear.
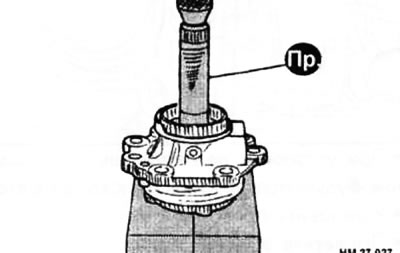
- Using a drift, install the outer race of the front pinion bearing.
- Apply transmission oil to the inner race of the front pinion bearing and to the mating surface of the pinion. Using the drift (Pr), install the inner race of the front bearing of the drive gear onto the drive gear.
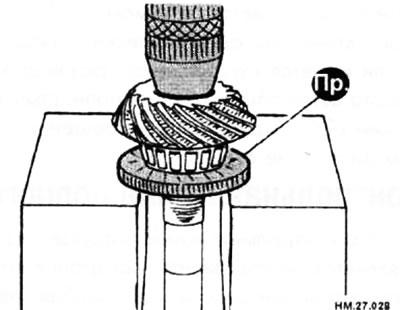
- Install the new deformable spacer sleeve onto the pinion gear.
- Apply transmission oil to the inner race of the rear pinion bearing and install it onto the pinion hub.
- Using the mandrel (Pr), install the oil seal onto the drive gear bushing.
- Apply general purpose grease to the seal lips and gear oil to the seal circumference.
- Using a mandrel, press the connecting flange into place.
- Apply anti-corrosion oil to the threads and surface of the pinion nut and adjust the tightening torque of the pinion nut (1 28-294 N·m) and the preload of the pinion bearings (P1 = 0.40-0.78 N·m).
- Discard the old pinion nut and replace it with a new one.
- First, adjust the lower torque value of the drive pinion nut.
- If the preload value exceeds the standard values, replace the deformable spacer sleeve and retighten the nut. Never loosen the pinion nut to adjust preload.
- After adjustment, rotate the connecting flange in both directions 2-3 times and check for any extraneous noise, difficulty in rotation or other unusual phenomena.
- Apply a thin, even coat of multi-purpose grease to the new O-ring and install the O-ring onto the pinion bushing.
- Install the selected adjustable pinion bushing washer.
- Install the pinion bushing and apply corrosion preventative oil to the threads and mounting surfaces of the mounting bolts.
- Tighten the bolts to 26-33 Nm.
- Check the backlash, preload, tooth contact and runout of the connecting flange. The total preload should have the following values:
♦ with all seals installed: P1 +0.46±0.01 Nm;
♦ without transfer case oil seal and ring gear oil seal: P1 +0.36+0.01 N·m.