Removing
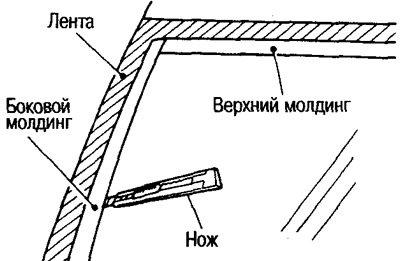
1. Apply protective tape around the perimeter of the windshield and along the ribs of the side moldings to prevent damage to painted surfaces.
2. Using a knife, cut the moldings around the perimeter of the glass.
3. Use pliers to remove all remnants of the molding from the slots in the body.
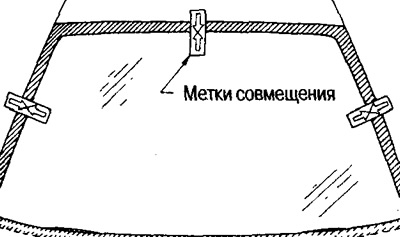
When reusing the windshield, apply alignment marks to the glass and body before removing it.
4. Cut the glue.
Perform one of the following procedures, depending on the tool you are using.
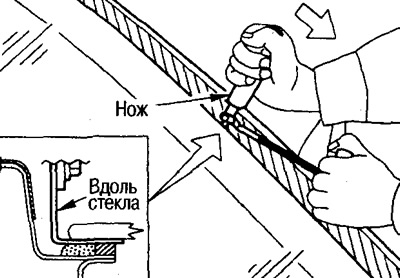
Attention: When reusing glass, do not use a knife (it can damage the glass).
With a knife (when replacing glass)
(1) To improve the sliding of the knife, moisten the area where the glue is applied along the entire perimeter from the side of the body with soapy water.
(2) Insert a knife into the adhesive and cut it, keeping the cutter parallel to the edge of the glass.
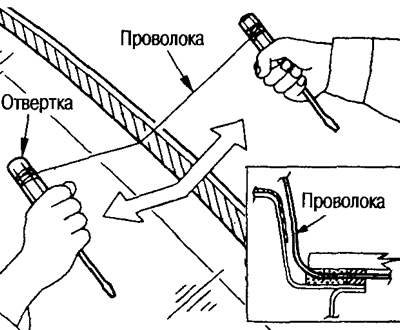
Using string wire (when reusing glass)
(1) Working in the cabin, drill a through hole in the sealant.
(2) Pass the string wire through the hole and tie the ends to the screwdrivers.
(3) Making sawing movements with a wire outside and inside the car along the perimeter of the glass, cut off the glue.
Note:
Do not press hard with string wire on the end of the glass.
Be careful not to damage the wire lead of the windshield defroster.
Place a copper plate, etc., to prevent the string wire from touching the plastic section of the dashboard.
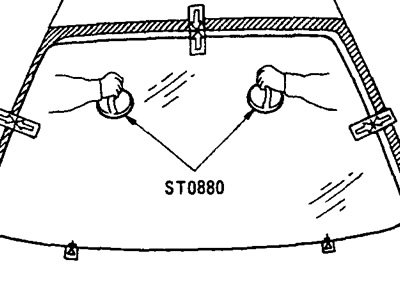
5. With rubber suction cups (special tool) take the glass out of the car.
Installation
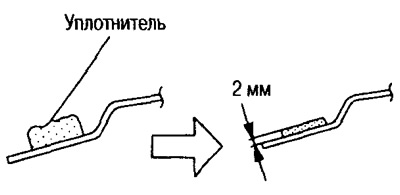
1. Using a knife, scrape off traces of glue around the entire perimeter from the side of the body so that a flat layer 2 mm thick remains.
Note: If body side adhesive area is damaged, repair with liquid 2-component urethane paint, do not use paint.
2. Replace spacers.
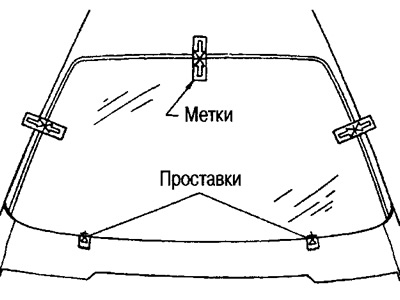
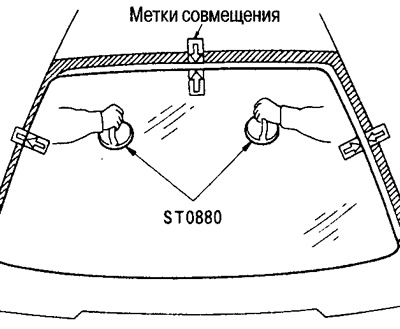
3. Reinstall the new glass on the vehicle, apply alignment marks to the body and glass, and remove the glass.
4. If the removed glass is installed, use a knife or spatula to remove the remnants of the old adhesive.
5. Clean the adhesive area on the glass and top molding with clean gasoline.
6. If the molding mount was removed, replace it with a new one.
7. Before installing a new mount, stick double-sided tape on its flanges, moving from the center to the edges, and install the mount.
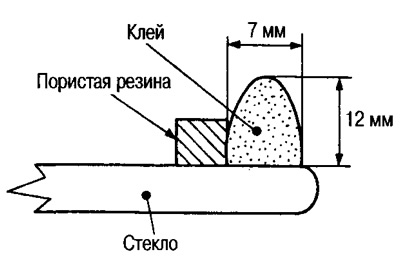
8. Glue foam rubber all around the glass as shown in the picture, starting at the center of the underside of the support.
foam rubber

Place of application of primer

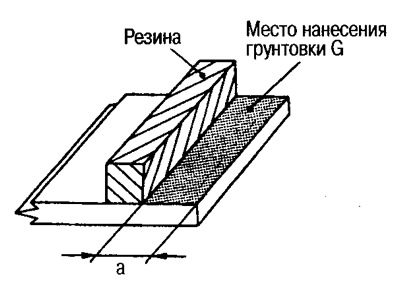
9. Apply a primer.
Note: The primer plays an important role and contributes to the strength of the glass bonding and the preservation of the paintwork.
There are 2 types of primers, do not mix them up.
- Primer M: for painted surfaces.
- Primer G: for glass.
Apply primer G around the entire perimeter of the glass, following the instructions in the picture.
10. Apply primer M to the bonding area on the body.
Note:
If Primer M protrudes beyond the application area on the painted surface, remove it quickly with clean gasoline.
Place a copper plate, etc. to prevent the primer M from coming into contact with the dashboard.
11. After applying the primer within the time specified in the instructions, apply adhesive to the glass around the entire perimeter, as shown in the figure.
Remove the cap from the glue tube and cut off the spout, then apply the glue with a press gun.
12. Holding the glass with rubber suction cups (special tool) align the marks on the glass and the body and install the glass on the car.
13. Press lightly on the glass over its entire surface and seat the glass completely.
14. Using a spatula, evenly spread the adhesive over the surface, removing it from where it is in excess and adding it where it is not enough.
15. Apply a primer around the entire perimeter of the molding as shown.
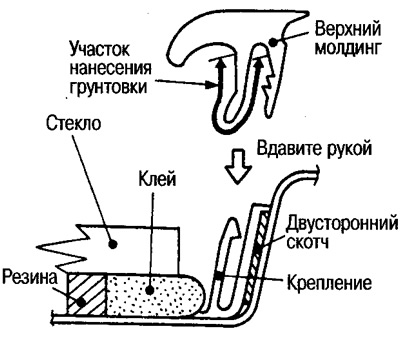
16. Align the marks on the moldings and mount with the center of the glass. Install the mount evenly, moving outward from the center of the body.
If, due to low temperatures, it is not possible to install the molding in the corner area, warm up the molding first and then install it.
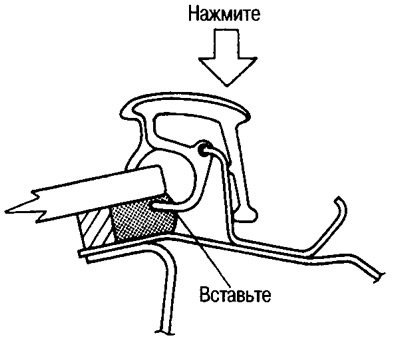
17. Install the side moldings, secure them, let the moldings stick. Also, install the seal holder while helping yourself with light blows from a plastic hammer.
Note:
After installing the glass, open the door windows and do not close until the adhesive has hardened sufficiently. Do not drive your vehicle during this time.
Install the windshield molding before the adhesive hardens.
18. Make sure there is no water seepage from the outside.
19. Remove the protective tape.